A CSR, known as a Certificate Signing Request, constitutes an encoded text block forwarded to a Certificate Authority during an SSL Certificate application. To activate your Certificate, you need a CSR code.
Typically, it’s crafted on the server designated for Certificate installation and must encompass details concerning your website and business, subsequently encoded into the Certificate.
CSR Details
Ensure accurate completion of the CSR code particulars for expedited SSL acquisition. Validation for OV and EV SSL certificates mandates precise business data entry.
- Common Name (the domain name for Certificate issuance)
For instance – example.com
Note! For Wildcard certificates, preface the Common Name with an asterisk (e.g. *.example.com).
- Country (two-letter code)
Country (C) – the two-letter country code where the organization or applicant operates (e.g., GB for Great Britain or US for the United States; consult the country code here).
- State (or province)
State (S) – the jurisdiction or region where the organization or applicant is situated (e.g., California).
- Locality (or city)
Locality (L) – the urban area where the organization or applicant is established (e.g., Los Angeles). Do not abbreviate this parameter.
- Organization (your company name. Feel free to enter “NA” for any Domain Validated certificate)
Organization (O) – the officially registered organization name applying for a certificate (e.g., 1Byte Inc.). For Organization and Extended Validation certificates, Certificate Authorities authenticate the provided organization. For Domain Validation SSLs, this field is non-critical and won’t be listed on the issued certificate; however, it should at least be filled with “NA.
- Organizational Unit (department. Feel free to enter “NA” for any Domain Validated certificate)
Organization Unit (OU) – the department or division name within the organization (e.g., SSL Support).
- Email address (provide a valid email address)
Email Address – the organization’s or applicant’s email. This field is optional.
Note! This email won’t be utilized during the verification unless discrepancies are detected. However, it serves as an admin contact unless modified during activation. The SSL will be issued to the admin contact email address upon activation.
- Challenge Password and Optional Company Name – refrain from utilizing a challenge password and leave the Optional Company Name field blank. These values are outdated and may hinder SSL certificate acquisition.
Key Algorithm Selection
Typically, OpenSSL serves as the go-to tool for CSR generation on Linux-based web servers like Apache or Nginx. Since it’s typically pre-installed on these servers, there should be no complications.
Now, it’s time to determine the preferred key algorithm:
The RSA key algorithm stands as the prevailing choice in today’s landscape.
ECDSA key algorithm, on the other hand, represents a modern approach primarily utilized for ECC certificate creation.
Establishing SSH Connectivity
To initiate the CSR generation process, you’ll need to establish an SSH connection to your server.
SSH, short for Secure Shell or Secure Socket Shell, is a Network protocol offering users, particularly system administrators, a secure means to access a computer across unsecured networks.
To connect to your server via SSH, ensure you have the following information handy: the server’s IP address, your username, and password. Additionally, you’ll need an SSH client installed on your local machine. Several options are available, such as ZOC Terminal, PuTTY, OpenSSH, MobaXterm, and SecureCRT.
You can obtain the necessary IP address, username, and password from your hosting provider.
Storing SSL Files Safely
For enhanced organization and security, it’s advisable to create a dedicated folder to house your SSL files. This folder not only provides a safe repository but also serves as a convenient location to execute CSR generation commands.
When generating a CSR (.csr file), a corresponding Private Key (.key file) is concurrently created. Safeguarding this Private Key is paramount, as its loss would necessitate regenerating another CSR, thereby restarting the entire process.
Under no circumstances should you share your Private Key with anyone. Maintaining its confidentiality is imperative to prevent unauthorized access. Notably, if a Certificate Authority detects a compromised Private Key, it retains the authority to revoke the associated certificate.
As an alternative, consider creating an SSL folder within your home directory. Execute the following command to create this folder:
mkdir ~/ssl
Subsequently, navigate to this folder using the command:
cd ~/ssl
By adhering to these practices, you can ensure the secure storage and management of your SSL files, mitigating the risk of unauthorized access or loss.
RSA Overview
The RSA algorithm stands as a pillar of asymmetric cryptography, involving two keys: the Public key and Private key. Widely recognized for its role in digital security, RSA remains a cornerstone in safeguarding sensitive data. For a deeper understanding, refer to this informative article.
To generate the CSR, execute the following commands. It’s advisable to execute these commands within the folder designated for SSL file storage to streamline organization.
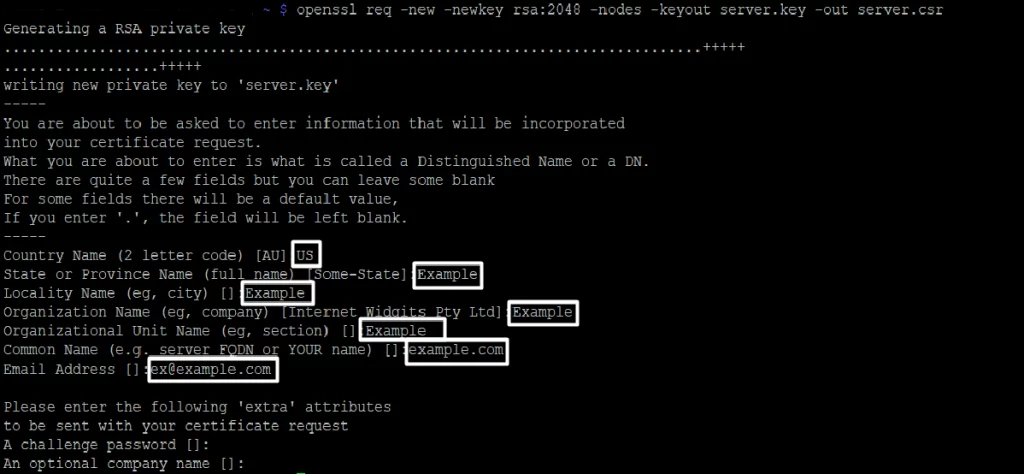
openssl req -new -newkey rsa:2048 -nodes -keyout server.key -out server.csr
Note! For clarity, replace ‘server.key’ and ‘server.csr’ with the actual domain name the certificate pertains to. These placeholders will be underlined in the commands.
For instance:
openssl req -new -newkey rsa:2048 -nodes -keyout yourdomain_tld.key -out yourdomain_tld.csr
Upon execution, the terminal prompts you to input values such as Common Name (CN), Locality (L), State (S), Country (C), Organization (O), Organization Unit (OU), and Email Address. Refer to this section for precise information on the required inputs.
Warning! Should the command encounter errors, consult this section for troubleshooting guidance.
The CSR should exclude characters such as ‘?’, ‘@’, ‘#’, ‘$’, ‘%’, ‘^’, ‘&’, and ‘*’, as they may trigger issues. The sole permitted non-alphanumeric character is the backslash ”.

Alternatively, you can generate a CSR using the following command, specifying the details within the command itself:
openssl req -nodes -newkey rsa:2048 -keyout server.key -out server.csr -subj "/C=GB/ST=Yorks/L=York/O=My Company Ltd./OU=IT/CN=example.com"
Additional Flags in the CSR RSA
To incorporate the Street address value into the CSR code, introduce the ‘Subject’ (‘-subj’) tool alongside the corresponding data in the command:
openssl req -nodes -newkey rsa:2048 -keyout server.key -out server.csr -subj "/C=GB/ST=Yorks/L=York/O=My Company Ltd./OU=IT/CN=example.com/streetAddress=Example Avenue 1"
For including the zip code in the address, adjust the command as follows:
openssl req -nodes -newkey rsa:2048 -keyout server.key -out server.csr -subj "/C=US/ST=Example/L=Example/O=Example Inc Ltd./OU=Example/CN=example.com/streetAddress=Example 1/postalCode=123456"
Furthermore, to generate a CSR for a Multi-Domain SSL certificate incorporating all Subject Alternative Names (SANs) in a single line, execute the following command:
openssl req -new -addext "subjectAltName = DNS:additionaldomain1.com,DNS:www.additionaldomain2.com,DNS:www.additionaldomain3.com" -addext "certificatePolicies = 1.2.3.4" -newkey rsa:2048 -keyout -keyout server.key -nodes -out server.csr
By adhering to these commands, you can customize the CSR to include additional details or cater to multi-domain SSL certificate requirements efficiently.
ECC Overview
The Elliptic Curve Discrete Logarithm Problem (ECDLP) serves as the underlying challenge to decrypt the ECDSA key. As of now, significant progress towards solving this problem remains elusive, rendering ECC certificates highly resilient against conventional “brute force” hacking methods.
To generate a CSR utilizing ECC, consider executing the following commands within the designated folder for SSL file storage, ensuring clarity and organization:
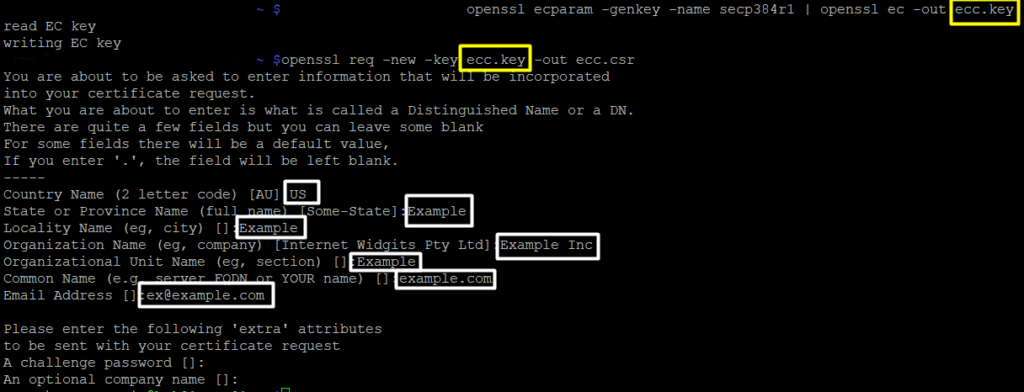
openssl ecparam -genkey -name secp384r1 | openssl ec -out ecc.key
openssl req -new -key ecc.key -out ecc.csr
Note! Execute the first command prior to the second one, as the CSR relies on the key generated by the initial command. Ensure consistency in file names between commands.
Warning! In case of command failure, consult the troubleshooting section for assistance.
For example:
Upon executing:
openssl ecparam -genkey -name secp384r1 | openssl ec -out yourdomain.key
Proceed with the subsequent command:
openssl req -new -key yourdomain.key -out ec.csr
Note! Running the second command prompts immediate input for values (Common Name (CN), Locality (L), State (S), Country (C), Organization (O), Organization Unit (OU), Email Address) within the terminal. Refer to the relevant section for detailed information on required inputs.
Note! Ensure the CSR excludes characters such as ‘?’, ‘@’, ‘#’, ‘$’, ‘%’, ‘^’, ‘&’, and ‘*’, as they may induce issues. The sole permitted non-alphanumeric character is the backslash ”.

Additional Flags in the CSR ECC
Another method to generate a CSR for a Multi-Domain SSL certificate involves a one-liner command incorporating all Subject Alternative Names (SANs). By utilizing the -addext san extension alongside -subj, a concise command can be formulated:
openssl req -new -nodes -newkey ec:<(openssl ecparam -name secp384r1) -keyout bare_ec.key -out bare_ec.csr -subj -addext
This command streamlines the process by combining key components in a single line, enhancing efficiency and ease of use.
After Generating the CSR
Once you’ve successfully generated your CSR, you can proceed to activate your SSL certificate using it.
To begin, copy the CSR code. This can be done by navigating to the directory where the CSR was generated and executing the following command:
ls
This command will display a list of files present in the current directory. Locate the file with the “.csr” extension, and then open it using the following command:
cat filename.csr
Replace “filename” with the name specified during CSR generation.
The CSR code will be displayed, enclosed within the following tags, which should also be copied:
—–BEGIN CERTIFICATE REQUEST—–
-----END CERTIFICATE REQUEST-----
Possible Errors
In the event of encountering an error message stating “OpenSSL is not recognized as an internal or external command”, it suggests that the OpenSSL library may not be installed or that the %PATH% specified during installation was incorrect.
To verify the installation of the OpenSSL library, execute the following command:
dpkg -l 'openssl*'
A successful installation will result in a response featuring “ii”. If this is not the case, indicating issues with OpenSSL Libraries, it’s advisable to contact your hosting provider or web developer for assistance.


