
After the Certificate Authority issues your SSL certificate, you must install it on your website’s hosting server. Here’s how to install the certificate in DirectAdmin:
SSL installation on DirectAdmin
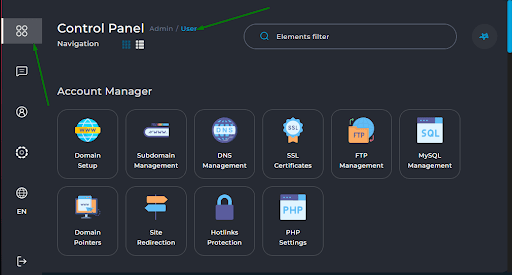
1) Navigate to your server’s main menu by clicking the button at the top-left corner of the screen, as shown in the screenshot below. Choose User:
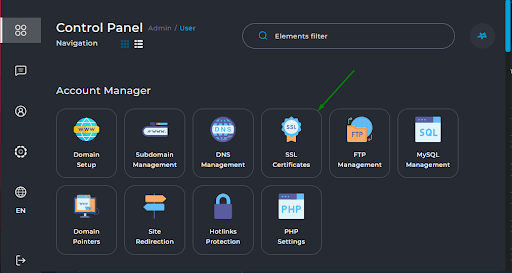
2) In the Account Manager section, click SSL Certificates:
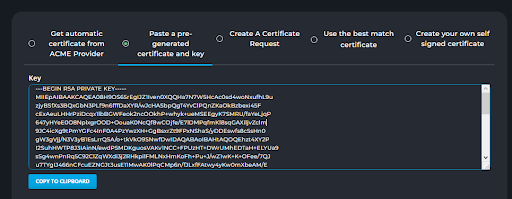
3) Choose the Paste a pre-generated certificate and key option:

4) Then, paste the Private key for your SSL into the Key field.
Note: The Private key is generated at the same time as the CSR code. The Private key is enclosed with the following header and footer: —–BEGIN PRIVATE KEY—– and —–END PRIVATE KEY—–. If you generate the CSR code in DirectAdmin, you need to save the Private key manually as DirectAdmin does not save it automatically.
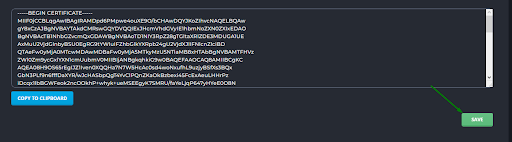
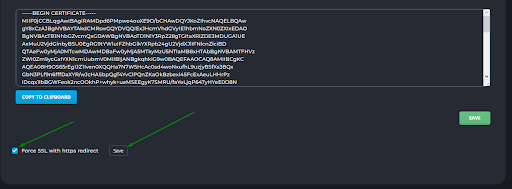
Paste the certificate code that you received from the Certificate Authority, including —–BEGIN CERTIFICATE—– and —–END CERTIFICATE—– to the Certificate field. The same code is also contained in the yourdomain.crt file located in your 1Byte account. You can open this file with a plain text editor like Notepad (for Windows) or TextEdit (for macOS).
Once you’ve pasted the key, tick the option Force SSL with https redirect. This enables HTTPS redirect for your website so that your visitors are automatically redirected to the secure version of the website. Then, click Save.
To complete the installation, upload the CA Bundle file (.ca-bundle) to DirectAdmin.
This file is in the certificate ZIP archive you received from the Certificate Authority via email. You can also download all SSL files from your 1Byte account. The CA Bundle file should have the name: yourdomain.ca-bundle.
You can open it via Notepad (Windows) or TextEdit (mac OS) to copy its content in the TXT format required for the DirectAdmin panel.
Choose the “Paste a pre-generated certificate and key” option and click on SSL CA Certificate.

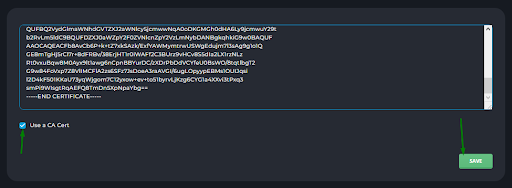
Next, copy and paste the entire content of the .ca-bundle file to the box and tick Use a CA cert option. After that, click Save.
You will see the notification “Success CA certificate is ok. Your site should be secure within a few minutes“. This means that the SSL was installed successfully. To check the certificate installation, you can use this online tool: https://decoder.link
Troubleshooting the “Could not Execute your request” error
From time to time, you may encounter the following error message when opening the SSL Certificates section in your Account Manager: “Could not Execute your request. SSL is not enabled for this domain. This means that the Disable SSL option was turned on in the SSL Certificates section of your DirectAdmin. This option doesn’t allow SSL installation. It also prevents the user from opening the SSL Certificates section. As a result, when that option is enabled, you won’t be able to install your certificate or turn the option off via the user management area.
It is only possible to disable that option via SSH. For this, you’ll need to have root access via SSH to the server where your DirectAdmin is installed. Once logged in as a root user, run this command to open the configuration file for the domain:
sudo nano /usr/local/directadmin/data/users/USER/domains/DOMAIN.TLD.conf
- nano is the command to open the .txt file.
- User is the name of the account where you will apply the changes.
- DOMAIN.TLD is your domain name.
In the configuration file, locate the field ssl=OFF and change it to ssl=ON. After that, press CTRL+O to save the changes and CTRL+X to exit the file. This should fix the error.
If the SSL certificates section error persists, contact your hosting provider for further assistance.