For installing the SSL Certificate on a server with Exchange 2007, we suggest utilizing the Exchange Management Shell.
Similar to CSR code generation, you’ll need to employ commands with the appropriate parameters of the cmdlet. Firstly, ensure that you have saved the Validated Certificate, which was provided by the Certificate Authority, to the root directory of the C drive. The file should be in a format compatible with the Exchange server, which can be either .cer, .p7b, or .p7s.
Next, import of the saved SSL Certificate. For this, open EMS (Exchange Management Shell):
Start >> All Programs >> Microsoft Exchange Server 2007 >> Exchange Management Shell.
Then run two commands together – one for the installation of the Certificate at the server and one enabling it for the required services. Both commands should be in the same line, separated by a pipe character:
Import-ExchangeCertificate -Path C:\www.example.com.cer | Enable-ExchangeCertificate -Services “SMTP, IMAP, POP, IIS”
- C:www.example.com.cer – path to the saved validated SSL certificate;
- “SMTP, IMAP, POP, IIS” – all the required services should be mentioned.

(!) Important:
If you are installing a certificate in PEM (X.509) format: After installation you will need to follow the procedure outlined in “Root and Intermediate Certificate installation via MMC”, with the other files that you have been sent, to complete the installation.
Installation of the Certificate can be verified by command:
Get-ExchangeCertificate -DomainName www.example.com
In the Services column you will see SIP and W which stand for SMTP, IMAP, POP3 and Web (IIS). If your certificate isn’t properly enabled, you can re-run the Enable-ExchangeCertificate command by pasting the thumbprint of your certificate as the -ThumbPrint argument such as:
Enable-ExchangeCertificate -ThumbPrint [paste] -Services “SMTP, IMAP, POP, IIS”
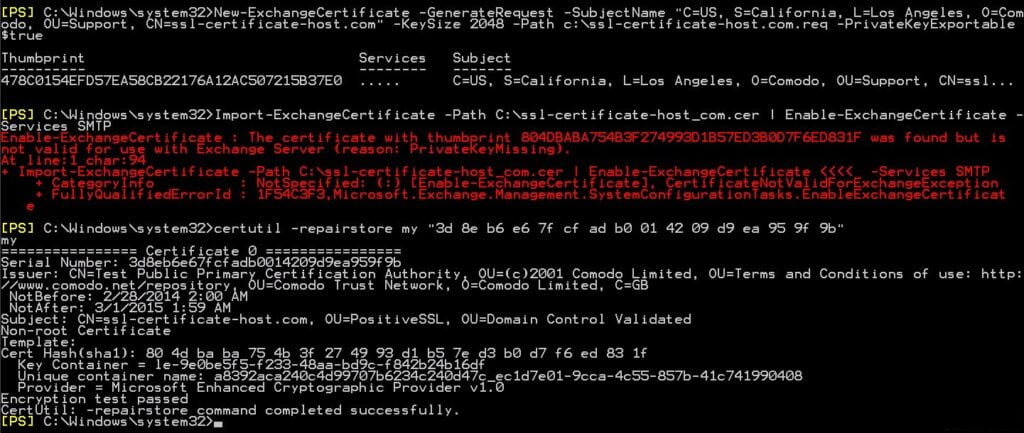
If the installation returned the error message: “The certificate with thumbprint [XXX] was found but is not valid for use with Exchange Server (reason: PrivateKeyMissing)” then use one of the solutions below, depending on the reason for the error.
- CSR code and RSA Key pair was generated at another server. In this case, you need to import your key before the installation;
- RSA Key was lost/deleted. In this case, enabling of the Certificate is not possible. You need to reissue the certificate using a new CSR code, generated via EMS;
- If none of the above explanations describe your situation, and you are not able to detect the issue, try to run the command certutil -repairstore my “YourSerialNumber” command (quotes included). If your private key was somehow corrupted, but is still on the server, this command will resolve the issue. If the key is corrupted, the certificate icon will be missing the golden key in ‘Personal Certificates’ in mmc).

Here is a more detailed instructions on how to resolve the issue defined in the last case:
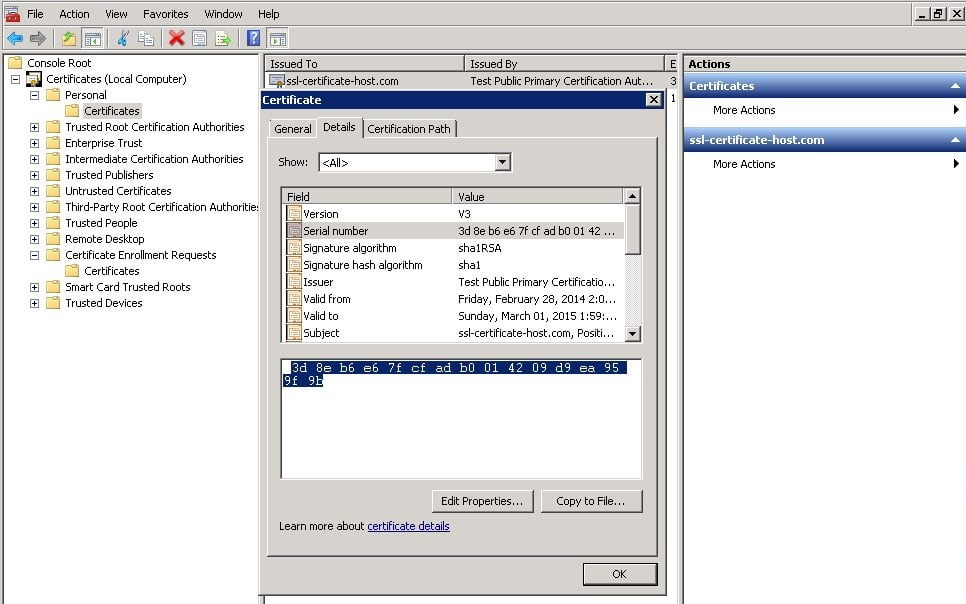
1) Enter MMC (Microsoft Management Console) >> add the Certificate Snap-In for the Local Computer account >> double-click on the imported certificate in Personal Certificates >> select Details tab >> click on Serial Number field and copy that string.

2) Type: certutil -repairstore my “YourSerialNumber”
3) After that, go back to the MMC and right-click Certificates and select Refresh.
4) Double-click on the problem certificate. At the bottom in General tab you will see: “You have a private key that corresponds to this certificate”.
5) The Private Key is attached to the certificate now. Try to install Certificate once again.
As an alternative, to confirm that all required steps have been completed, and that the certificate is both installed and operational, run the following command:
Get- ExchangeCertificate <ThumbPrint> | fl


