
You can create a Certificate Signing Request (CSR) by utilizing the Certeq utility. This tool is favored by server administrators who utilize a command-line interface on their Windows servers. In this guide, we will elucidate the process of generating a CSR using Certeq and importing its corresponding SSL certificate.
How to Generating a CSR on Windows using Certeq
Step 1
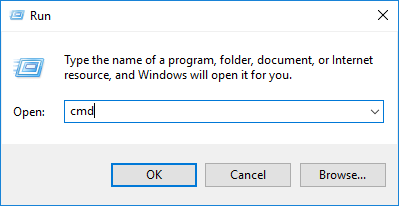
You will first need to open the command prompt by following these 3 steps:
- Press Win+R to open the Run window.
- Type cmd in the Open field.
- Click OK.
The default directory within the console is located on disk C. To avoid permission issues, we recommend switching to a different disk.
To switch to another disk, simply enter the drive letter (in the example below, it’s ‘d’), followed by a colon:
d:
This will redirect you to the main directory of disk D.
It’s also possible to enter an existing disk in the command. If you wish to create the CSR in a specific directory, simply switch to the disk that uses the aforementioned command. To run the command, it should look something like this:
cd d:\exampe\directory\ssl
After that, you will create a new text file called ‘request.inf’ by running:
notepad request.inf
Here, the dialog window will ask whether or not you wish to create a new file. Click Yes from the options.
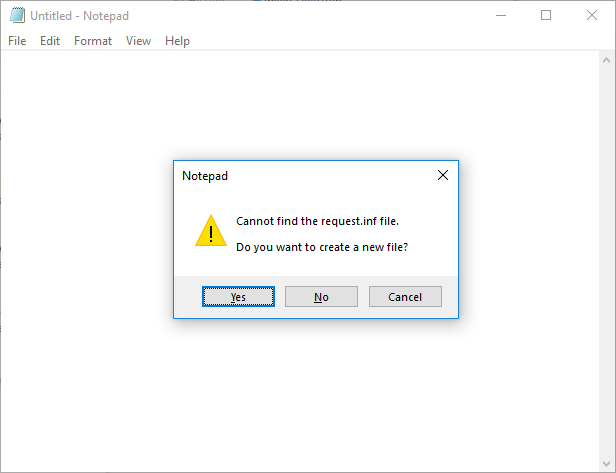
This will then open a new Notepad window. There you should copy and paste the following content:
;—————– request.inf —————–
[Version]
Signature=”$Windows NT$”
[NewRequest]
Subject = “CN=example.com, C=US, L=Los Angeles, ST=California, O=NA”
KeySpec = 1
KeyLength = 2048
Exportable = TRUE
MachineKeySet = TRUE
SMIME = False
PrivateKeyArchive = FALSE
UserProtected = FALSE
UseExistingKeySet = FALSE
ProviderName = “Microsoft RSA SChannel Cryptographic Provider”
ProviderType = 12
RequestType = PKCS10
KeyUsage = 0xa0
HashAlgorithm = SHA256
[EnhancedKeyUsageExtension]
OID=1.3.6.1.5.5.7.3.1 ; this is for Server Authentication / Token Signing
;———————————————–
Step 2
Now you will need to edit the data in the Subject directive. The description of each variable is explained below:
CN (Common Name) – refers to the domain name or subdomain you wish to secure
C (Country) – refers to the country related to your domain
L (Locality) – refers to the city related to your domain
ST (State) – refers to the state related to your domain*
O (Organization) – refers to the company name related to your domain**
*Please enter the full name of the state, not the abbreviation
**If you do not have any organization or company, simply enter NA
Note: It is possible to add the street address value to the CSR code if needed, by specifying the ‘Street’ variable in the ‘Subject’ directive as follows:
Subject = “CN=example.com, C=US, L=Los Angeles, ST=California, O=NA, Street= Example Avenue 1”
Once you have finished editing your data, save the file and return to the command console.
To generate a new CSR using the policy we created above, simply run this command:
certreq -new request.inf request.csr
This command will then create a new file called ‘request.csr’.
To open it, run ‘notepad request.csr’ in the command console. You will then see the CSR code that looks like a block of code enclosed between the ‘—–BEGIN CERTIFICATE REQUEST—–’ and ‘—–END CERTIFICATE REQUEST—–’ header and footer. This full code should be submitted during the SSL activation in your 1Byte account.