

PrestaShop is an eCommerce platform that specializes in the development of e-commerce sites. Its purpose is to assist you in creating a stylish, fast online store. In this tutorial, 1Byte will show you how to deploy a LAMP-based PrestaShop store on a CentOS 7 server instance.
STEP 1
1. Domain name
Here are some reasons why you must have a domain name:
- When purchasing Cloud Server, you need a domain name to connect to the hosting.
- Without a domain name, you can not install SSL Certificate on it
- When you put your website into business, how do customers know what your website’s name is to access?
→ A domain name is a MUST
→ If you do not have a domain name, consider visiting 1Byte to buy it
2. Cloud Server
+ Because you have full root access, you can install PrestaShop framework entirely, whereas this is not possible with Shared Hosting.
→ If you do not have one, you can buy it directly at Cloud Server
3. Deploy and logged in to your Server
To be able to install packages in the easiest and most standard way. You need to use terminal
→ Logged in to your Cloud Server
NOTE:
If your Cloud Server was previously used to host a website. Then 1Byte encourages you to:
- Backup all data (if necessary)
- Reinstall Cloud Server
You may ask why?
→ Because there is a significant likelihood that previously installed packages and frameworks may conflict with the packages and frameworks that are about to be installed
Let’s Get Your Hands wet
Step 1: Login into your Server
Log in to Cloud server by terminal
Step 2: Update the system
Regardless of what we decide to do, we should first make sure that all of our packages is up to date.
sudo yum update -yNext, we need to install nano, unzip, and wget packages. We will need these commands later on
- Nano: a command-line-based text editor
- Unzip: a command is used to unpack zip files
- Wget: a free and open-source software package for retrieving files using HTTP, HTTPS, and FTP
sudo yum install nano -y
sudo yum install unzip -y
sudo yum install wget -y
By default, SELinux is enabled on a default CentOS 7 system. We recommend disabling SELinux on your system to prevent any security conflicts. You can disable SELinux by editing the /etc/selinux/config file
nano /etc/selinux/config
- Find the following line:
SELINUX=enforcing - Then, replace it with the following line:
SELINUX=permissive - Next, use combined-key Clrl + O to save and Ctrl + X to close the file.
- Finally, restart your system to apply the changes.
sudo rebootIn order for PrestaShop to function correctly, you need to set up the LAMP stack on your machine before you can deploy and use PrestaShop. In the following steps, I will show you how to install and configure Apache, MariaDB, and PHP.
NOTE:
LAMP stands for Linux, Apache, MySQL, and PHP. Together, they provide a proven set of software for delivering high-performance web applications
Step 3: Install and configure Apache
sudo yum -y install httpdNOTE:
In case you cannot install httpd as shown below
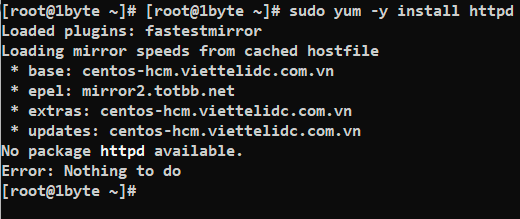
Don’t worry, This could be because the repository package of HTTP has been excluded to another place. This leads to you not being able to run “yum install httpd”
(If you did not run into a problem like this, please skip)
To fix this, please do as follow:
nano /etc/yum.conf
- As you can see, you cannot install the “httpd” package because it is currently excluded
- Ok we know the reason, now we just need to remove “httpd” from “exclude” line
- By the way, we also have to remove “mariadb” and “php” from “exclude” line too.
→ Because later on, we need to install PHP and MariaDB
Please make sure that the file yum.conf has been modified correctly as shown below
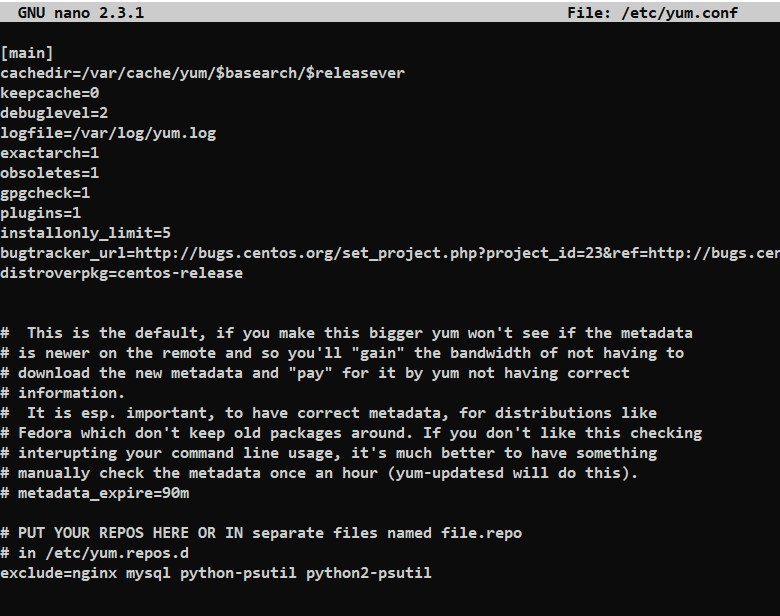
- As always, use combined-key Clrl + O to save and Ctrl + X to close the file.
- Ok let’s install httpd package again by running this command
yum clean all && yum update -y && yum install httpd -yEND OF FIXING INSTALL HTTPD WHEN GET ERROR!!!
Back to the road, if there is no error when installing httpd, please follow the steps below:
sudo systemctl start httpd
sudo systemctl enable httpd
sudo systemctl status httpd
Modify the current firewall rules so that visitors can access your online store:
sudo firewall-cmd --zone=public --permanent --add-service=http
sudo firewall-cmd --reload
sudo firewall-cmd --list-services
Step 4: Install and configure MariaDB
Install MariaDB and set it to automatically start after the system reboot:
sudo yum install mariadb mariadb-server -y
sudo systemctl start mariadb.service
sudo systemctl enable mariadb.service
sudo systemctl status mariadb.service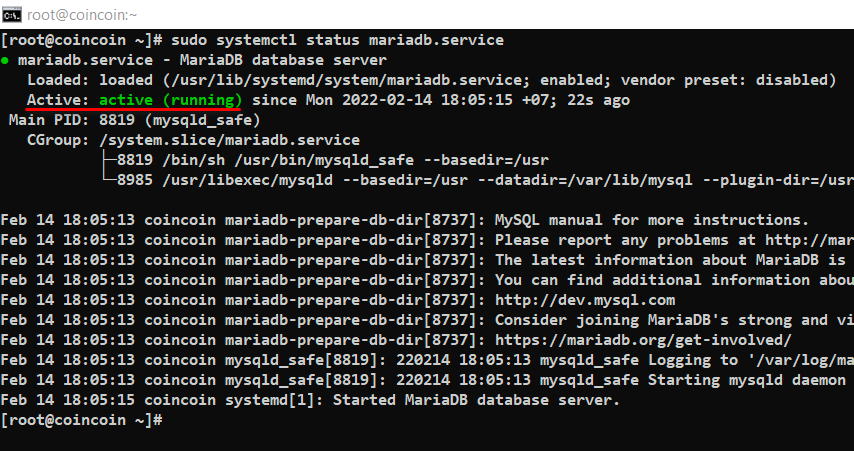
Execute the secure MySQL installation process:
sudo /usr/bin/mysql_secure_installationGo through the process in accordance with the instructions below:
Enter current password for root (enter for none): Press the Enter key
Set root password? [Y/n]: Input Y, then press the Enter key
New password: Input a new root password, then press the Enter key
Re-enter new password: Input the same password again, then press the Enter key
Remove anonymous users? [Y/n]: Input Y, then press the Enter key
Disallow root login remotely? [Y/n]: Input Y, then press the Enter key
Remove test database and access to it? [Y/n]: Input Y, then press the Enter key
Reload privilege tables now? [Y/n]: Input Y, then press the Enter key
NOTE:
- In these steps above, you must remember the root user’s password in order to access the database.
- Current password for root = password of root to connect to your server
- Set root password = password of root to connect to your database
END OF NOTING
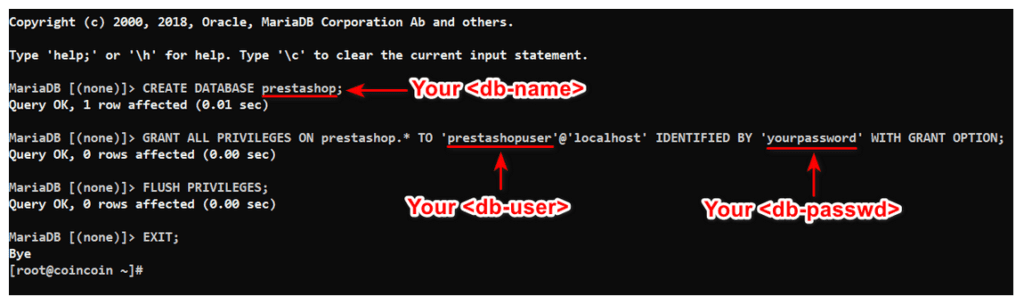
Now, log into the MySQL shell so that you can create a dedicated database for PrestaShop:
mysql -u root -p
Then setup the PrestaShop database using the following commands
CREATE DATABASE prestashop;
GRANT ALL PRIVILEGES ON prestashop.* TO 'prestashopuser'@'localhost' IDENTIFIED BY 'yourpassword' WITH GRANT OPTION;
FLUSH PRIVILEGES;
EXIT;
Step 5: Install PHP and required extensions
Install PHP and required extensions using the yum command:
sudo yum install httpd mariadb-server php php-cli php-bcmath php-mysqli php-gd php-pdo php-xmlrpc php-intl php-posix php-json php-curl php-zip unzip -yAfter installing all the required packages, edit the php.ini file and change some default settings:
nano /etc/php.iniChange the following lines corresponding to the values in the figure below:
TIP BEFORE EDITING:
When working with nano, to find navigate to a certain keyword, use Ctrl + W, then type the keyword to find, and finally just press Enter (basically, it works like you press Ctrl + F to file a keyword in your browser, or in Microsoft Word Office)
→ The nano will automatically move the mouse pointer to the location containing that keyword
max_input_vars = 3000
post_max_size = 64M
upload_max_filesize = 64M
max_execution_time = 600
memory_limit = 256M


NOTE:
Please make sure to press Ctrl + O to save and Ctrl + X to quit
END OF NOTTING
Put all of the configuration changes into effect:
sudo systemctl restart httpd mariadbStep 6: Create a web root and download the PrestaShop archive
Create web root “prestashop”
mkdir /var/www/html/prestashop
cd /var/www/html/prestashop
→ After this, all website-related data such as plugins, themes, files, …etc will be put in this directory
Download the latest stable version of PrestaShop, which is 1.7.8.3 as of writing:
sudo wget https://www.prestashop.com/download/releases/prestashop_1.7.8.3.zip
ls -l
- For future reference, you can always find the URL of the latest download from the PrestaShop official website.
- Now we need to
unzipto uncompress the archive
unzip prestashop_1.7.8.3.zip
ls -la
NOTE:
Please do not delete or unzip the file “prestashop.zip“. Because this file will be used when installing PrestaShop in the browser
END OF NOTTING
Setup the proper ownership for all of the files and directories in the archive, then move them to the web root directory:
chown -R apache:apache /var/www/html/prestashopStep 7: Remove the default page and configure apache to accept PrestaShop site
nano /etc/httpd/conf.d/prestashop.confAfter running the above command, please paste the following lines into prestashop.conf
<VirtualHost *:80>
    ServerAdmin [email protected]
    ServerName hobbykh.fun
    ServerAlias *.hobbykh.fun
    DocumentRoot /var/www/html/prestashop

    <Directory /var/www/html/prestashop>
        Options +FollowSymlinks
        AllowOverride All
        Require all granted
    </Directory>

    ErrorLog /var/log/httpd/prestashop-error_log
    CustomLog /var/log/httpd/prestashop-access_log common
</VirtualHost>
NOTE:
Remember that change the value at:
- ServerAdmin into your webmaster email
- ServerName to your domain name
END OF NOTTING
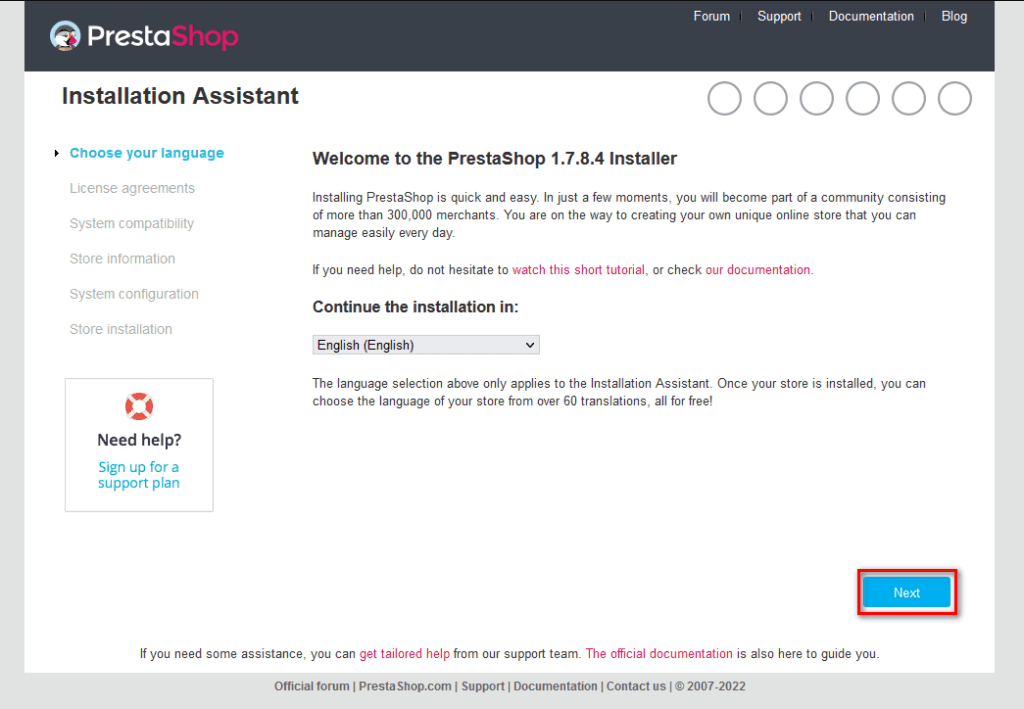
Step 8: Visit your server from a web browser
http://[your-server-IP]/
8.1 – Let’s start by installing yum-utils
yum install yum-utils -y8.2 – Let’s download Remi repo
yum install http://rpms.remirepo.net/enterprise/remi-release-7.rpm -y8.3 – We will now run the commands to install PHP version 7.4
yum-config-manager --enable remi-php748.4 – Refresh the repository and restart the httpd service
yum update -y
systemctl restart httpd
8.5 – Let’s check our PHP version
php --version
8.6 – Visit your server again via a web browser
http://[your-server-IP]/
Ok now we just need to back our terminal and install the so-called PHP zip extension
yum install php-zip -y
systemctl restart httpd
8.7 – Comeback our server in the web browser again

As you can see, everything turned out perfectly. The PrestaShop wizard will automatically install it on your server. All you need to do now is enjoy a cup of tea.
Once the installation is done, we’ll be… well, the post is already too long.
Step 2
you need to read through and finished Part 1. This is a must and you have to have the following components:
- Domain Name
- Cloud Server
- PrestaShop framework is already installed on your Server
- A spirit of eagerness to learn new things
No More Small Talk, Let’s Hands On
In Part 1, you will be stopping here

But don’t worry too much because 1Byte is already here, I am always with you when you are in trouble
According to PrestaShop’s instructions, there are several things you need to fix.
→ Let’s go back to the Server side and use the Terminal Interface to fix it

1) Instal “Mbstring” PHP extension by running this command
sudo yum install php-mbstring -y

sudo systemctl restart httpd
2) Next is install “PHP Accelerator” to boost up your site
But hold on!!!…
I also read the document of PHP accelerator and this only works with PHP versions 4 and 5. While our PHP is version 7
→ Will skip this step. You see, I save you time again

Ok now, we just need to refresh our page, to check whether the Warning Message remains or not?
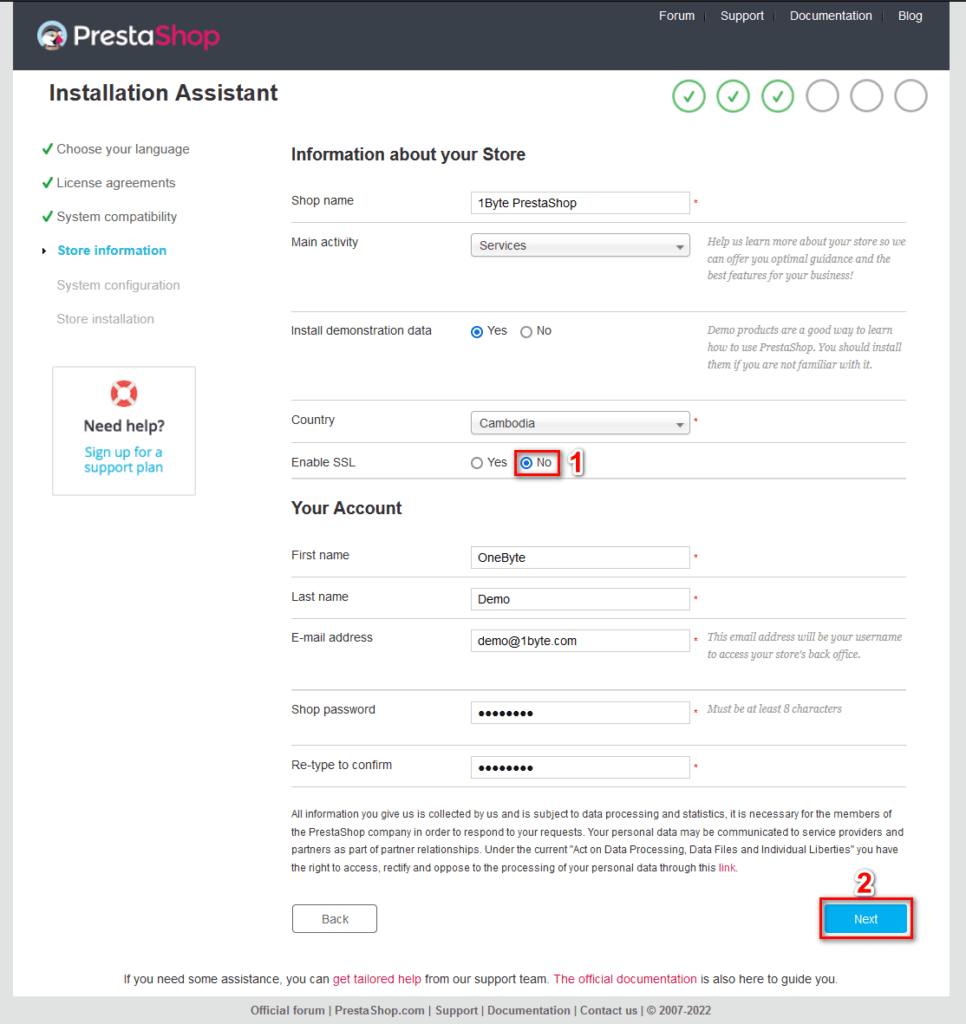
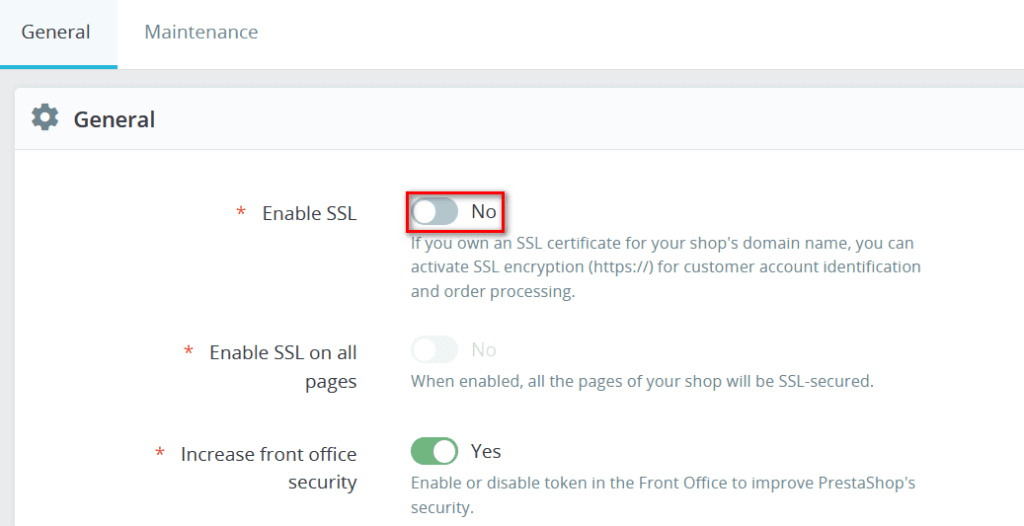
IMPORTANT NOTE 1:
- Please remember not to check Enable SSL with option YES
- Please check with options NO
- This is because If you choose the YES option, this will make your website inoperable for two reasons:
1) On the server side, we haven’t told the firewallcmd allowe https service yet, we just allowed http service
2) Up to now, our website has not installed SSL certificates
IMPORTANT NOTE 2:
PrestaShop requests database information (which I already created in Part 1) in this phase.
Once everything is OK, move to the next section
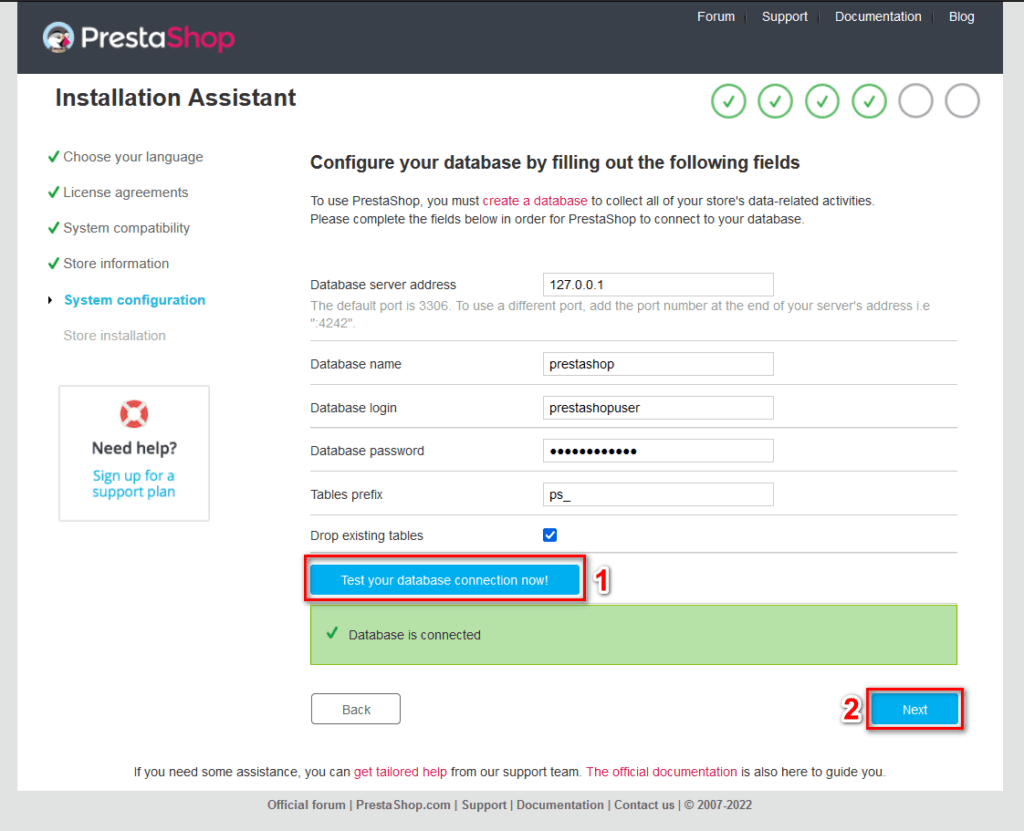
After provding the info to PrestaShop, check the connection to your database
- If everything goes well, a message like the one above will be shown.
- Then just click on Next button
- If PrestaShop cannot connect to the database, you need to check the information such as db_name, db_user and db_pass which was created at Part 1

(And now you just enjoy a cup of tea while the system automatically installs for you)
If you see this picture like me, congratulations, you have successfully installed PrestaShop framework using your browser
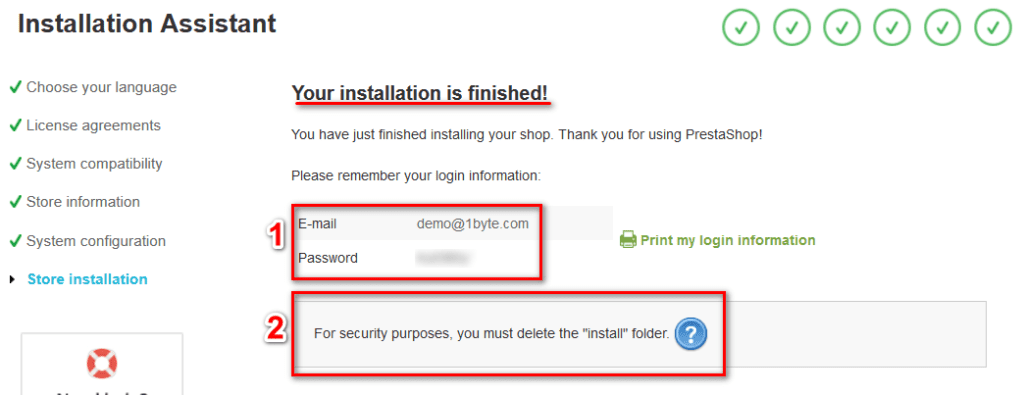
NOTE:
- The info of box (1) will be your credential to login in Admin Dashboard
- Ok la, let’s back to our terminal and do the following commands
#Navigate to prestashop directory and list all files
cd /var/www/html/prestashop/
ls
Why am I highlighting the whole directory named “admin”? I’ll leave it open for now, but in a bit, I’ll explain it to you below
#Remove the install directory
rm -rfv install/
IMPORTANT NOTE:
- Once the directory named “install” was completely deleted, the system will automatically change the folder name “admin” to “adminxxx“
- Why is that? because PrestaShop doesn’t want bad guys (hackers) to know the path to the admin dashboard page. Therefore, to prevent curious people from coming to the admin page, PrestaShop will rename this “admin” folder to “adminxxx“
To verify this, use this command again
#Verify the directory named "admin"
ls
As you can see, the directory “admin” has been renamed to “admin233ymehbz“
This name will be completely different from yours.
So please check it:
→ I have already helped you get the answer to the question above
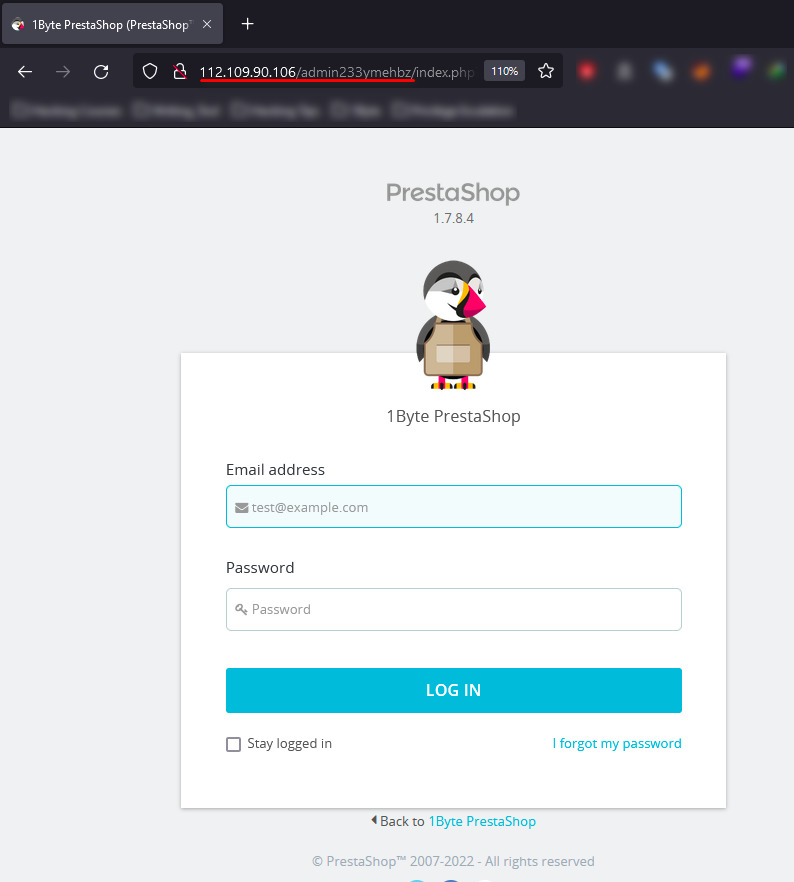
→ To connect to your admin dashboard you have to type in your URL as follow: http://<your-server-ip>/admin233ymehbz
But with a name like that, it would be difficult to remember, right?
Therefore, we often rename this directory “adminxxx“ to a name that is easy to remember, but it’s hard to guess
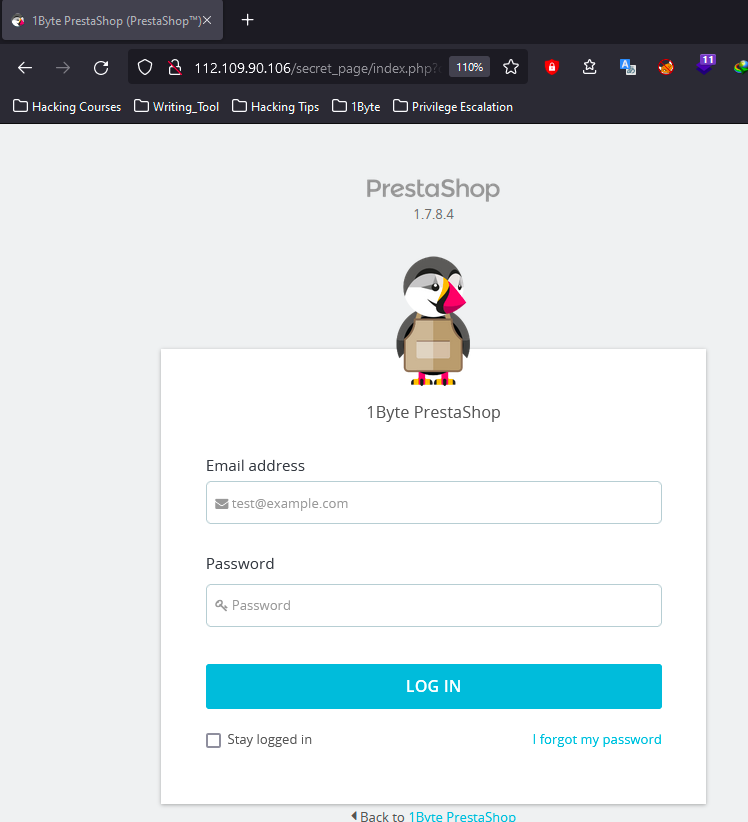
#Rename "adminxxx" directory to a new name
mv admin233ymehbz/ secret_page/
ls
Let’s test again by navigating to http://<your-ip-server>/secret_page
Step 3
Step 1: Login into your Server via terminal
ssh root@<your-server-IP>
Step 2: Configure firewall-cmd to accept https service
sudo firewall-cmd --zone=public --permanent --add-service=https
sudo firewall-cmd --reload
sudo firewall-cmd --list-services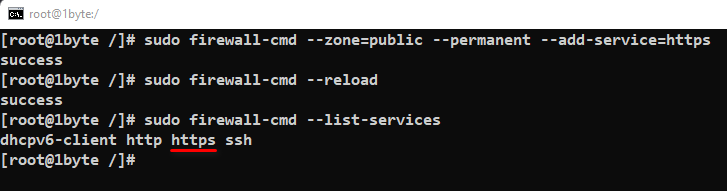
Step 3: Install the Certbot Let’s Encrypt
sudo yum install epel-release -y
sudo yum install certbot python2-certbot-apache mod_ssl -y
Step 4: Point your domain to this Cloud Server/ Cloud Hosting
NOTE:
You need to have a domain name. This is a MUST. If you don’t have a domain name, you can’t continue this tutorial 😂. We would really appreciate it if you purchased on 1Byte’s Website
Do you know what your server’s IP address is? This is also a must, and there are several methods to figure out:
- Method 1: You can check your email to get this information
- Method 2: You can go to User Dashboard, choose the Cloud Server or Cloud Hosting section, and get its IP
- Method 3: Check directly on the terminal with ifconfig command
END OF NOTTING:
Ok, back to the main point. Here, I will guide you to point your domain to Cloud Server/Cloud Hosting on 1Byte platform + If you use a 3rd party domain, you have to do it yourself because each provider will have a different way of pointing, and managing domains→ 1Byte encourages you to buy our domains. Why? Because following to the instructions step-by-step guarantees success 100%.
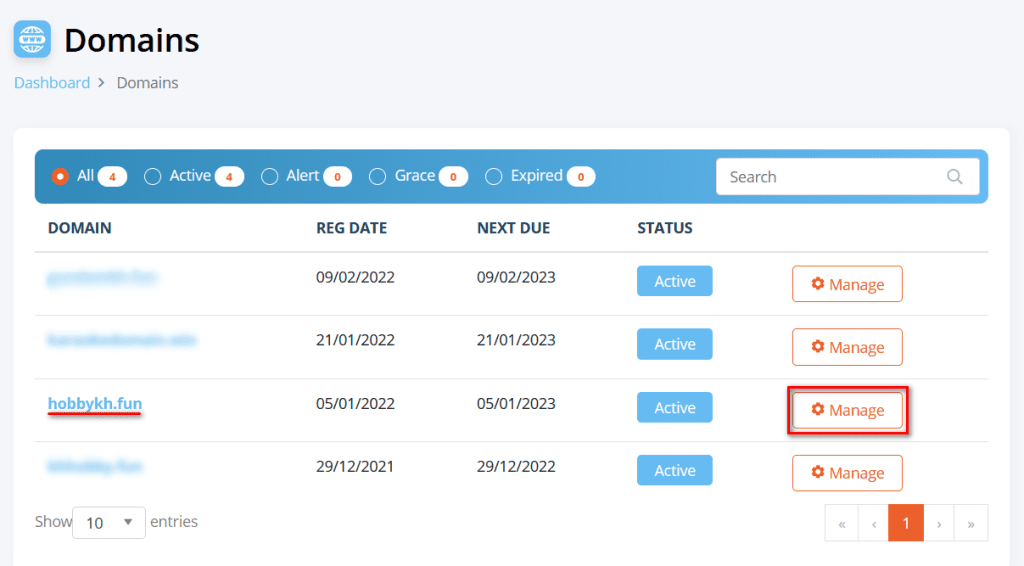
4.1 – Login into your User Dashboard, navigate to the Domain section, and choose the domain that you want to use
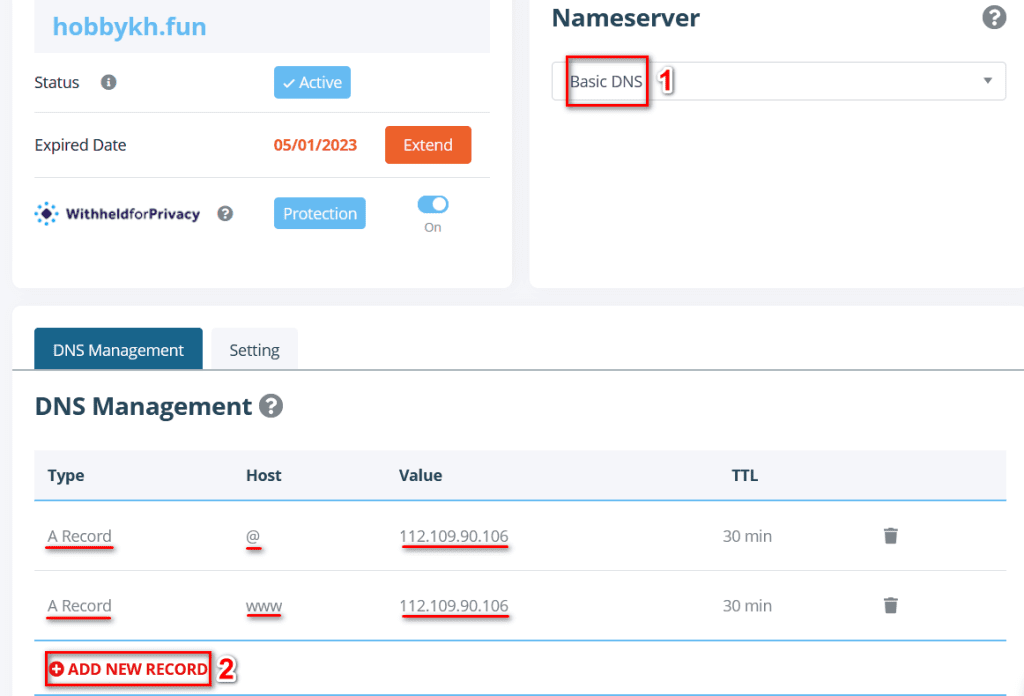
4.2 – Navigate to DNS Management and do as shown below
NOTE:
- If your domain is completely new → This process only takes 5-15 minutes
- If your previous domain has been used, and now you transfer this domain to a new host
→ This process may take up to 30 minutes. Depends on what was the previous TTL value you used
END OF NOTTING
4.3 – Verify wheter your domain has received the server’s IP address or not?
#Using ping command to verify
ping hobbykh.fun -c4
Step 5: Generate the cert key & install the Let’s Encrypt SSL Certificate
Back to your terminal, and type the command followings:
#Remember to change your domain name in here
sudo certbot --apache -d hobbykh.fun -d www.hobbykh.fun
The program will present you with a step-by-step guide to customize your certificate options. It will ask you to provide an email address for lost key recovery and notices, and then prompt you to agree to the terms of service.
If you did not specify your domains on the command line, you will be prompted for that as well.
If your Virtual Host, which we already done in Step 1 files does not specify the domain they serve explicitly using the ServerName directive, you will be asked to choose the virtual host file. In most cases, the default ssl.conf file will work.
You will also be able to choose between enabling both http and https access or forcing all requests to redirect to https. For better security, it is recommended to choose the option 2: Redirect if you do not have any special need to allow unencrypted connections. Select your choice then hit ENTER.
Please choose whether or not to redirect HTTP traffic to HTTPS, removing HTTP access.
- - - - - - - - - - - - - - - - - - - - - - - - - - - - - - - - - - - - - - - -
1: No redirect - Make no further changes to the webserver configuration.
2: Redirect - Make all requests redirect to secure HTTPS access. Choose this for
new sites, or if you're confident your site works on HTTPS. You can undo this
change by editing your web server's configuration.
- - - - - - - - - - - - - - - - - - - - - - - - - - - - - - - - - - - - - - - -
Select the appropriate number [1-2] then [enter] (press 'c' to cancel):2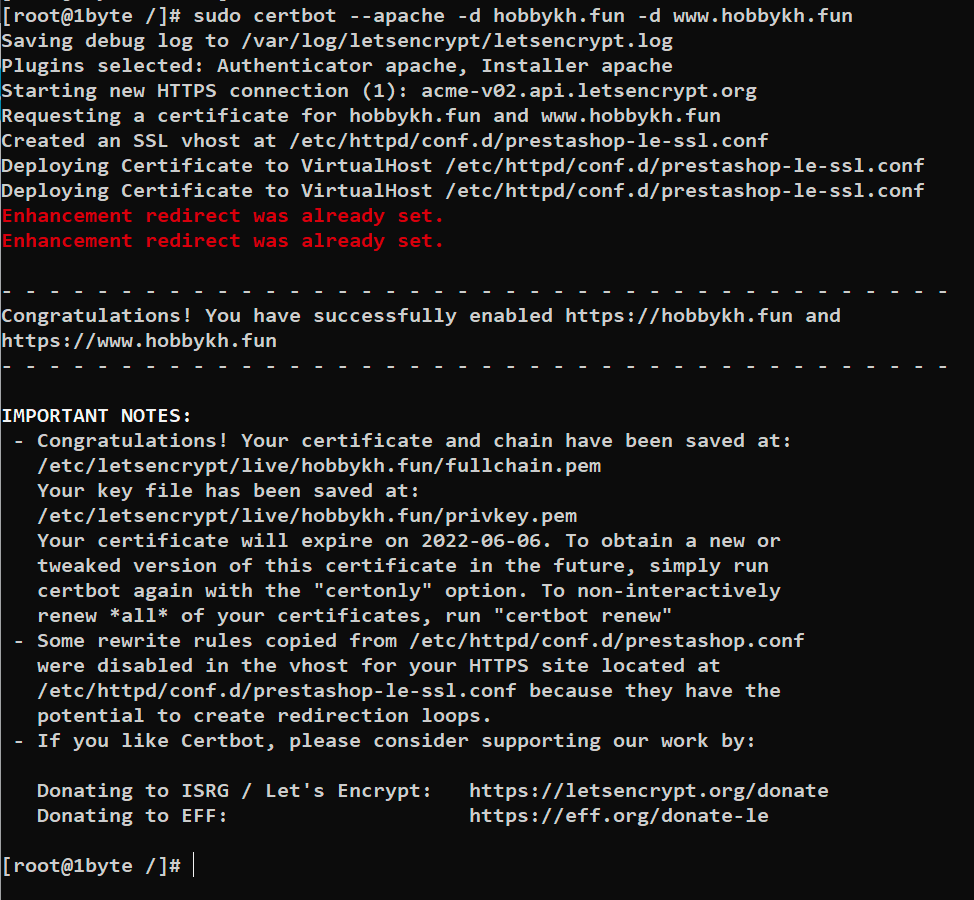
NOTE:
In the special case, your domain has been used for a certain website, and has installed SSL certificates. Then Output from terminal will look like this


Step 6: Navigate to your website and check again
(Ouch…our website has not secured yet @@! What’s wrong???) EXPLAINATION:+ Let’s Encrypt, my dear friend, has already installed the SSL certificate on our website successfully.
If you recall from Step 2, we told PrestaShop not to force to use the SSL certificate in haste since we want to connect to PrestaShop insecurely (http) first, then install the SSL certificate afterwards.+ Now we just need to go back to the Admin Dashboard, and configure PrestaShop to use SSL certificate
Step 7: Configure PrestaShop to only use https (secured protocol)


After Log in to PrestaShop as the administrator, On the left-sidebar menu, in the Configure section, select General option
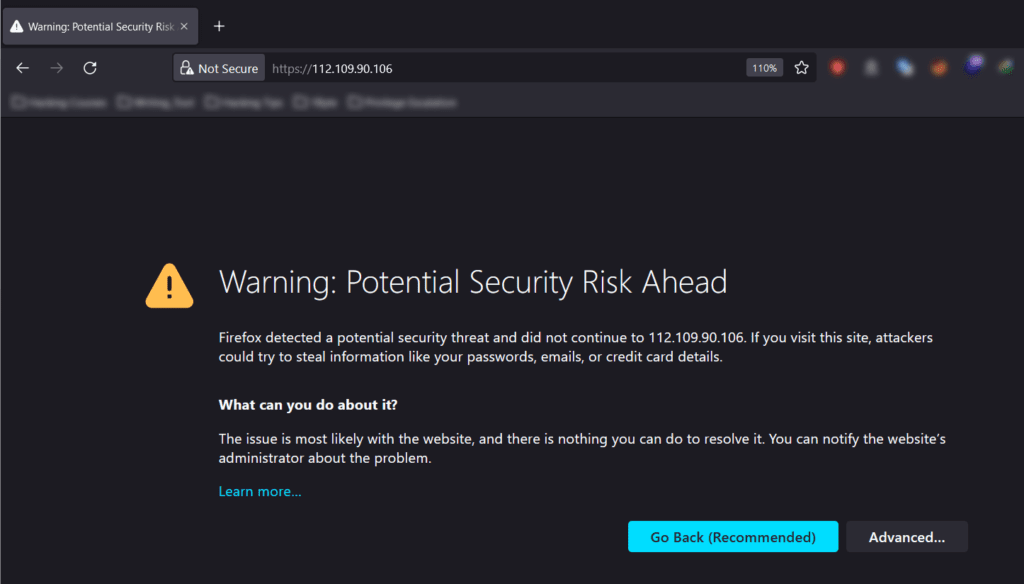
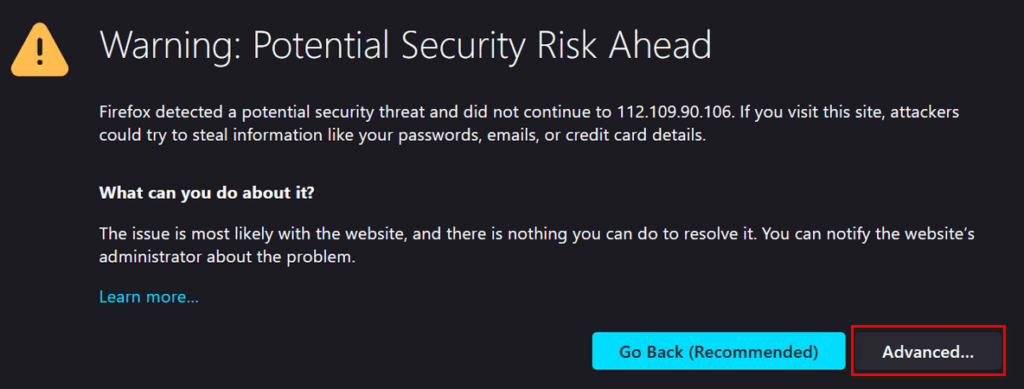
Currently PrestaShop has not enabled SSL, so when you click on the above link, your browser will warn you. Just click Advanced… then Accept The Risk
At this point, you will be redirected to another PrestaShop page. Just click on “I understand the risk” button

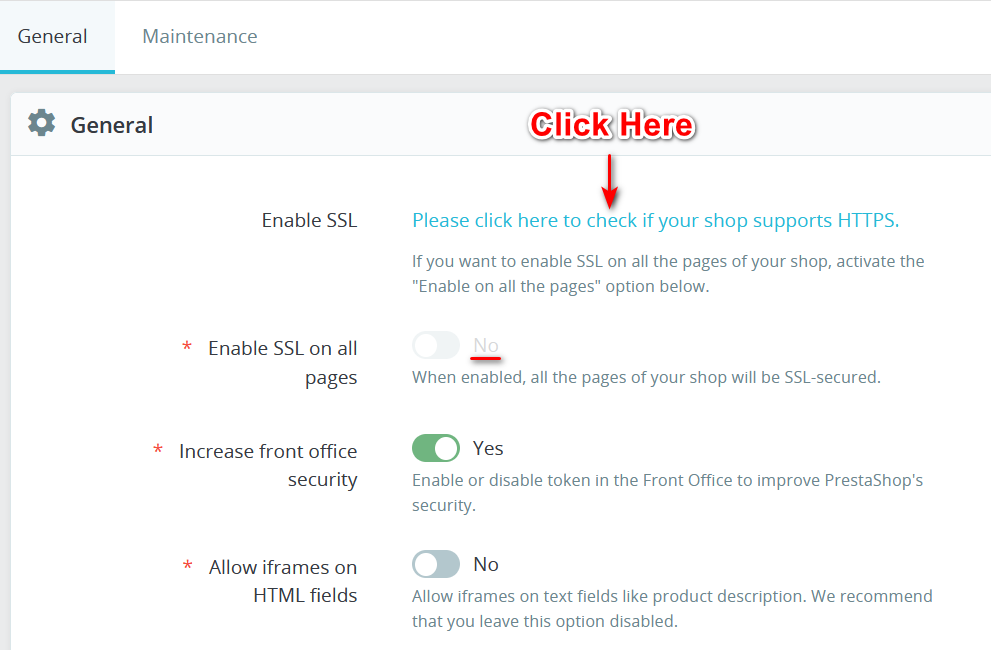
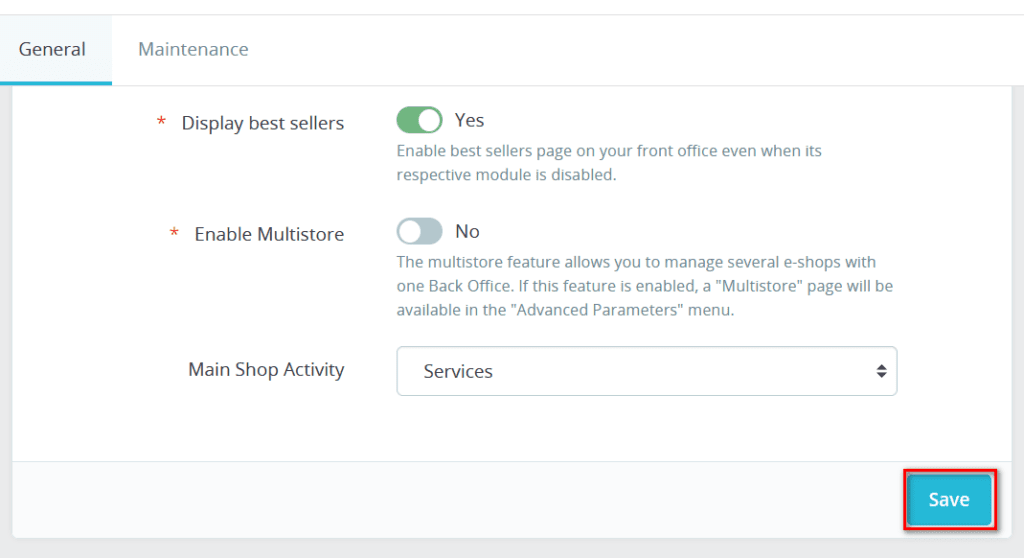
And now you just need to switch to YES at Enable SSL section
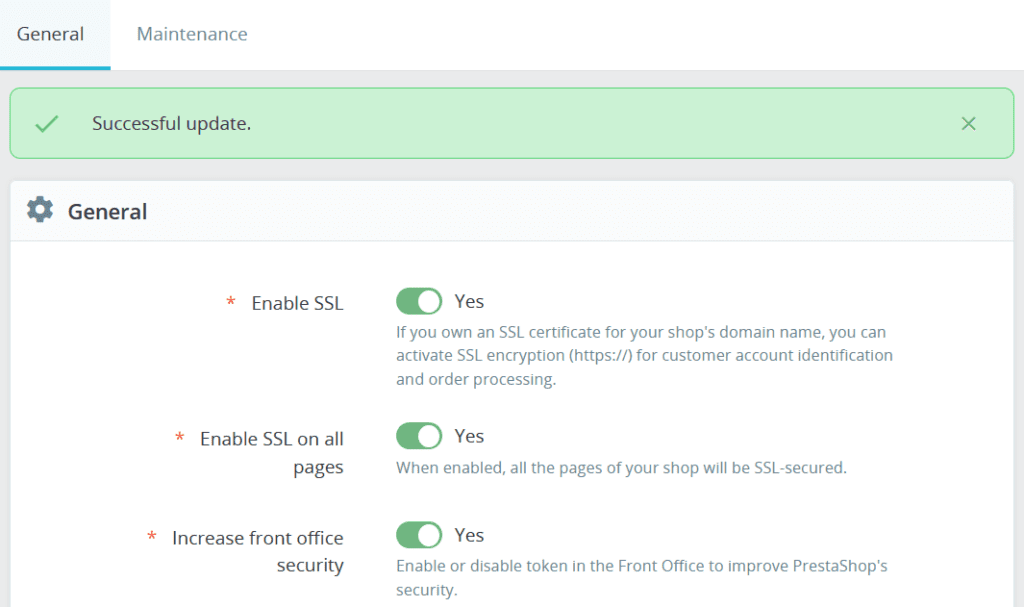
Then roll to the bottom of this page, click Save
Don’t wait to celebrate, we still have to configure 1 more element
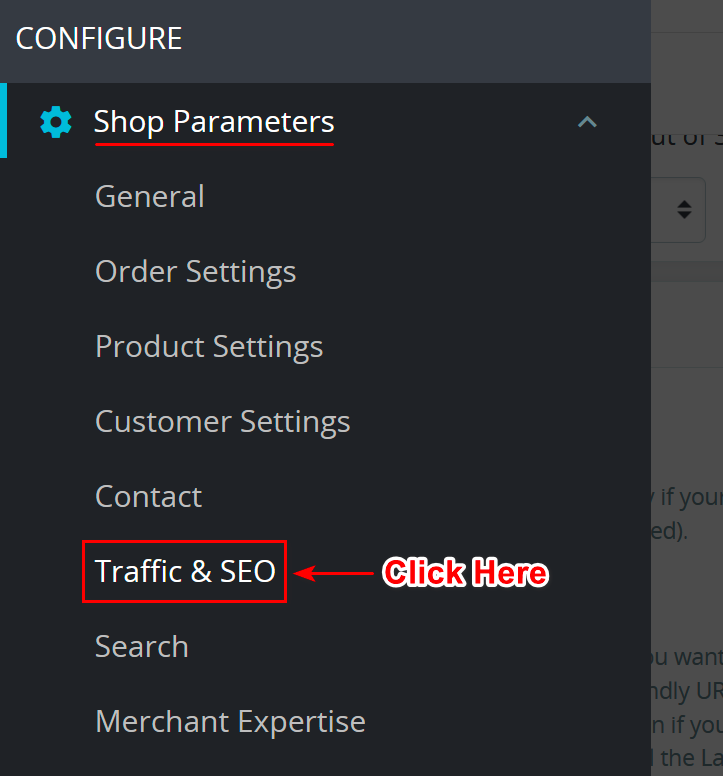
Same as above, but now select the “Traffic & SEO” option
Navigate to “Set Shop URL“
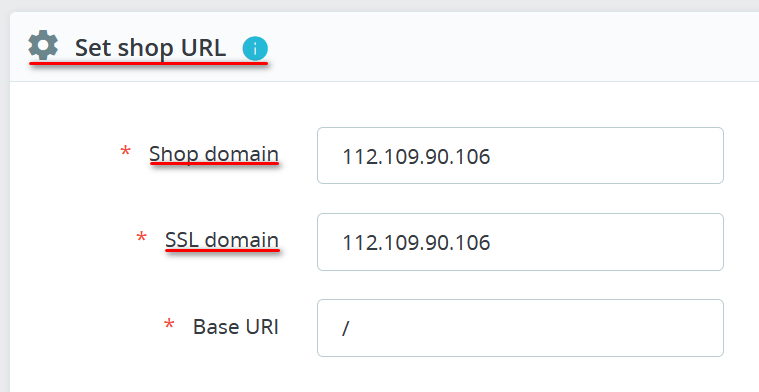
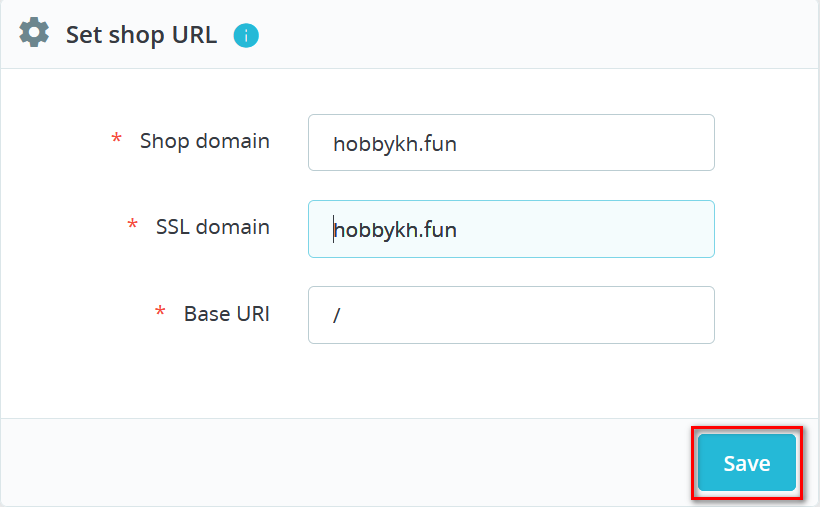
NOTE:
Don’t put https:// or https://www.
Step 8: Let’s connect to our website again
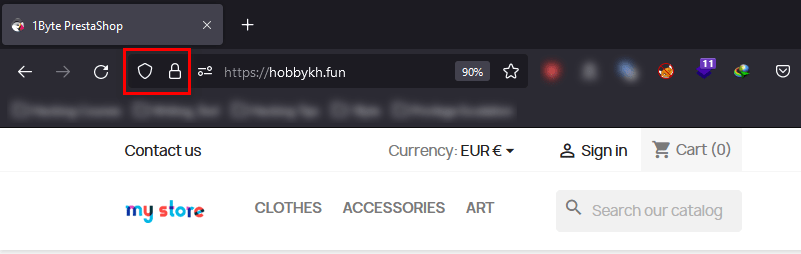
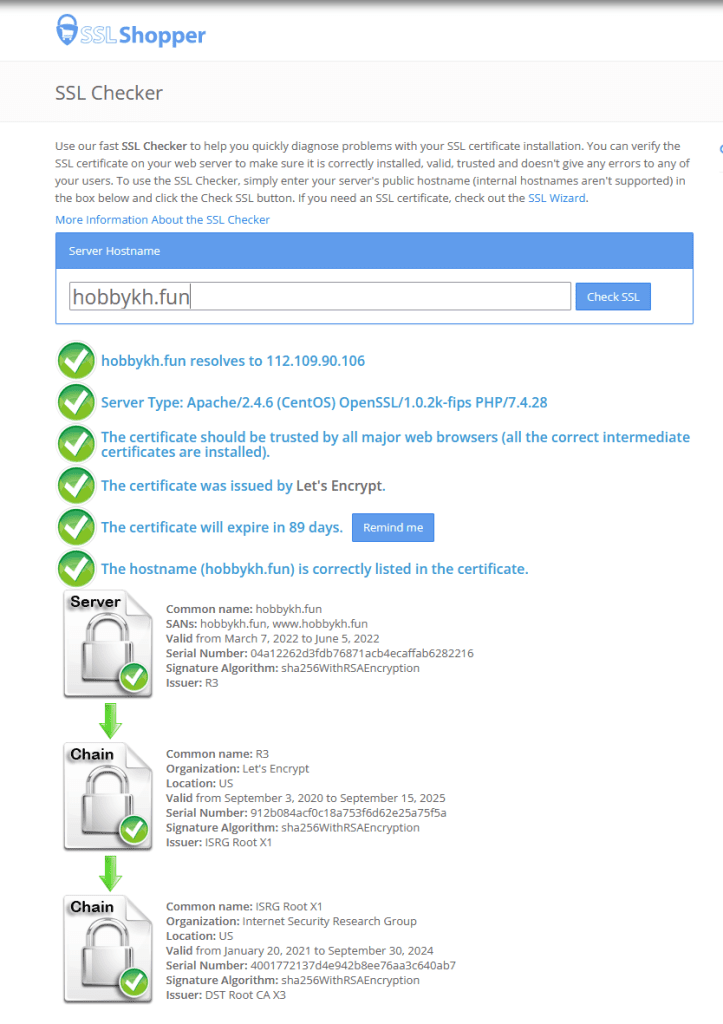
You can go to Digicert, SSL Shopper, or any website that you know to check. Just type your domain and enjoy the result
Conclusion
To everyone who has come to this point in the roadmap, I say, well done. Set up an SSL Certificate for your website now that PrestaShop is up and running. After that, all that’s left is to polish your website, add your products for sale, tweak your prices, and so on. 1Byte cannot assist you with this; it is your responsibility to do it on your own. Each person’s business concept, product, pricing point, and management style will be distinct from the others. Let 1Byte wish you well on your business and thank you to those of you who have used 1Byte’s services.