
1Byte will walk you through the process of building your own e-commerce website from the ground up in this tutorial. Don’t be concerned if you don’t know anything about coding. Simply copy and paste the steps in the tutorial to build your own e-commerce site. If 1Byte can accomplish it, so can you!

As a way to keep the tutorial short and simple for viewers, 1Byte will be split up into three separate sections.
- Part 1: You’ll learn how to set up the Opencart framework on your Cloud Server (YOU ARE HERE)
- Part 2: How to customize the Opencart framework on your website
- Part 3: Design and build your own E-commerce site
Prerequisites
FURTHER READING: |
| 1. What Is a Content Delivery Network and How Does It Work? |
| 2. Cheapest Way to Host a Website on a Small Budget |
| 3. How to Monetize a Website for Sustainable Revenue Growth |
1. Domain name
Everything on the internet needs a domain name. If you don’t already own a domain name, you can get a good deal directly on 1Byte from this link or just navigate directly to our website. 1Byte will choose the domain: in this tutorial.
2. Web Hosting
1Byte will give you 3 suggestions as follows:
- Shared Hosting is a good option if you’re simply trying out, testing, or tinkering with an Opencart framework and don’t plan on using it for anything else. This will save you money, but the performance will be lower – ( NAH!…)
- Cloud Hosting is an excellent option if you intend to start your business on a small to medium scale. You should not share your resources with others, especially if you have an eCommerce site. Because it will have a negative impact on the performance of your website – (RECOMMENDED)
- Cloud servers will definitely be the best option. A must-have – for heavy traffic sites! In addition to benefiting from dedicated resources, the notch-up hardware (Cloud Hosting). Now you can control everything from the underlying infrastructure to the surface of your site. Cloud Hosting is limited on this side. Keep in mind that your website’s performance will be improved if your server hardware configuration is robust. A bit pricey, but well worth every penny! – (PERFECT CHOICE)
(In this demo, 1Byte will use Cloud Server – Basic Cloud 2 to host the web server)
The 6 Steps to Build eCommerce Site From Scratch by Opencart Framework
1. Install Required Packages
- SSH to your server with provided credentials on your email.
- Update the system package list to update all packages to the latest available versions.
$ sudo apt update -y && apt full-upgrade -y $ sudo apt install curl -y - The latest versions of OpenCart only support PHP version 8.0. Ubuntu 20.04 does not contain PHP 8.0 in its default repository list. To install it, add the PHP repository to the APT.Add
ppa:ondrej/phprepository.$ sudo apt -y install software-properties-common $ sudo add-apt-repository ppa:ondrej/php (Remember to press "Enter" keyboard to continue) - Update system package manager.
$ sudo apt update - Install PHP 8.0 and more modules.
$ sudo apt install apache2 mysql-server php8.0 libapache2-mod-php8.0 php8.0-mysql php8.0-curl php8.0-xml php8.0-zip php8.0-gd php8.0-cli php8.0-fpm libapache2-mod-fcgid wget unzip -y - Enable Apache2 with PHP-FPM.
$ sudo a2enmod proxy_fcgi setenvif $ sudo a2enconf php8.0-fpm - Restart the Apache service.
$ sudo systemctl restart apache2
2. Create Opencart Database
- Log in to MySQL shell. On the password prompt, just press ENTER to continue.
$ sudo mysql -u root -p (Remember to input your root's password) - Create a database called
opencart.CREATE DATABASE opencart; - Create a user called
opencartwith a passwordStrongPassword.CREATE USER 'opencart'@'localhost' IDENTIFIED BY 'StrongPassword'; - Grant all database privileges to the user.
GRANT ALL PRIVILEGES ON opencart . * TO 'opencart'@'localhost'; - Save the changes.
FLUSH PRIVILEGES; - Exit the shell.
exit;
Here Are Some Important Info You Should Pay Attention
- Your database name: opencart
- Your username to login database: opencart
- Your password to login database: StrongPassword
→ Later on, based on this info. You can connect to your database
(The above values are just examples, you should change them at your own discretion)
3. Instal Opencart
- Download the latest OpenCart version.
- $ wget https://github.com/opencart/opencart/archive/refs/heads/master.zip
- Unzip the downloaded file.
$ sudo unzip master.zip - Create the installation directory
/var/www/html/opencart.$ sudo mkdir /var/www/html/opencart - Move the unzipped files to the installation directory.
$ sudo mv opencart-master/* /var/www/html/opencart - Copy OpenCart configuration files.
$ sudo cp /var/www/html/opencart/upload/{config-dist.php,config.php} $ sudo cp /var/www/html/opencart/upload/admin/{config-dist.php,config.php} - Change ownership of the installation directory.
$ sudo chown -R www-data:www-data /var/www/html/opencart - Change access permissions for the installation directory.
$ sudo chmod -R 755 /var/www/html/opencart
4. Configure APACHE2
- Create a new Apache virtual host file named
opencart.conf.$ sudo nano /etc/apache2/sites-available/opencart.confAdd the following code to the file. Save and close the file.Note: In this case, we’ve merely temporarily configured HTTP (not HTTPS, which is insecure) on port 80 to receive the domain name 1byte-ecommerce-site.com. Later, we will configure port 443 (https, secure) further and redirect all incoming traffic from port 80 to port 443.
<VirtualHost *:80> ServerAdmin admin @1byte-ecommerce-site.com DocumentRoot /var/www/html/opencart/upload/ ServerName 1byte-ecommerce-site.com ServerAlias www.1byte-ecommerce-site.com <Directory /var/www/html/opencart/upload/> Options FollowSymLinks AllowOverride All Order allow,deny Allow from all </Directory> ErrorLog /var/log/apache2/1byte-ecommerce-site.com-error_log CustomLog /var/log/apache2/1byte-ecommerce-site.com-access_log common </VirtualHost> - Disable the Apache default configuration file.
$ sudo a2dissite 000-default.conf - Enable OpenCart Apache configuration file.
$ sudo a2ensite opencart.conf - Enable Apache rewrite mode.
$ sudo a2enmod rewrite - Restart the Apache service.
$ sudo systemctl restart apache2
5. Access Opencart Web Interface
To access the OpenCart Web Interface, go to your browser and visit http://Server_IP/. For example:
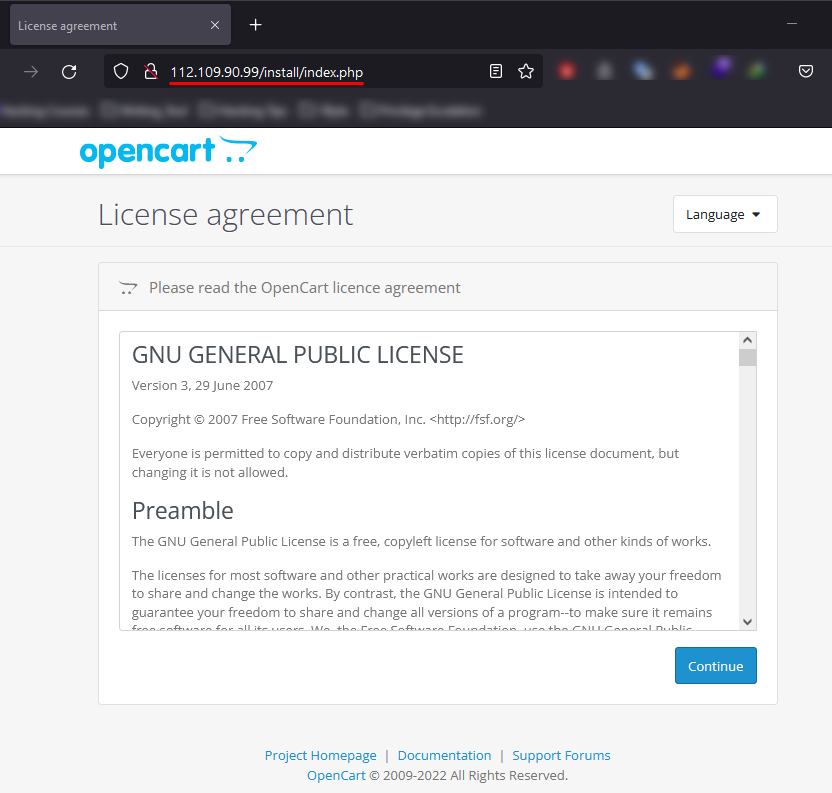
Continue reading to enter this series. In the next part, 1Byte will walk you through connecting to the database you established, creating an administrator account, and other settings.
Opencart has been installed on your Cloud Server as depicted in the following image.


NOTE:
1) Having a red checkmark in the “Status” column indicates that a missing package has been installed.
2) The following directory will hold all of the website’s data:
/var/www/html/opencart

The next page will require you to fill in the database details. Enter the details you defined in the MySQL database and click ‘Continue’.

NOTE: At this step, we need to pay attention to the following:
- (1) + (2) + (3) + (4): The value to be filled in will be taken from above

- (5) + (6) + (7): This is the information you’ll need to access your Opencart management page (the GUI interface).

When you click “Continue” (8), you will be sent to the web page displayed below. This implies you’ve installed and configured Opencart on your website successfully.
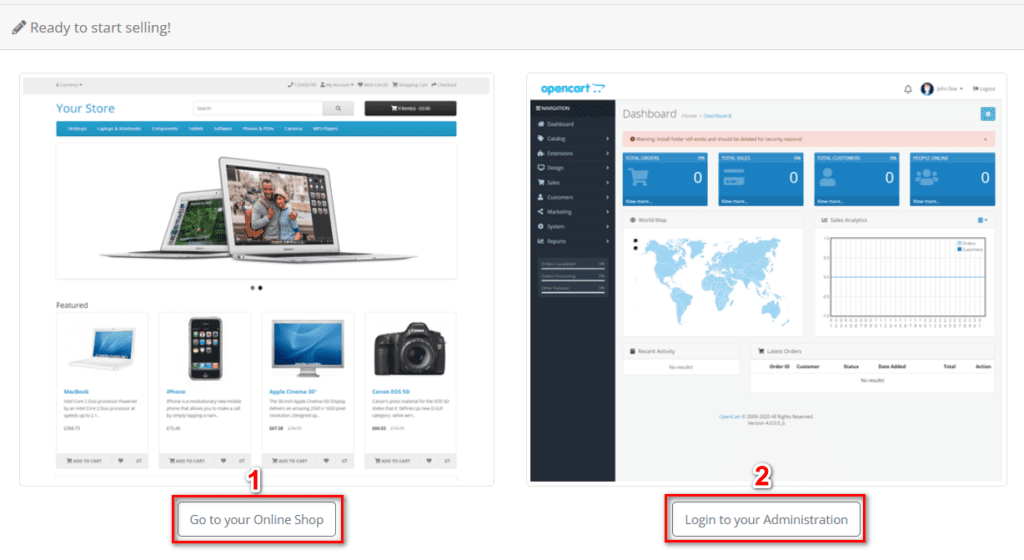
- Go to the Front End page, where your customers (buyers) may see all of your products and services, by selecting Option (1)
- In the second option (2), you may go to the Back Office (BO) page, where only you can upload images and product information, change the product’s pricing, and so on and so forth which customers cannot see as well as manage.
Voila! With that, We have come to the end, and see you in the next Part!!!
6. Point the domain name to your website (Cloud Server)
NOTE:
1Byte does recommend you purchase Domains directly from the 1Byte website. Because doing so allows you to effortlessly follow each step without trouble.
If you purchase the Domain Name through a third-party (not directly via 1Byte’s services). Then, you have to go to that provider’s domain control page and configure the DNS record as shown below.
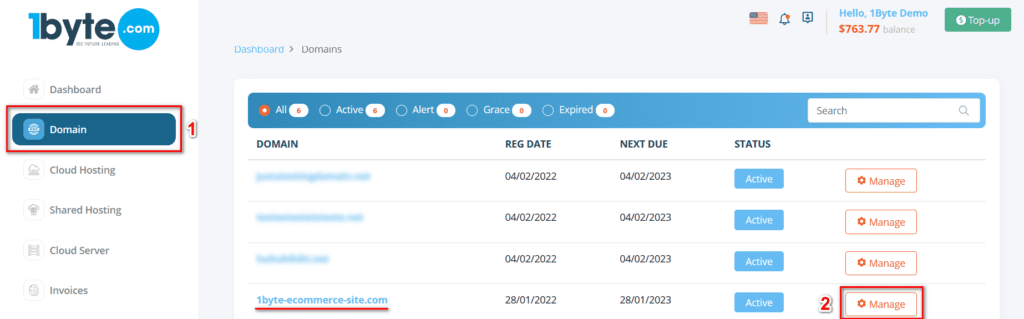
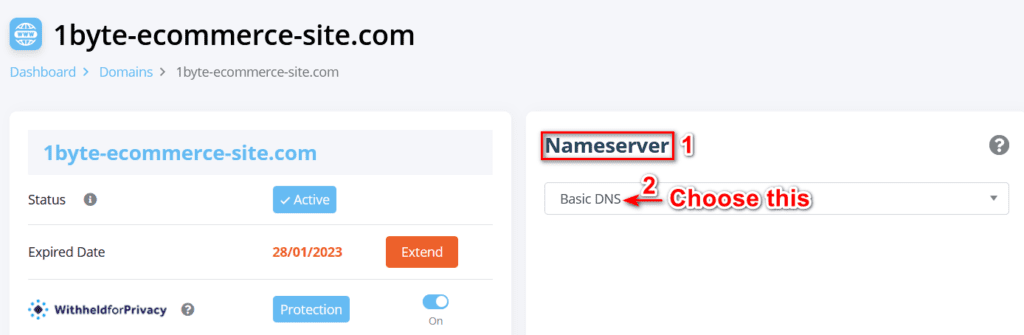
6.1 – Go to User Dashboard, navigate the “Domain” section at the left-bar menu, and click on the “Manage” button
6.2 – Point your domain to your Cloud Server
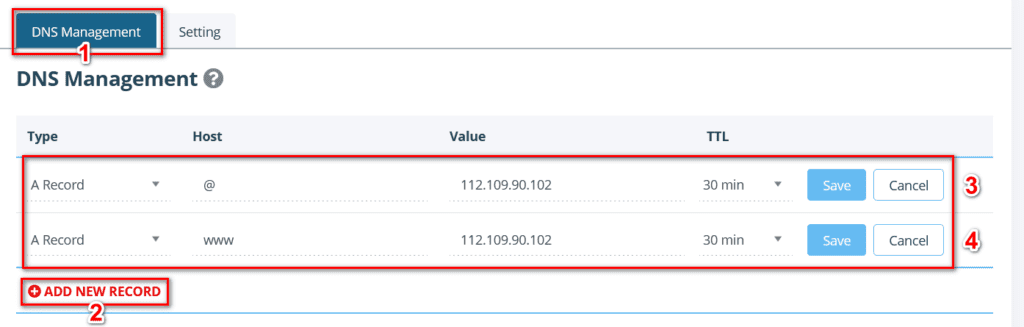
- Proceed to “Add new record”
- (1) in the “DNS Management
- (2) section
- Create two “A Record” from the “Type” column.
- In the “Host” column, enter “@” and “www” for each row
- In the “Value” column, enter your Cloud Server IP address
- Finally, press “Save” 1.3 – Check to see whether the Cloud Server address has been correctly linked to the Domain?
You may confirm this by sending a ping command to your domain; if you receive an IP address response, it means that your domain has successfully pointed to the Cloud Server IP address.
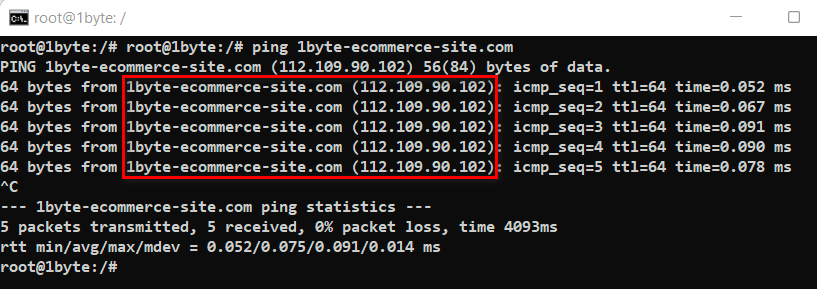
→ Customers now can use their Domain Name to visit your website.→ Problem 1 has been solved