
Welcome to our step-by-step tutorial on how to change DNS server. This guide is designed to help you understand DNS servers and how to change them. We’ll provide new stats and information, backed by reports and specific examples.
DNS servers play a crucial role in your internet browsing experience. They translate domain names into IP addresses. This process helps your browser find websites on the internet.
Sometimes, you might want to change your DNS server. Reasons can vary. You might seek faster browsing speeds. Or you might want to enhance your online security.
In this article from 1Byte, we’ll show you how to change your DNS server. We’ll provide clear, simple steps. We’ll also offer specific examples for different operating systems.
Understanding DNS Server Settings
Let’s dive into the world of DNS server settings. This section will help you understand what these settings are and where to find them on your computer.
FURTHER READING: |
| 1. How to Whitelist IP Address: A Comprehensive Guide |
| 2. What Is a Dedicated IP Address? |
| 3. What is Cloud Networking? |
Where DNS server settings are located on a computer
DNS server settings are found in your computer’s network preferences. These settings are crucial. They guide your computer to connect to the internet.
On a Windows computer, you can find these settings in the Control Panel. Look for the “Network and Internet” option. Then, click on “Network and Sharing Center”.
On a Mac, you can find these settings in System Preferences. Click on “Network”. Then, select your network connection.
Changing your DNS server is a simple process. It involves entering new DNS addresses in these settings. We’ll show you how to change the DNS server in the next section.
Different DNS server options
There are several DNS server options available. Each has its own benefits.
Google DNS is a popular choice. It offers speed and security. It’s also reliable. Google DNS addresses are 8.8.8.8 and 8.8.4.4.
OpenDNS is another good option. It provides phishing protection. It also offers customizable filtering. OpenDNS addresses are 208.67.222.222 and 208.67.220.220.
Cloudflare DNS is known for privacy. It promises to wipe all DNS queries within 24 hours. Cloudflare DNS addresses are 1.1.1.1 and 1.0.0.1.
Choosing the right DNS server can enhance your internet experience. In the next section, we’ll show you how to change DNS server.
Step-by-Step Guide for How to Change DNS Server
Welcome to our step-by-step guide on how to change DNS server. This section is designed to help you navigate the process with ease.
Changing your DNS server can improve your internet experience. It can boost speed and enhance security. But how do you make the change?
We’ll walk you through the process. We’ll provide clear, simple steps. We’ll also offer specific examples for different operating systems.
Whether you’re a tech novice or a seasoned pro, this guide is for you. Let’s dive in and learn how to change DNS server together.
Step 1: Open Control Panel
The first step in learning how to change the DNS server is to open the Control Panel on your computer. This is where you can manage various system settings, including network configurations.
Here’s how you do it:
- Navigate to the Start menu. It’s usually located at the bottom left corner of your screen.
- Click on it to open.
- In the search bar, type “Control Panel”.
- As you type, you’ll see the Control Panel app appear in the search results.
- Click on it to open.
Now, you have successfully opened the Control Panel. This is your gateway to changing your DNS server. In the next section, we’ll guide you through the process. Stay tuned!
Step 2: Navigate to Network Settings
The second step in learning how to change DNS server is to navigate to your network settings. This is where you can manage your internet connections.
Here’s how you do it:
- In the Control Panel, look for the “Network and Internet” option.
- Click on it to open.
- In the new window, you’ll see several options.
- Look for the “Network and Sharing Center”.
- Click on it to open.
Now, you’re in the Network and Sharing Center. This is where you can view your active networks and change adapter settings.
Step 3: Change Adapter Settings
The third step in learning how to change DNS server involves adjusting your adapter settings. This is where you can manage the properties of your current network.
Here’s how you do it:
- In the Network and Sharing Center, find “Change adapter settings” on the left-hand side.
- Click on it to open.
- You’ll see a list of all your network connections in the new window.
- Identify your current network. It’s usually the one with a connection status.
- Right-click on your current network to open a dropdown menu.
- From the dropdown menu, select “Properties”.
Now, you’re ready to access the properties of your current network. This is where you can change your DNS server. In the next section, we’ll guide you through these settings.
Step 4: Access Internet Protocol Version 4 (TCP/IPv4)
The fourth step in learning how to change DNS server involves accessing the Internet Protocol Version 4 (TCP/IPv4) settings. This is where you can input the new DNS server addresses.
Here’s how you do it:
- In the properties window of your current network, find the “Networking” tab.
- Click on it to open.
- You’ll see a list of items this connection uses.
- Look for “Internet Protocol Version 4 (TCP/IPv4)” in the list.
- Click on it to highlight.
- Then, click on the “Properties” button below the list.
Now, you’re ready to input your new DNS server addresses. In the next section, we’ll guide you through this process.
Step 5: Change DNS Server
The fifth step in learning how to change DNS server involves entering your new DNS server addresses. This is where you can customize your internet connection.
Here’s how you do it:
- In the properties window of “Internet Protocol Version 4 (TCP/IPv4)”, a new window will open.
- Look for the option “Use the following DNS server addresses”.
- Click on it to select.
- You’ll see two fields: “Preferred DNS server” and “Alternate DNS server”.
- Enter the DNS addresses of your choice in these fields.
- Once you’ve entered the addresses, click “OK” to save changes.
Now, you’ve successfully changed your DNS server. In the next section, we’ll show you how to verify this change.
Step 6: Verify the Change
The final step in learning how to change a DNS server is to verify the change. This ensures that your new DNS server is working correctly.
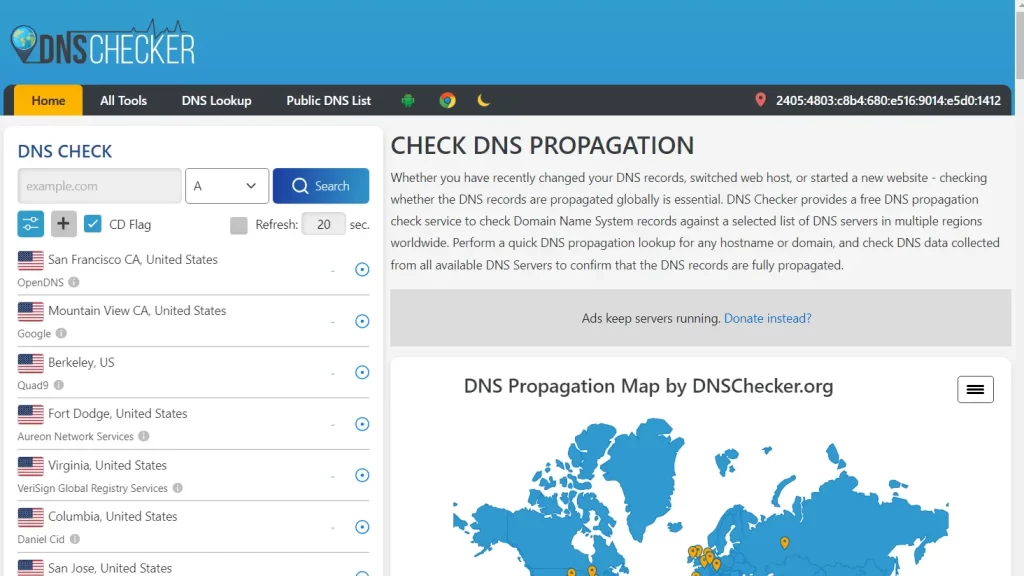
Here’s how you do it:
- After changing your DNS server, it’s important to check if the change was successful.
- You can do this by using online tools.
- One such tool is “DNS Checker”.
- This tool allows you to check your DNS propagation.
- It shows you if your new DNS server is visible to the rest of the internet.
By following these steps, you can successfully change and verify your DNS server.
Conclusion
In conclusion, understanding how to change DNS server is a valuable skill in today’s digital age. It can enhance your internet browsing experience by improving speed and security. This tutorial provided a step-by-step guide to help you navigate the process with ease.