
+ You have probably experienced the confusing situation when you:
1) Upgrade Cloud Server’ storage (purchase extra storage).
2) Change to another package with higher storage capacity than the original package
+ But you observe that your server’s storage capacity has not increased
→ Reason being, you have not mounted the additional storage that 1Byte provides.
+ This tutorial from 1Byte will instruct you on mounting your updated storage into Debian 11
+ In case you’re not using Debian, but rather Centos or Windows, you may read the corresponding posts here
1) Ubuntu
2) CentOS
3) Windows & Windows Server
4) Debian 11 (You are here)
+ If you’re utilizing Cloud Hosting, just get in touch with the 1Byte Support team and we’ll take care of everything for you.
+ If you apply this post to a service provided by a provider other than 1Byte, we will not guarantee that everything works as it should
PREREQUISITES
+ A running Debian 11 has been upgraded storage
+ Data should be backed up off-server (to another server or to cloud-based internet storage or to your local computer/ laptop), not only on the server you’re now using. Considering how easily it is to accidentally run wrong commands, choose wrong options that leads to delete everything off the hard drive by fiddling with it, it’s best to avoid doing so. Check out on our tutorial on how to backup and restore the cloud server on 1Byte here.
ADDITIONAL KNOWLEDGE
– `sda & `sdb` are the device name for the first SCSI (or SATA) disk attached to your system. Device names for hard drives and other storage devices in Linux follow a standard naming convention, and sda is the device name for the first disk, sdb is the device name for the second disk, and so on. You can consider they are a letter drive C, D, E in Windows system
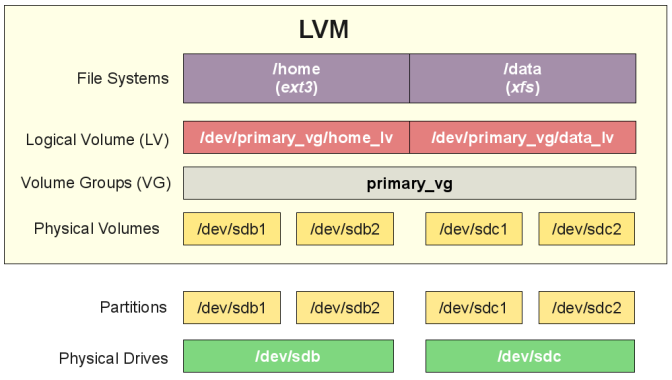
– `debian-vg` or `debian–vg-root` is a logical volume (LV) that is used by Debian to store the root filesystem. It is created from the physical storage devices that are available on your system, and it is used to store the root filesystem, which is the top-level directory that contains all the files and directories on your system.
– On Linux, data is typically stored on a `partition` or `logical volume`. A partition is a section of a physical storage device, such as a hard drive, that is used to store data. A logical volume, on the other hand, is a virtual storage device that is created from one or more physical storage devices.
WORKFLOWS
0) Check storage info of Debian
1) Backup important data (Tutorial on this link)
2) Create a new Physical Volume Partitions from Physical Hard Drive
3) Extend the Partition to the Volume Group that you want it to resize
4) Add Volume Group into Logical Volume
5) Now you can store Linux system file into Logical Volume
STEP-BY-STEP
0. Check Storage Info Of Your Server
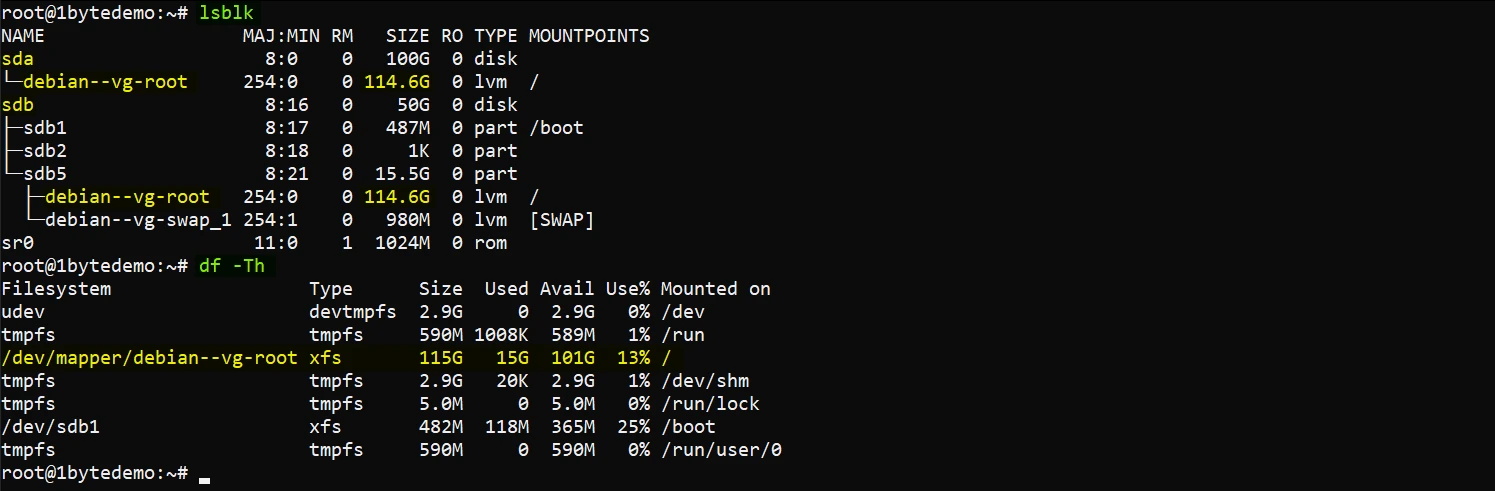
+ The `lsblk` command is used to list information about block devices on your system. When you run`lsblk`, it will display a list of all the block devices attached to your system, along with their device names, sizes, and other information
#Displays information about the block devices on your Server
lsblk
+ Let’s check out an example below
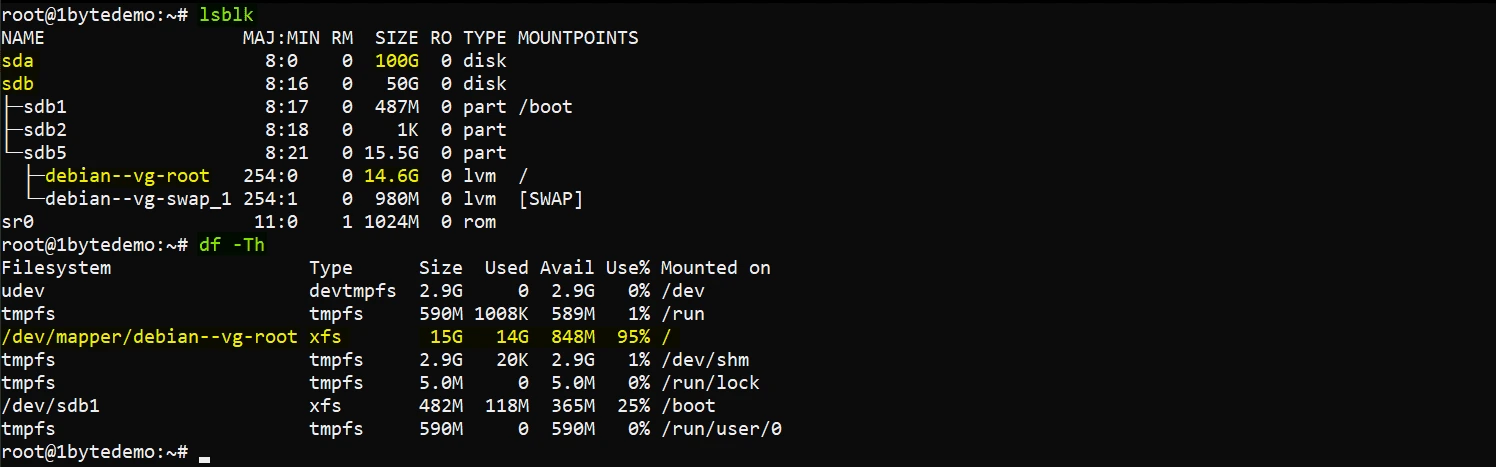
+ On the left image side shows an original Cloud Server. If you add the sdb1, sdb2 & sdb5 together, the total storage is 15GB. Formerly, the default storage disk will be assigned into sda partitions. But after the upgrade, it moved to sdb partitions.
+ On the left and right image side, after upgrading storage, a 114.6 GB increase has been added to the sda (physical hard drive).
+ However in the right image, we will attempt to make a sum of the sdbs (sdb1, sdb2, and sdb5) and sda with the new additional 100 GB. The total capacity is still only 50GB. So, How to make sda and sdb to symmetrically using the same disk space?
+ Another method to check storage on Linux is to use the `df -Th command. `df` stands for “disk free,” and it shows information about the file systems on your system, including the file system type, total size, used space, available space, and mount point. The `-T` option tells `df` to display the file system type, and the `-h` option tells it to display sizes in “human-readable” format (e.g., in MB or GB rather than in bytes).
#Displays information about the file systems on your Server
df -Th→ Through the above 2 commands, we can confirm that 1Byte has provided 150GB more storage for your server, but you still can’t use this storage block because you have not configured your Server to use this Storage, and you haven’t put this Storage to use yet
1. Backup important data on your Server
+ As mentioned in the Intro section, this article will not guide backup data because only you know what data is important, where the data is located to backup, …etc. We suggest you to reach out to another article here on how to backup and restore your server at this link.
2. Create A New Partition From The Disk
Once the partition is created, make it a physical volume (PV) for LVM:
sudo pvcreate /dev/sda # Or whatever partition disk was created

3. Extend Volume Group From Newly Created Partition
+ The ” vgs ” command provides volume group information in a configurable form, displaying one line per volume group
#Check logical volume info
vgs
→ We need to expand this volume more 250GB
#3.1 Expand volumne group
#3.3 Run `vgs` command again to check the result
vgs

#Remember to change your partition number as well as VG name correctly
vgextend debian-vg /dev/sda

#3.3 Run `vgs` command again to check the result
vgs
+Volume group debian-vg now is extend up to 250GB
3. Extend Logical Volume (LM) To Reach The Maximum Storage Of Volume Group
#Extend vgubuntu-root to /dev/sda
sudo lvextend -l +100%FREE /dev/debian-vg/root

#and resize it
sudo xfs_growfs /

#Verify Logical Volume again
lvs


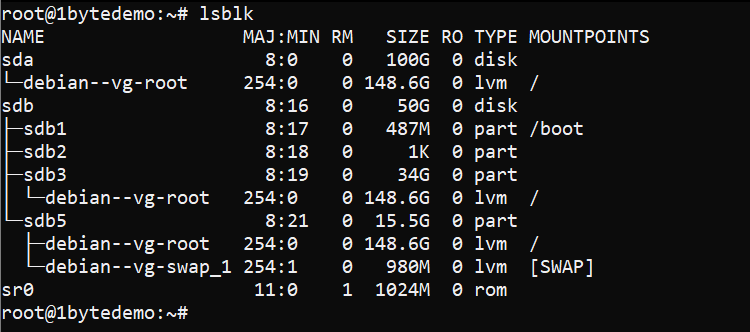
+ As you can see, we are successfully extend the volume of debian–vg-root from 15.56GB to 115.56GB
+ It looks like the logical volume (/dev/debian--vg-root) now includes space from the 100GB disk (sda), but we’re concerned about the remaining 35GB on sdb that hasn’t been used.
From above output:
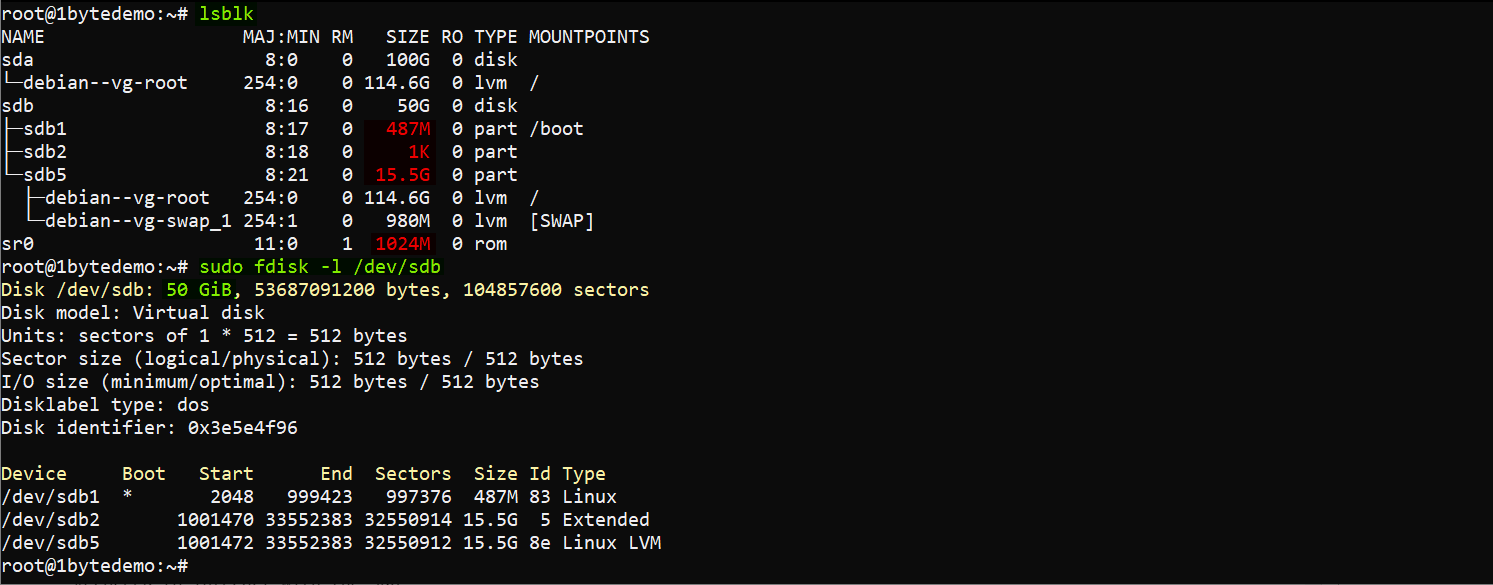
sdbis a 50GB disk.sdb1(boot partition) is 487MB.sdb5is 15.5GB, which includes the root and swap logical volumes.- That leaves 35GB of unallocated space on
sdbthat hasn’t been added to the volume group.
Steps to Add the Remaining 35GB on sdb:
Step 1: Check for Unallocated Space
First, verify that there’s unallocated space on sdb. You can use the fdisk command to check:
sudo fdisk -l /dev/sdb
This will show you the partition layout and confirm that the remaining 35GB is unpartitioned on the above image.
Step 2: Create a New Partition on sdb
You’ll need to create a new partition to use the remaining space on sdb.
Start fdisk for sdb:
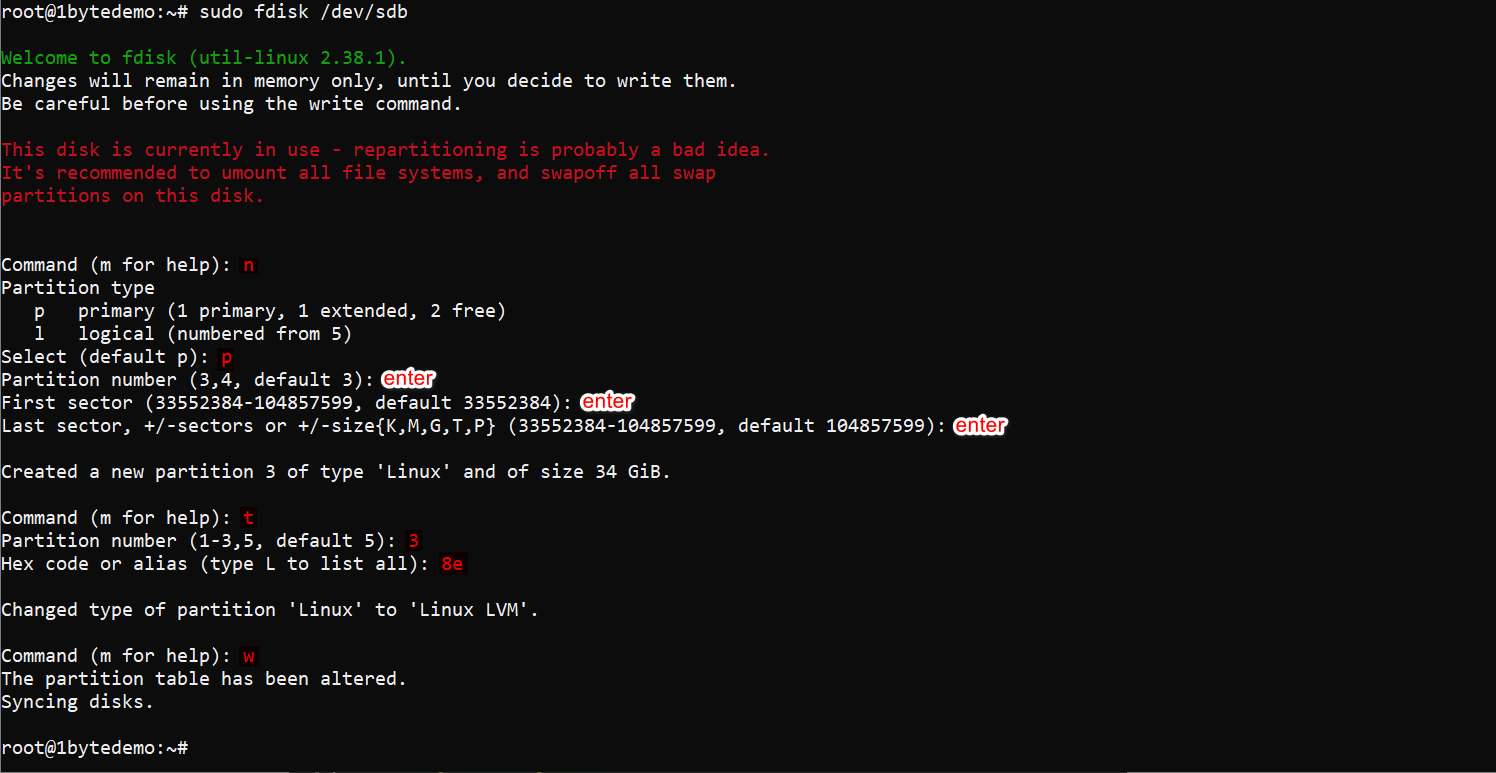
sudo fdisk /dev/sdb
Inside fdisk, create a new partition:
- Type
nto create a new partition. - Choose the partition type (
primaryorlogical). For LVM, you can use a logical partition. - Accept the defaults for the start and end sectors to use the remaining free space.
- Type
tto change the partition type, and set it to8efor LVM. - Type
wto write changes and exit.
NOTE:
+ It should be take a notice that in my case, my system created partition number 3 → sda3
+ It is possible for your case, the system will create another partition number (not sda3). It could be sda4, sda5, sda6,…etc
#Step 2:
#2.1: Press " t  " to switch partition type
#2.2: Press "partition number". In my case, partition number is 3 (sda3)
#2.3: Press " L  " to list all types of partition
#2.4: Press " 8e " to choose partition type is Linux LVM
Step 3: Create a Physical Volume on the New Partition
Once the partition is created, make it a physical volume (PV) for LVM:
sudo pvcreate /dev/sdb3 # Or whatever partition number was created

Step 4: Extend the Volume Group
Now add the new physical volume to your existing volume group (debian-vg):
sudo vgextend debian-vg /dev/sdb3

Step 5: Extend the Logical Volume
With the volume group extended, you can now extend the root logical volume to use this additional space:
sudo lvextend -l +100%FREE /dev/debian-vg/root

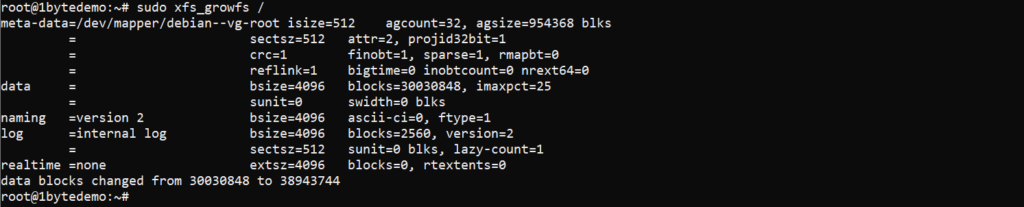
Step 6: Resize the Filesystem
Finally, resize the filesystem to use the newly extended logical volume:
sudo xfs_growfs /
+ Finally, run ” lsblk ” again to check whether the storage of debian–vg-root reach to 148.56GB or not?
FINAL WORDS
- If you read this far, congrats!!!
- For any questions or concerns during the installation process, don’t hesitate to get in touch with us
MORE REFERENCES
+ To get the latest promotions, events. Please check out this link
+ To get the fastest answer, the FAQ Page is the best place to look for
+ Keep up with 1Byte’s YouTube channel to make it simpler to comprehend
+ As always, 1Byte would bring you fresh content and exclusive deals in the future. STAY TUNED!!!