
Welcome back, in this tutorial I will instruct you on mounting your updated storage into CentOS Server. If you’re utilizing 1Byte’s Cloud Hosting, just get in touch with the 1Byte Support team and we’ll take care of everything for you. In case you’re not using CentOS, you may read the corresponding posts here.
4) Debian
Prerequisites
A running CentOS 7 has been upgraded to storage
Data should be backed up off-server (to another server or to cloud-based internet storage or to your local computer/ laptop), not only on the server you’re now using. Considering how easy it is to accidentally run wrong commands, and choose the wrong options that lead to deleting everything off the hard drive by fiddling with it, it’s best to avoid doing so.
FURTHER READING: |
| 1. VoIP Advantages and Disadvantages for Business |
| 2. Colocation vs Dedicated Server Hosting: Which Option Is Right for You? |
| 3. What Is a Dedicated Server? All You Need to Know |
Workflows
1) Check storage info
2) Backup important data (Related Article Here)
3) Create a new virtual partition from a virtual physical hard drive
4) Extend Volume Group (VG) to reach its maximum capacity storage
5) Extend Logical Volume (LV) to reach its maximum capacity storage
6) Check storage info again
Let’s Dive In
Step 1: Check Storage Info
- The `
lsblk` command is used to list information about block devices on your system. When you run`lsblk`, it will display a list of all the block devices attached to your system, along with their device names, sizes, and other information
#Displays information about the block devices on your Server
lsblk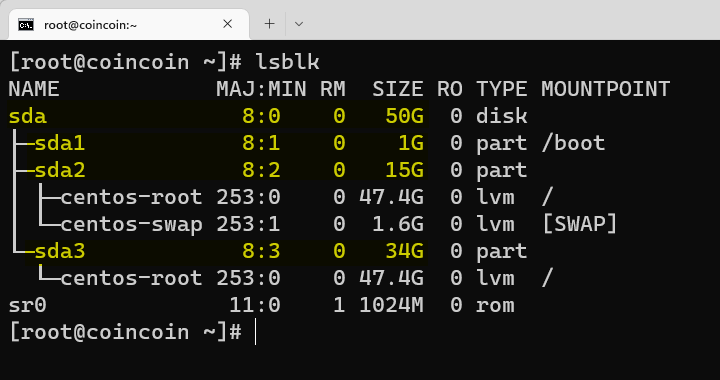
- On the left image side, only 1 virtual hard drive `
sda` is attached to your server. `sda1, sda2`, and `sda3` are virtual partitions that are divided from `sda` - If you sum up all `
sda1`, `sda2`, and `sda3`, the total storage is equal to `sda` and equal to 50GB
→ This means that your server has a total of 50GB of storage and all of this storage is put to use
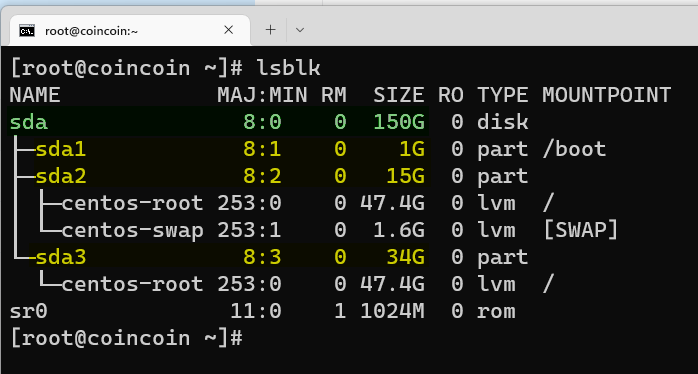
- Similar to the image on the left, this image on the right also has only one virtual hard drive `
sda`, and there are 3 partitions created from `sda` namely `sda1`, `sda2`, and `sda3` - This time, however, it is different from the picture on the left in that the total capacity of `
sda` is 150GB, while the sum of `sda1`, `sda2`, and `sda3` is only 50GB.
→ This proves that, after updating storage, your server has a total storage capacity of 150GB, but only 50GB is in use, and the remaining 100GB has not been put to use.
What is `centos-root`?
This refers to the root filesystem, which is the top-level directory in the file hierarchy of a Linux system. It is represented by a forward slash (/) and contains all the other directories and files on the system. The root filesystem is mounted at boot time and serves as the foundation for the entire file hierarchy.
Another method to check the storage on Linux is to use the `df -Th command. `df` stands for “disk free,” and it shows information about the file systems on your system, including the file system type, total size, used space, available space, and mount point. The `-T` option tells `df` to display the file system type, and the `-h` option tells it to display sizes in “human-readable” format (e.g., in MB or GB rather than in bytes).
#Displays information about the file systems on your Server
df -Th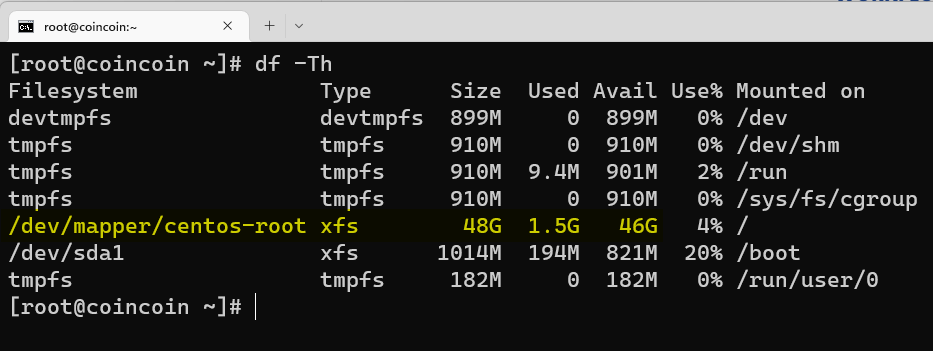
+ We don’t see any difference before and after updating storage. The `centos-root`still remains storage capacity of 50GB
→ This is further confirmation that 1Byte has increased your storage by 100GB, but you have not yet mounted this storage to your server, so your Server is only making use of 50GB.
Step 2: Backup your important data
+ In an effort to make this tutorial short and sweet, I won’t be covering how to back up your data. Since no one else but you could possibly know what data is crucial, where it is stored, etc.
+ However, we have tutorial on how to backup and restore your cloud server in case if your data has corrupted or lost by this tutorial.
Step 3: Create a new virtual partition from the virtual hard drive
+ `fdisk` command allows you to manage disk partitions on a virtual hard drive. With `fdisk`, you can create, delete, and modify virtual partitions on a virtual hard drive or other virtual storage device connected to your server.
NOTE: In this step, you need to read carefully and choose exactly as instructed below. Just making the wrong choice or wrong typos can ruin the mount storage process, possibly even corrupting and losing your data
#Proceed to interact with the virtual hard drive (sda)
fdisk /dev/sda
#3.1: Input " n " to create a new virtual parititon
n
#3.2: Input " p " to choose primary partition type
p
#Right after doing this, the system will create a new partitions,
#Please do remember this partition number
#3.3: Press " Enter " to get the new first sector. This will prevent overlap with existing sectors
#3.4: Press " Enter " to get the new last sector. This will prevent overlap with existing sectors
#3.5: Press " t " to define partition type
t
#3.6: Input "partition number". In step 3.2, the system created partition number 4 (sda4)
4
#3.7: Input " 8e " to choose partition type is Linux LVM
8e
#3.8: Input "w" (write) to save changes
w
Please check out the image below carefully to see how it looks in real action

NOTE:
+ At step 3.2: Initially, my server has 3 partitions (`sda1`, `sda2`, and `sda3`)
→ After inputting “p” in step 3.2, the system will automatically create a new partition `sda4`
→ Remember, the partition created will not always be partition 4 `sda4`
+ At step 3.6, You need to input the correct partition number that the system generated in step 3.2. If you choose the wrong partition number in this step, there is a high chance that the data stored in the old partitions will be deleted or damaged.
→ Please choose correctly
#3.9: Restart the server to update the change
reboot
#3.10: Login back to your server and rụn command `lsblk` to confirm the new virtual partition 4
lsblk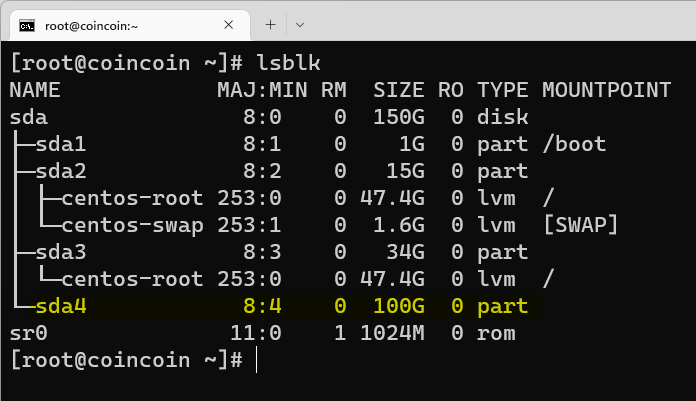
+ However, we are still unable to use partition 4 for three reasons:
1) We have not created a virtual “logical volume” from `sda4` partition.
2) We have not yet assigned that virtual “logical volume” of 100GB.
3) We have not yet attached `centos-root` to `sda4`.
Step 4: Extend the Volume Group (VG) to reach its maximum capacity storage
+ `centos-root` also known as `filesystem (/)` has format type `lvm` (logical volume manager)
→ This means that the data will be stored directly on the `logical Volume (LV)`, but `logical Volume (LV)` is created right inside `Volume Group (GV)` not on the partition
→ Therefore, we need to convert 100GB of `partition sda4` into 100GB `Volume Group (GV)` first, then after that, we convert 100GB in `Volume Group (GV)` to `Logical Volume (LV)`
→ In other words, we will grow the `Volume Group (GV)` to reach its maximum capacity storage, and after that extend the `Logical volume (LV)` reaches maximum storage as well
#Run command `vgs` to check the storage of Volume Group (VG)
vgs
#Run command `lvs` to check the storage of Logical Volume (LV)
lvs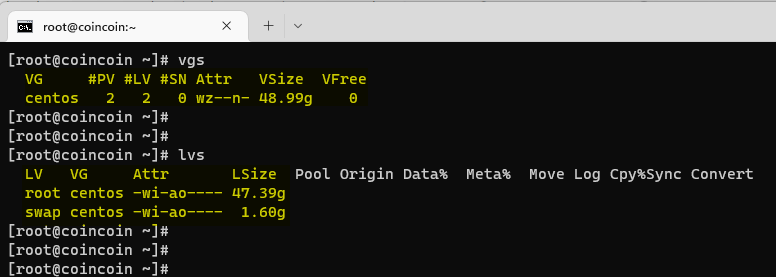
There is just one `Volume Group (GV)` named `centos`, with a current storage capacity of 48.99GB.
There are two `Logical Volumes (LVs)`, one called `root` with 47.39GB of storage and the other named `swap` with 1.60GB of storage.
Now we will proceed to extend the storage of `Volume Group (GV)` to reach its maximum capacity by running the command below
#Be sure to change the partition number correctly, in my case, the partition will be `sda4`
vgextend centos /dev/sda4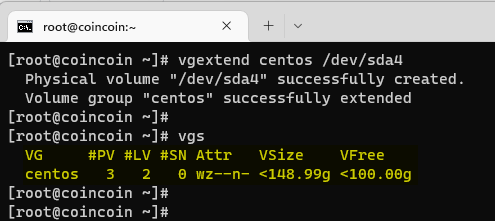
When you run the `vgextend` command, the virtual volume is added to the `volume group (VG)` and the size of the volume group increases to include the space on the virtual volume. This allows you to create additional logical volumes within the volume group or to extend existing logical volumes to use the additional space.
Initially, Volume Group centos were only 48.99 GB, now it is increased to 148.99 GB.
Step 5: Extend Logical Volume (LV) to reach its maximum capacity storage
Similar to step 4, instead of extending Volume Group (VG), now we will extend Logical Volume (LV) by running the command below
#Be sure to change the partition number correctly, in my case, the partition will be `sda4`
lvextend /dev/centos/root /dev/sda4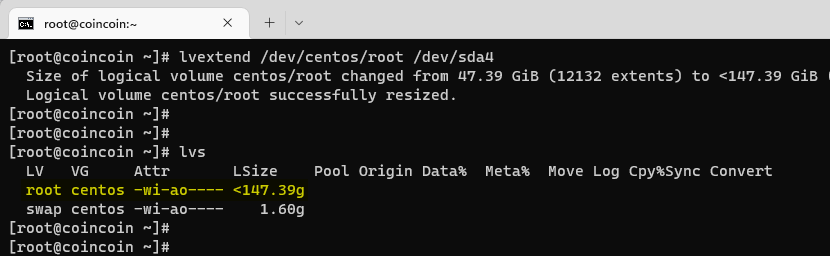
Initially, the Logical Volume root was only 47.39GB, now it is increased to 147.39GB.
#`xfs_growfs` is a utility that is used to resize an xfs file system.
xfs_growfs /dev/mapper/centos-root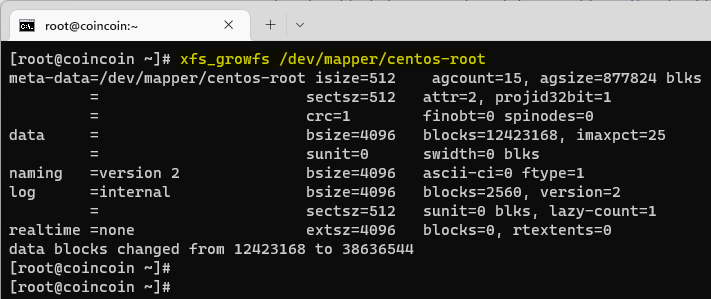
- `
/dev/mapper/centos-root` is the device file for the `xfs` file system. When you run the `xfs_growfs` command with this device file as the argument, the `xfs_growfs` utility will resize the file system to use the additional space on the underlying block device.
Step 6: Check storage info again
This step is the last step to check the results that we have achieved
#Displays information about the file systems on your Server
df -Th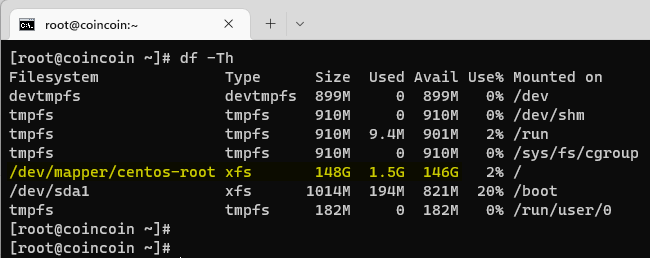
The picture on the left before executing the commands in Step 5, now the `centos-root` only has 48GB
And the picture on the right is executing the commands in Step 5, now `centos-root` has increased by 100GB, and its total storage capacity is 148GB
→ Mounted successfully
#Displays information about the block devices on your Server
lsblk
- In the picture on the left before executing the commands in Step 5, nothing is attached to the virtual partition `
sda4` - And the picture on the right is executing the commands in Step 5, now `
centos-root` has attached to virtual partition `sda4`
→ Mounted successfully
Final Words
You’ve made it this far, so congrats!!! Adding more storage to your CentOS server is now a piece of cake that you can do on your own. You can review our journey below to choose the right OS.