
The IP Blocker interface in cPanel allows you to block access to your site for one or more IP addresses or fully qualified domain names (FQDNs).

Block an IP address
To deny access to an IP address or range of IP addresses, perform the following steps:
Enter the IP address or range in the IP Address or Domain text box. You can enter IP addresses in any of the following formats:
Single IP address (for example,
10.5.3.33).Range (for example,
10.5.3.3-10.5.3.40).Implied range (for example,
10.5.3.3-40).CIDR format (for example,
10.5.3.3/32).Implied IP address (for example,
10.).
Click Add.
NOTE:
- If you enter IP addresses directly into the
.htaccessfile, enter them in CIDR format only. 10.as an implied IP address represents10.*.*.*, where each asterisk (*) represents a positive whole number. If you enter10., the system blocks access to any IP address that begin with10.
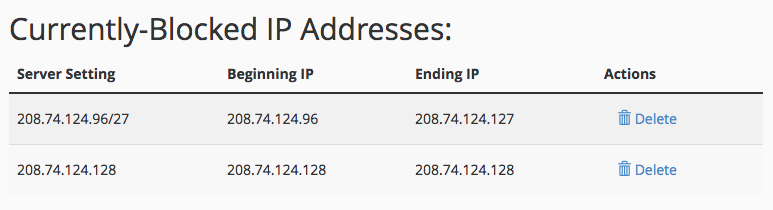
Currently-Blocked IP Addresses
The system separates the IP address ranges that you enter into subnets in CIDR format. Then, the system adds the addresses to the .htaccess file.
The interface lists blocked IP addresses and ranges in the table in CIDR format, where:
The server Setting represents the CIDR-formatted IP address range.
Beginning IP represents the begging of the range.
Ending IP represents the end of the range.
For example, if you enter the range 208.74.124.96-208.74.124.128, the Currently-Blocked IP Addresses table will appear similar to the following example:
Unblock an IP address
To remove an IP address from the list of blocked IP addresses, perform the following steps:
Click Delete in the Actions column for the appropriate IP address.
Click Remove IP.
Summing-up
That’s all for now, till then stay tuned and connected to 1Byte. Don’t forget to give your valuable feedback in the comments below. Like and share us and help us get spread.