INTRODUCTION
+ You have probably experienced the confusing situation when you:
1) Upgrade Cloud Server’ storage (purchase extra storage).
2) Change to another package with higher storage capacity than the original package
+ But you observe that your server’s storage capacity has not increased
→ Reason being, you have not mounted the additional storage that 1Byte provides.
+ This tutorial from 1Byte will instruct you on mounting your updated storage into Ubuntu server, applies to both version 20.04 and 18.04.
+ In case you’re not using Ubuntu, but rather Centos or Windows, you may read the corresponding posts here
1) Ubuntu (You are here)
2) CentOS
4) Debian
+ If you’re utilizing Cloud Hosting, just get in touch with the 1Byte Support team and we’ll take care of everything for you.
+ If you apply this post to a service provided by a provider other than 1Byte, we will not guarantee that everything works as it should
FURTHER READING: |
| 1. What is Live Streaming Server? How to Build and Should You Have One |
| 2. What Is a Hosted Solution? What You Need to Know |
| 3. Complete Guide To Build An eCommerce Website From Scratch |
PREREQUISITES
+ A running Ubuntu 18.04 or 20.04 has been upgraded storage
+ Data should be backed up off-server (to another server or to cloud-based internet storage or to your local computer/ laptop), not only on the server you’re now using. Considering how easily it is to accidentally run wrong commands, choose wrong options that leads to delete everything off the hard drive by fiddling with it, it’s best to avoid doing so.
ADDITIONAL KNOWLEDGE
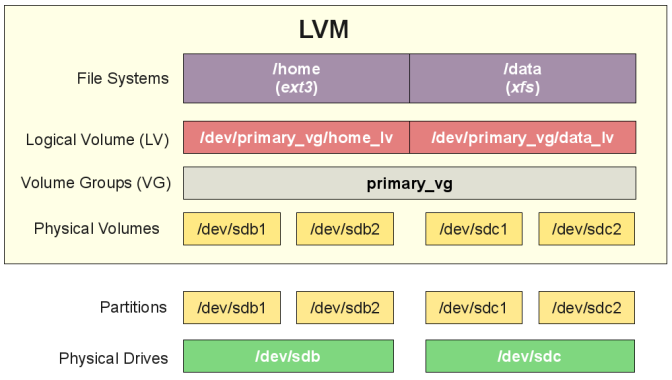
– `sda` or `sdb` are the device name for the first SCSI (or SATA) disk attached to your system. Device names for hard drives and other storage devices in Linux follow a standard naming convention, and sda is the device name for the first disk, sdb is the device name for the second disk, and so on. You can consider they are a letter drive C, D, E in Windows system
– `vgubuntu-root` or `ubuntu–vg-root` is a logical volume (LV) that is used by Ubuntu to store the root filesystem. It is created from the physical storage devices that are available on your system, and it is used to store the root filesystem, which is the top-level directory that contains all the files and directories on your system.
– On Linux, data is typically stored on a `partition` or `logical volume`. A partition is a section of a physical storage device, such as a hard drive, that is used to store data. A logical volume, on the other hand, is a virtual storage device that is created from one or more physical storage devices.
WORKFLOWS
0) Check storage info of Ubuntu
1) Backup important data (Tutorial article related to this link)
2) Create a new Partitions from Physical Hard Drive
3) Extend the Partition to the Volume Group that you want it to resize
4) Add Volume Group into Logical Volume
5) Now you can store Linux system file into Logical Volume
STEP-BY-STEP
0. Check Storage Info Of Your Server
+ The `lsblk` command is used to list information about block devices on your system. When you run`lsblk`, it will display a list of all the block devices attached to your system, along with their device names, sizes, and other information
sudo lsblk
+ Let’s check out an example below
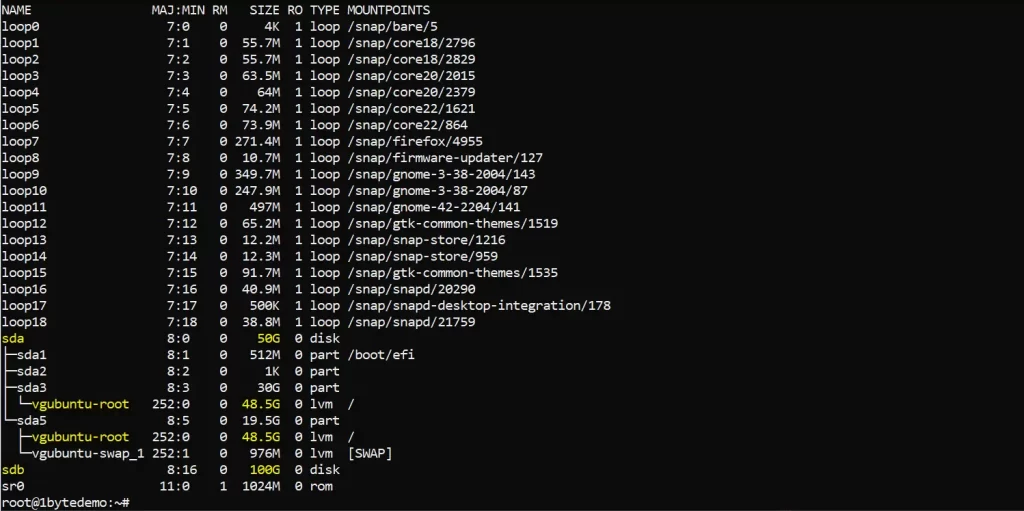
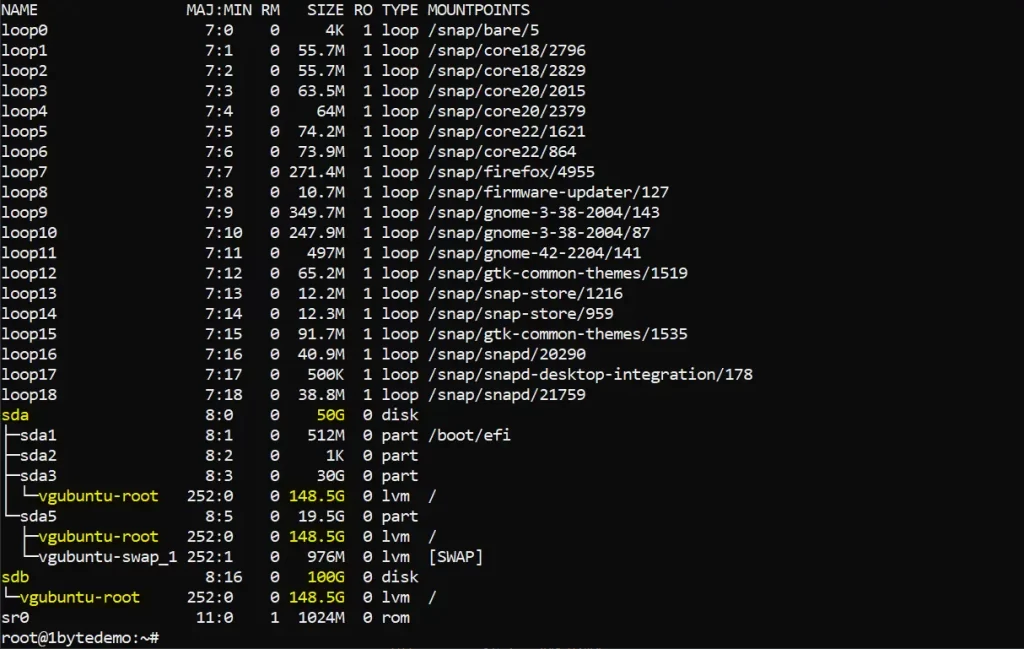
+ On the left image side shows an original Cloud Server. If you add the sda1, sda2,…,sda5 together, the total storage is 50GB
+ On the right image side, after upgrading storage, a 100GB increase has been added to the sdb (physical hard drive).
+ However in the right image, we will attempt to make a sum of the sdas (sda1, sda2, sda3, and sda5) and sdb with the new additional 100 GB. The total capacity is still only 50GB. So, How to make sda and sdb to symmetrically using the same disk space?
+ Another method to check storage on Linux is to use the `df -Th command. `df` stands for “disk free,” and it shows information about the file systems on your system, including the file system type, total size, used space, available space, and mount point. The `-T` option tells `df` to display the file system type, and the `-h` option tells it to display sizes in “human-readable” format (e.g., in MB or GB rather than in bytes).
sudo df -Th

→ Through the above 2 commands, we can confirm that 1Byte has provided 100GB more storage for your server, but you still can’t use this storage block because you have not configured your Server to use this Storage, and you haven’t put this Storage to use yet
1. Backup important data on your Server
+ As mentioned in the Intro section, this article will not guide backup data because only you know what data is important, where the data is located to backup, …etc. We suggest you to reach out to another article here on how to backup and restore your server at this link.
2. Create A New Physical Volume From The Disk
+ You will convert /dev/sdb into a physical volume for use in LVM.
+ Using ” pvcreate ” command is used to create Physical Volume partitions on the hard drive
+ And the hard drive we need to interact is sdb. Then run the command below
sudo pvcreate /dev/sdb

+ Using ” pvs ” command to verify the physical volume creation:
sudo pvs
+ You should see something like this:

3. Extend Volume Group From Newly Created Partition
+ The ” vgs ” command provides volume group information in a configurable form, displaying one line per volume group
vgs
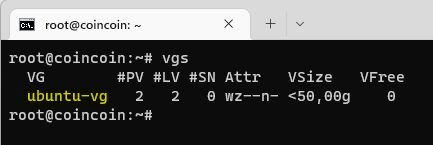

+ Note:You need to pay attention to what this VG name is, each version will have a different name
+Volume group `vgubuntu` now only has 49.50GB, while `ubuntu-vg` has 50.00GB
→ We need to expand this volume more 100GB
sudo vgextend vgubuntu /dev/sdb

+ Verify Volume group of /dev/sdb again

+ This means that your volume group now has a total of 150GB of space (50GB from the original disk and 100GB from the new one).
3. Extend Logical Volume (LM) To Reach The Maximum Storage Of Volume Group
sudo lvextend -l +100%FREE /dev/mapper/vgubuntu-root

sudo lvs sudo: This runs the command as a superuser.lvextend: This is the command to extend a logical volume.-l +100%FREE: This tells the system to extend the logical volume by 100% of the available free space in the volume group. The+100%FREEmeans, “use all the unallocated free space” within the volume group without needing to specify an exact size./dev/mapper/vgubuntu-root: This is the logical volume path that you are extending (vgubuntuis the volume group, androotis the logical volume name).- Use Case: The
+100%FREEoption is particularly useful when you don’t know how much free space is available in the volume group and want to allocate all remaining space to the logical volume. It automatically uses all available free space without needing to specify the exact number.


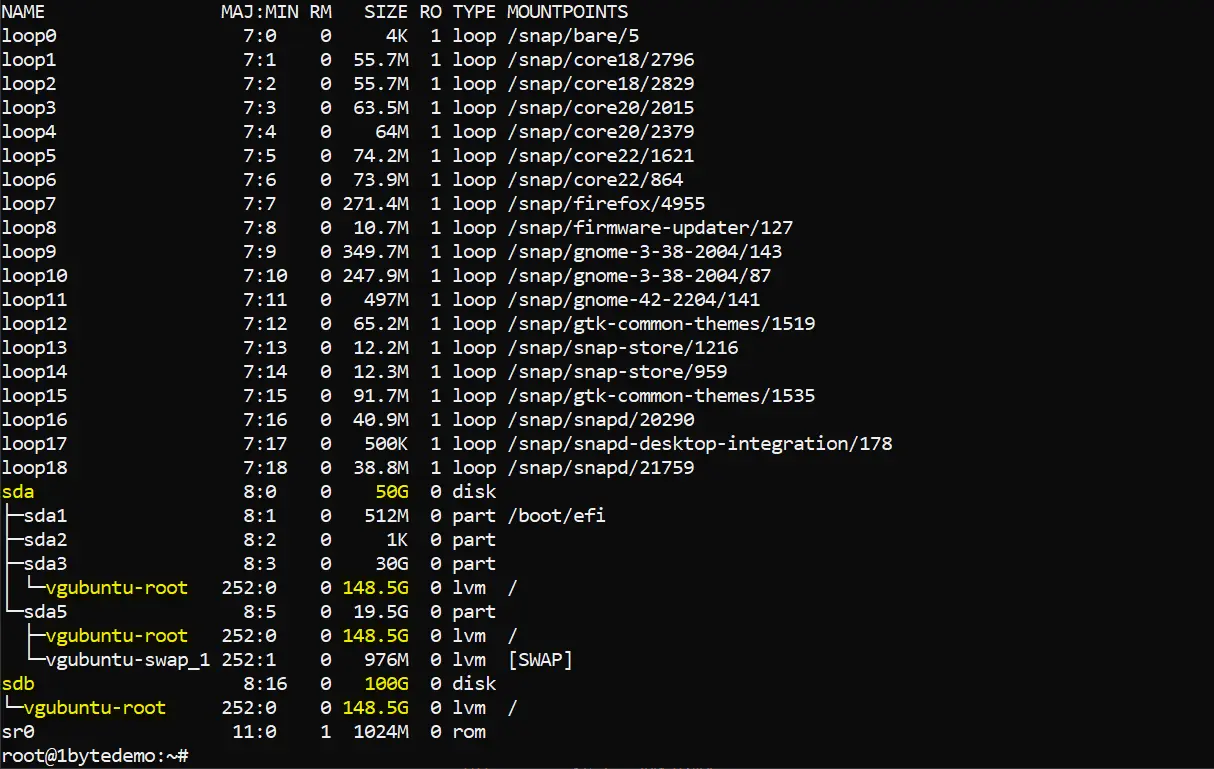
+ As you can see, we are successfully extend the volume of vgubuntu-root from 48.51GB to 148.54GB
+ Now that we have extended the logical volume, the final step is to resize the file system to take advantage of the additional space.

+ Finally, run ” lsblk ” again to check whether the storage of vgubuntu-root reach to 148.54GB or not?

FINAL WORDS
+ If you read this far, congrats!!!
+ For any questions or concerns during the installation process, don’t hesitate to get in touch with us
Leverage 1Byte’s strong cloud computing expertise to boost your business in a big way
1Byte provides complete domain registration services that include dedicated support staff, educated customer care, reasonable costs, as well as a domain price search tool.
Elevate your online security with 1Byte's SSL Service. Unparalleled protection, seamless integration, and peace of mind for your digital journey.
No matter the cloud server package you pick, you can rely on 1Byte for dependability, privacy, security, and a stress-free experience that is essential for successful businesses.
Choosing us as your shared hosting provider allows you to get excellent value for your money while enjoying the same level of quality and functionality as more expensive options.
Through highly flexible programs, 1Byte's cutting-edge cloud hosting gives great solutions to small and medium-sized businesses faster, more securely, and at reduced costs.
Stay ahead of the competition with 1Byte's innovative WordPress hosting services. Our feature-rich plans and unmatched reliability ensure your website stands out and delivers an unforgettable user experience.
As an official AWS Partner, one of our primary responsibilities is to assist businesses in modernizing their operations and make the most of their journeys to the cloud with AWS.
MORE REFERENCES
+ To get the latest promotions, events. Please check out this link
+ To get the fastest answer, the FAQ Page is the best place to look for
+ Keep up with 1Byte’s YouTube channel to make it simpler to comprehend
+ As always, 1Byte would bring you fresh content and exclusive deals in the future. STAY TUNED!!!

