

PrestaShop is an eCommerce platform that specializes in the development of e-commerce sites. Its purpose is to assist you in creating a stylish, fast online store. In this tutorial, 1Byte will show you how to deploy a LAMP-based PrestaShop store on a CentOS 7 server instance.
Prerequisites
1. Domain name
Here are some reasons why you must have a domain name:
- When purchasing Cloud Server, you need a domain name to connect to the hosting.
- Without a domain name, you can not install SSL Certificate on it
- When you put your website into business, how do customers know what your website’s name is to access?
→ A domain name is a MUST
→ If you do not have a domain name, consider visiting 1Byte to buy it
2. Cloud Server
+ Because you have full root access, you can install PrestaShop framework entirely, whereas this is not possible with Shared Hosting.
→ If you do not have one, you can buy it directly at Cloud Server
3. Deploy and logged in to your Server
To be able to install packages in the easiest and most standard way. You need to use terminal
→ Logged in to your Cloud Server
NOTE:
If your Cloud Server was previously used to host a website. Then 1Byte encourages you to:
- Backup all data (if necessary)
- Reinstall Cloud Server
You may ask why?
→ Because there is a significant likelihood that previously installed packages and frameworks may conflict with the packages and frameworks that are about to be installed
Let’s Get Your Hands wet
Step 1: Login into your Server
Log in to Cloud server by terminal
Step 2: Update the system
Regardless of what we decide to do, we should first make sure that all of our packages is up to date.
sudo yum update -yNext, we need to install nano, unzip, and wget packages. We will need these commands later on
- Nano: a command-line-based text editor
- Unzip: a command is used to unpack zip files
- Wget: a free and open-source software package for retrieving files using HTTP, HTTPS, and FTP
sudo yum install nano -y
sudo yum install unzip -y
sudo yum install wget -y
By default, SELinux is enabled on a default CentOS 7 system. We recommend disabling SELinux on your system to prevent any security conflicts. You can disable SELinux by editing the /etc/selinux/config file
nano /etc/selinux/config
- Find the following line:
SELINUX=enforcing - Then, replace it with the following line:
SELINUX=permissive - Next, use combined-key Clrl + O to save and Ctrl + X to close the file.
- Finally, restart your system to apply the changes.
sudo rebootIn order for PrestaShop to function correctly, you need to set up the LAMP stack on your machine before you can deploy and use PrestaShop. In the following steps, I will show you how to install and configure Apache, MariaDB, and PHP.
NOTE:
LAMP stands for Linux, Apache, MySQL, and PHP. Together, they provide a proven set of software for delivering high-performance web applications
Step 3: Install and configure Apache
sudo yum -y install httpdNOTE:
In case you cannot install httpd as shown below
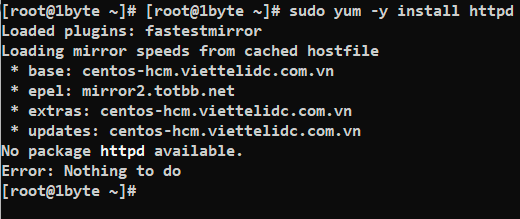
Don’t worry, This could be because the repository package of HTTP has been excluded to another place. This leads to you not being able to run “yum install httpd”
(If you did not run into a problem like this, please skip)
To fix this, please do as follow:
nano /etc/yum.conf
- As you can see, you cannot install the “httpd” package because it is currently excluded
- Ok we know the reason, now we just need to remove “httpd” from “exclude” line
- By the way, we also have to remove “mariadb” and “php” from “exclude” line too.
→ Because later on, we need to install PHP and MariaDB
Please make sure that the file yum.conf has been modified correctly as shown below
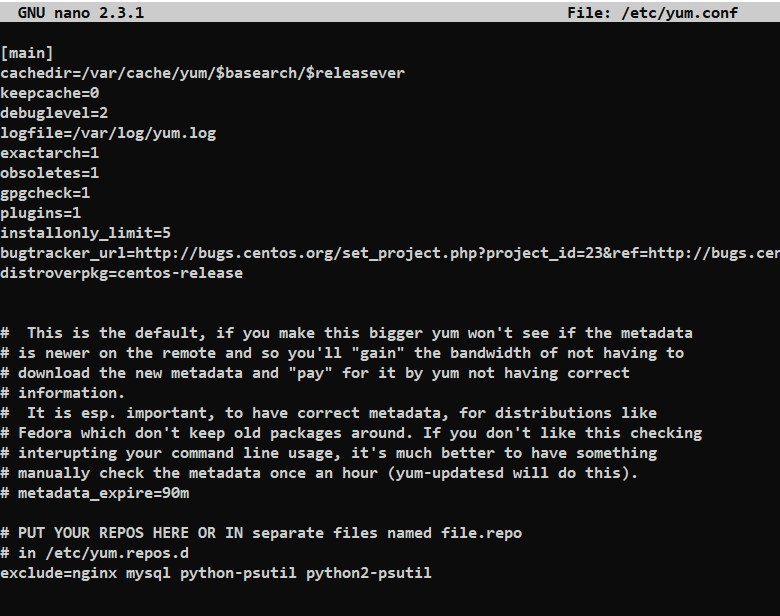
- As always, use combined-key Clrl + O to save and Ctrl + X to close the file.
- Ok let’s install httpd package again by running this command
yum clean all && yum update -y && yum install httpd -yEND OF FIXING INSTALL HTTPD WHEN GET ERROR!!!
Back to the road, if there is no error when installing httpd, please follow the steps below:
sudo systemctl start httpd
sudo systemctl enable httpd
sudo systemctl status httpd
Modify the current firewall rules so that visitors can access your online store:
sudo firewall-cmd --zone=public --permanent --add-service=http
sudo firewall-cmd --reload
sudo firewall-cmd --list-services
Step 4: Install and configure MariaDB
Install MariaDB and set it to automatically start after the system reboot:
sudo yum install mariadb mariadb-server -y
sudo systemctl start mariadb.service
sudo systemctl enable mariadb.service
sudo systemctl status mariadb.service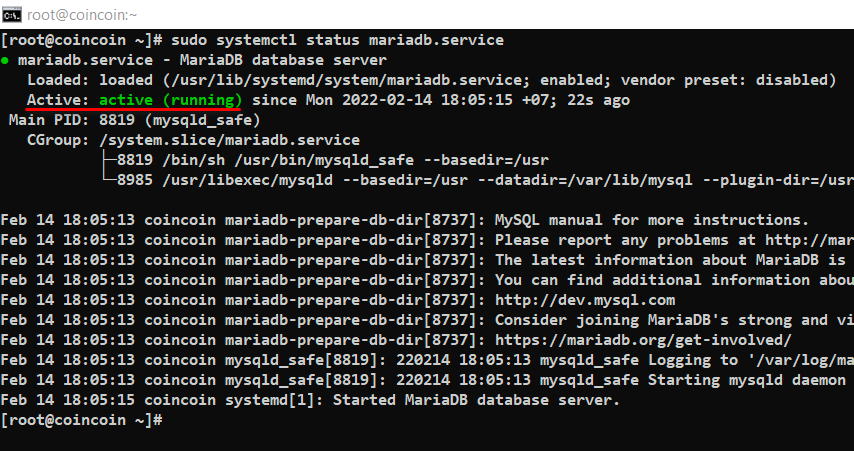
Execute the secure MySQL installation process:
sudo /usr/bin/mysql_secure_installationGo through the process in accordance with the instructions below:
Enter current password for root (enter for none): Press the Enter key
Set root password? [Y/n]: Input Y, then press the Enter key
New password: Input a new root password, then press the Enter key
Re-enter new password: Input the same password again, then press the Enter key
Remove anonymous users? [Y/n]: Input Y, then press the Enter key
Disallow root login remotely? [Y/n]: Input Y, then press the Enter key
Remove test database and access to it? [Y/n]: Input Y, then press the Enter key
Reload privilege tables now? [Y/n]: Input Y, then press the Enter key
NOTE:
- In these steps above, you must remember the root user’s password in order to access the database.
- Current password for root = password of root to connect to your server
- Set root password = password of root to connect to your database
END OF NOTING
Now, log into the MySQL shell so that you can create a dedicated database for PrestaShop:
mysql -u root -p
Then setup the PrestaShop database using the following commands
CREATE DATABASE prestashop;
GRANT ALL PRIVILEGES ON prestashop.* TO 'prestashopuser'@'localhost' IDENTIFIED BY 'yourpassword' WITH GRANT OPTION;
FLUSH PRIVILEGES;
EXIT;
Step 5: Install PHP and required extensions
Install PHP and required extensions using the yum command:
sudo yum install httpd mariadb-server php php-cli php-bcmath php-mysqli php-gd php-pdo php-xmlrpc php-intl php-posix php-json php-curl php-zip unzip -yAfter installing all the required packages, edit the php.ini file and change some default settings:
nano /etc/php.iniChange the following lines corresponding to the values in the figure below:
TIP BEFORE EDITING:
When working with nano, to find navigate to a certain keyword, use Ctrl + W, then type the keyword to find, and finally just press Enter (basically, it works like you press Ctrl + F to file a keyword in your browser, or in Microsoft Word Office)
→ The nano will automatically move the mouse pointer to the location containing that keyword
max_input_vars = 3000
post_max_size = 64M
upload_max_filesize = 64M
max_execution_time = 600
memory_limit = 256M


NOTE:
Please make sure to press Ctrl + O to save and Ctrl + X to quit
END OF NOTTING
Put all of the configuration changes into effect:
sudo systemctl restart httpd mariadbStep 6: Create a web root and download the PrestaShop archive
Create web root “prestashop”
mkdir /var/www/html/prestashop
cd /var/www/html/prestashop
→ After this, all website-related data such as plugins, themes, files, …etc will be put in this directory
Download the latest stable version of PrestaShop, which is 1.7.8.3 as of writing:
sudo wget https://www.prestashop.com/download/releases/prestashop_1.7.8.3.zip
ls -l
- For future reference, you can always find the URL of the latest download from the PrestaShop official website.
- Now we need to
unzipto uncompress the archive
unzip prestashop_1.7.8.3.zip
ls -la
NOTE:
Please do not delete or unzip the file “prestashop.zip“. Because this file will be used when installing PrestaShop in the browser (Part 2)
END OF NOTTING
Setup the proper ownership for all of the files and directories in the archive, then move them to the web root directory:
chown -R apache:apache /var/www/html/prestashopStep 7: Remove the default page and configure apache to accept PrestaShop site
nano /etc/httpd/conf.d/prestashop.confAfter running the above command, please paste the following lines into prestashop.conf
<VirtualHost *:80>
    ServerAdmin [email protected]
    ServerName hobbykh.fun
    ServerAlias *.hobbykh.fun
    DocumentRoot /var/www/html/prestashop

    <Directory /var/www/html/prestashop>
        Options +FollowSymlinks
        AllowOverride All
        Require all granted
    </Directory>

    ErrorLog /var/log/httpd/prestashop-error_log
    CustomLog /var/log/httpd/prestashop-access_log common
</VirtualHost>
NOTE:
Remember that change the value at:
- ServerAdmin into your webmaster email
- ServerName to your domain name
END OF NOTTING
Step 8: Visit your server from a web browser
http://[your-server-IP]/
8.1 – Let’s start by installing yum-utils
yum install yum-utils -y8.2 – Let’s download Remi repo
yum install http://rpms.remirepo.net/enterprise/remi-release-7.rpm -y8.3 – We will now run the commands to install PHP version 7.4
yum-config-manager --enable remi-php748.4 – Refresh the repository and restart the httpd service
yum update -y
systemctl restart httpd
8.5 – Let’s check our PHP version
php --version
8.6 – Visit your server again via a web browser
http://[your-server-IP]/
Ok now we just need to back our terminal and install the so-called PHP zip extension
yum install php-zip -y
systemctl restart httpd8.7 – Comeback our server in the web browser again

As you can see, everything turned out perfectly. The PrestaShop wizard will automatically install it on your server. All you need to do now is enjoy a cup of tea.
Once the installation is done, we’ll be… well, the post is already too long. Therefore, I would like to pause here and see you in Part 2