
Your website runs perfectly on localhost (only you can access your website), but now you want your friends, coworkers, and everybody to be able to see your achievement. Alternatively, you may have been dissatisfied with current hosting providers and now wish to try out 1Byte’s web hosting service.

How to Easily Upload Your Website With aaPanel on 1Byte?
1) Web Hosting or Cloud Server
→ In this tutorial, I will be using Cloud Hosting + aaPanel
(If you want to upload your website to Shared Hosting, please check this POST)
2) Domain name
→ A domain name is required for Web Hosting. If you don’t have a domain, purchase here.
3) Your website data

10 Steps to Easily Upload Your Website With aaPanel?
Step 1: Config your domain point to your Cloud Hosting
- Go to User Dashboard
- Select Domain at the left menu bar
- Select the Manage button at the domain you want to point
- At the Nameserver section, choose Basic DNS and Save changes

- Navigate to DNS Management section
- Click ADD NEW RECORD and choose A Record on the drop-down list
- Put the value of the Host field and Value field as in the image below

Finally, click Save
Step 2: Login into your aaPanel of Cloud Hosting
- Go to User Dashboard
- Navigate to the Cloud Hosting option on the left menu bar
- Choose aaPanel to login inside its dashboard

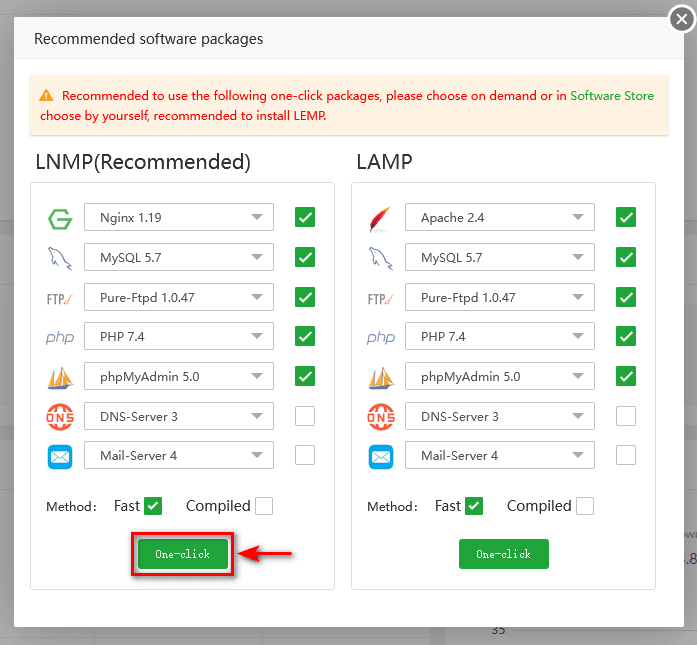
Step 3: Install LNMP one-click installation package
Installing the LNMP one-click installation package will be recommended to you when you log in to aaPanel.
NOTE:
In case you accidentally turned off this suggestion, you can still reinstall the following packages by doing follow steps
- Go to App Store section
- In the Search App, type the packages that you want to install
- The packages LNMP includes NGINX, MySQL, PHP, phpMyAdmin
- Select the version you want, then click Install to begin the installation process

Step 4: Creating a web root (directory to store all your website data)
- Go to Website section
- Click on Add site button
- Add your domain name in the Domain name field (Note: It’s important to include your domain name with and without www)
- Click Submit to finish


Step 5: Uploading your website data into the web root
- Go to the Files section
- Be sure that you go inside your web root path
- Remove all files inside your web root directory

- Click the Upload button to upload your website data
- Specify the absolute path of your website data
- Proceed to Upload

Finally, unzip this compressed file

Step 6: Checking if your website is up or not?
You need to type your domain name in the browser’s URL field

Why not take a look around at these sites?)

Step 7: Creating a database for this website
- Go back to the aaPanel Dashboard
- Navigate to the Databases section on the left menu bar
- Click on Add Databases button
- Name the database, set up an account for this database
- Click on Submit to finish

Because we will later use this information to configure the connection in the php file)

Step 8: Import your website’s database into the Cloud Hosting via aaPanel
In Databases section, click on phpMyAdmin so that you can log in to phpMyAdmin Dashboard

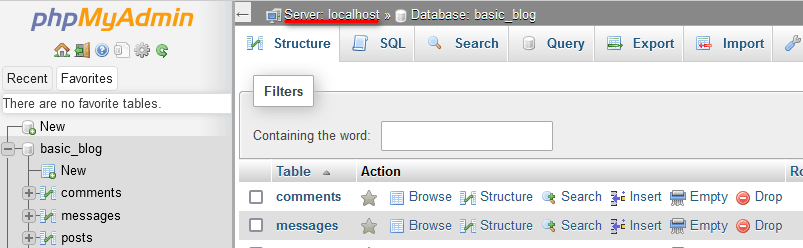
After logging inside the phpMyAdmin dashboard, choose your database name, click Import and Import your mysql file (database file)
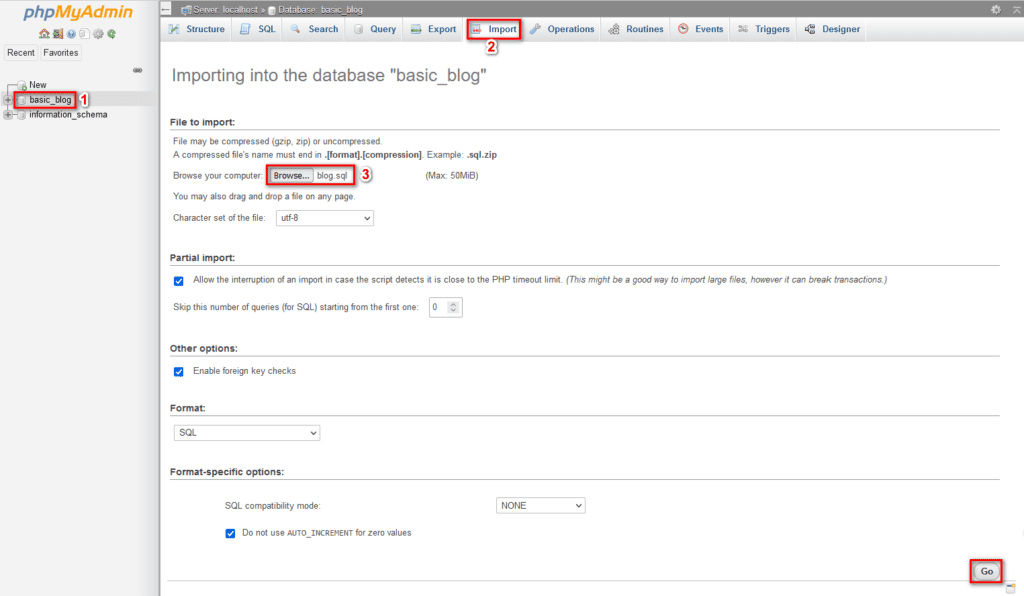
This file contains all of the website database’s data, and we will now import it into phpMyAdmin on aaPanel – Cloud Hosting)

Step 9: Configure your php file to connect this database
You must first know the following information before proceeding with this step.
1) What port does phpMyAdmin use?
2) Which php file should be used to establish a connection to MySQL?
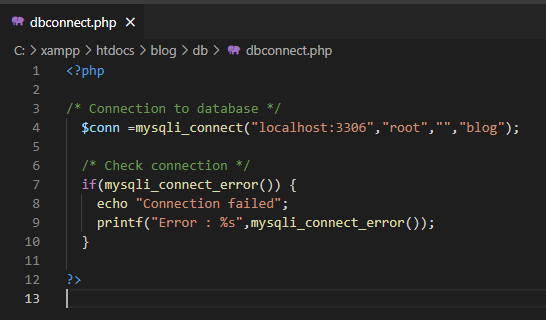
However, the information in the image below is for connecting to a local database, not for Cloud Hosting.
As a result, we must modify this information. )
3) What is the name, username, password of the database (already in Step 7)?
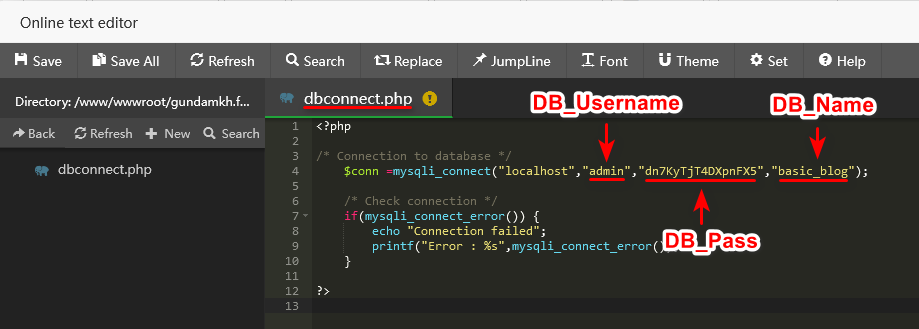
- DB_Name: basic_blog
- DB_User: admin
- DB_Password: dn7KyTjT4DXpnFX5
→ We will use these info to adjust in the file dbconnect.php
After you’ve gathered all of the necessary information, we’ll return to the aaPanel Dashboard, navigate to the Files section, and locate the php file used to connect to phpMyAdmin.
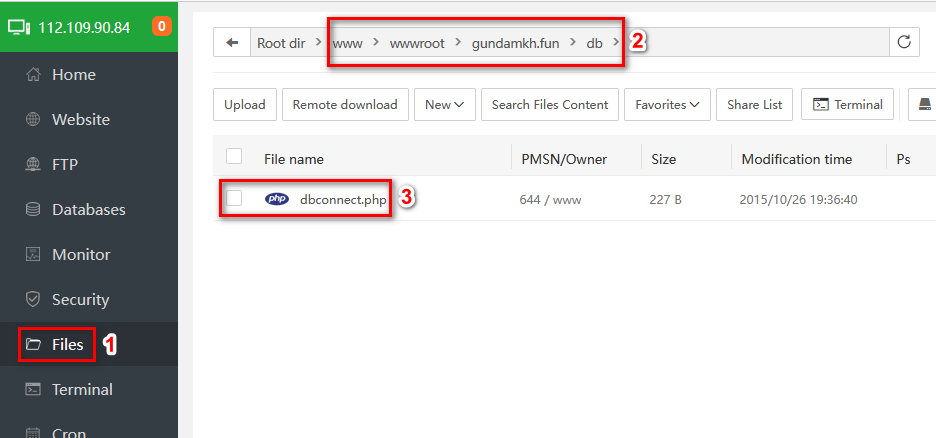
And we need to update the information in this file)
- Double click to the file so that you can open text editor online
Step 10: Rechecking your website again
This step is similar to Step 6, access your domain name on the URL bar to check
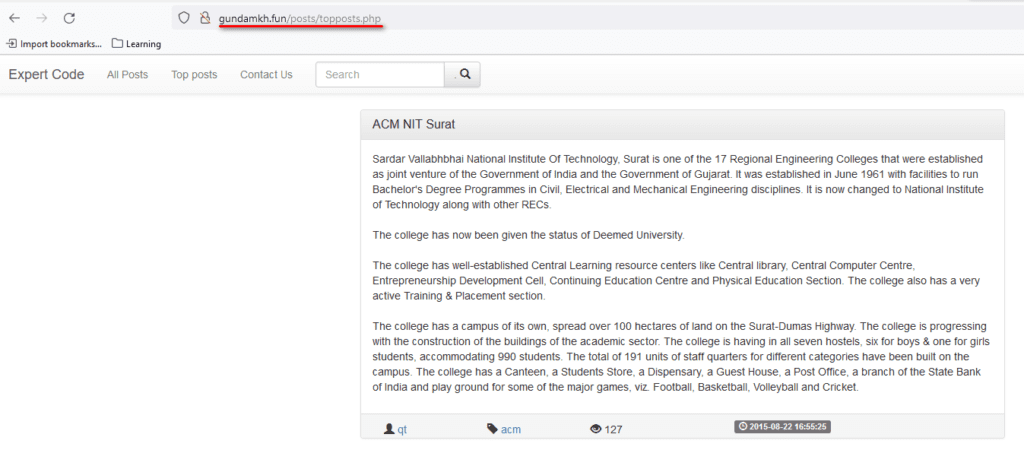
As well as you will no longer see the error message when connecting to MySQL)
Conclusion
Congratulations! You have successfully uploaded your website using aaPanel. Keep in mind that specific steps may vary slightly depending on your hosting provider and the version of aaPanel you’re using. If you encounter any issues during this process, refer to aaPanel’s documentation or contact your hosting provider’s support for assistance.