
You have probably experienced a confusing situation when you: 1) Upgrade Cloud Server’ storage (purchase extra storage). 2) Change to another package with higher storage capacity than the original package. But you observe that your server’s storage capacity has not increased. So the Reason is, you have not mounted the additional storage that 1Byte provides.
The Overview
This tutorial from 1Byte will instruct you on mounting your updated storage into 1Byte’s Cloud Server. If you’re utilizing 1Byte’s Cloud Hosting, just get in touch with the 1Byte Support team and we’ll take care of everything for you.
Each operating system has its own unique mounting approach. In order to keep the tutorial from becoming too lengthy. To make it easier to digest, I’m going to break it down into five sections.
1) Before starting (You are here!!!)
3) CentOS 7
4) Debian
Additional Knowledge
In the context of disk space management in Linux on the cloud, the hierarchy of disk entities is generally similar to the hierarchy of disk entities on a local machine. The main difference is that, on the cloud, the physical disks are not directly connected to your local machine, but rather they are connected to a remote server or cluster of servers that are running your cloud environment.
1) `Physical disks` are the actual physical disks that are connected to the servers running your cloud environment. They can be hard disks, solid-state drives, or other types of storage devices. `sda` is the device name for the first SCSI (or SATA) disk attached to your system. Device names for hard drives and other storage devices in Linux follow a standard naming convention, and sda is the device name for the first disk, `sdb` is the device name for the second disk, and so on. You can consider they are a letter drive C, D, E in the Windows system
2) `Partitions` are sections of physical disks that are set aside for a specific purpose. A physical disk can be divided into multiple partitions, each of which can be used for a different purpose.
3) `Volume Groups` is a logical container that can hold one or more logical volumes. It is used to manage disk space in a logical manner, allowing you to create, delete, resize, and move logical volumes as needed
4) `Logical volumes` are virtual partitions that are created within a volume group. It is used to divide the available space in a volume group into smaller, more manageable chunks. It is created from the physical storage devices that are available on your system, and it is used to store the root filesystem, which is the top-level directory that contains all the files and directories on your system.
5) On Linux, data is typically stored on a `partition` or `logical volume`. A partition is a section of a physical storage device, such as a hard drive, that is used to store data. A logical volume, on the other hand, is a virtual storage device that is created from one or more physical storage devices.
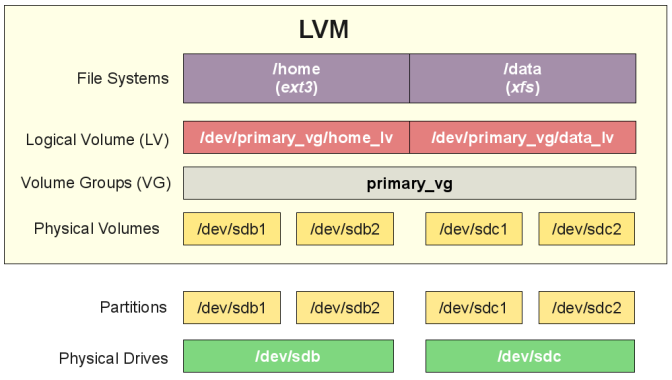
It’s worth noting that this hierarchy is just one way of organizing disk space in Linux on the cloud, and it’s possible to use volume groups, logical volumes, and partitions in different combinations depending on your needs. However, this is a common way of organizing disk space in the cloud, and understanding the hierarchy can be helpful in understanding how these different disk entities work together.
Workflows
- Check the storage info of your Server
- Backup important data (I will skip this step)
- Create new Partitions from Physical Hard Drive
- Extend the Partition to the Volume Group that you want it to resize
- Add Volume Group into Logical Volume
- Now you can store Linux system files in Logical Volume
Final Words
By this point in this journey, you should have a basic understanding of the Linux disk entity hierarchy, as well as know the workflow to mount storage. In the coming posts, I’ll demonstrate to you step by step each type of OS that 1Byte supports. Please check out the OS you are using below and see you soon!!!