
In this post, we’ll walk you through the basics of using cPanel, from configuring your domain name to quickly setting up a website. There are a number of useful tips and tactics that we’ll pass on to you as we go along the route.

Ready? Let’s get this party started!
4 Steps to Manage Your Domains and Sub-Domains on cPanel
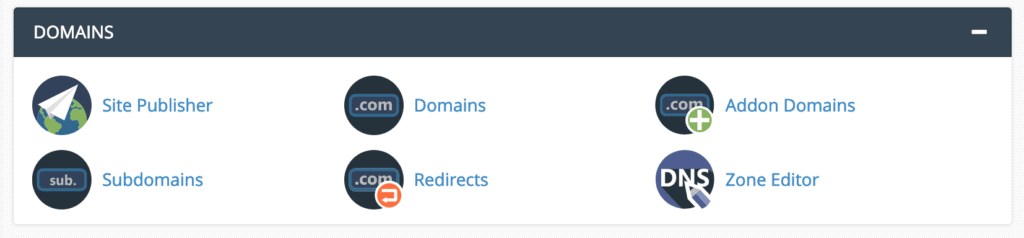
The “DOMAINS” area of cPanel is where you’ll go to add a new domain name (the one you just purchased) to your hosting account, manage existing domains, and create subdomains.
FURTHER READING: |
| 1. What and How to Setup Redirect Domain? |
| 2. Domain Privacy Protection: 7 Reasons Why You Need It |
| 3. WHOIS Service for Better Domain Privacy Protection |
1. Adding a new Domain Name
To add a domain name to your cPanel (and hence to your hosting package), navigate to the “DOMAINS” section displayed above and click on “Addon Domains.” An addon domain is a fancy term for a normal domain name that you may use to establish a fully working website — in other words, you can manage numerous domain names from the same control panel. You’ll be prompted to input your new domain name and a few more settings on the “Addon Domains” screen:
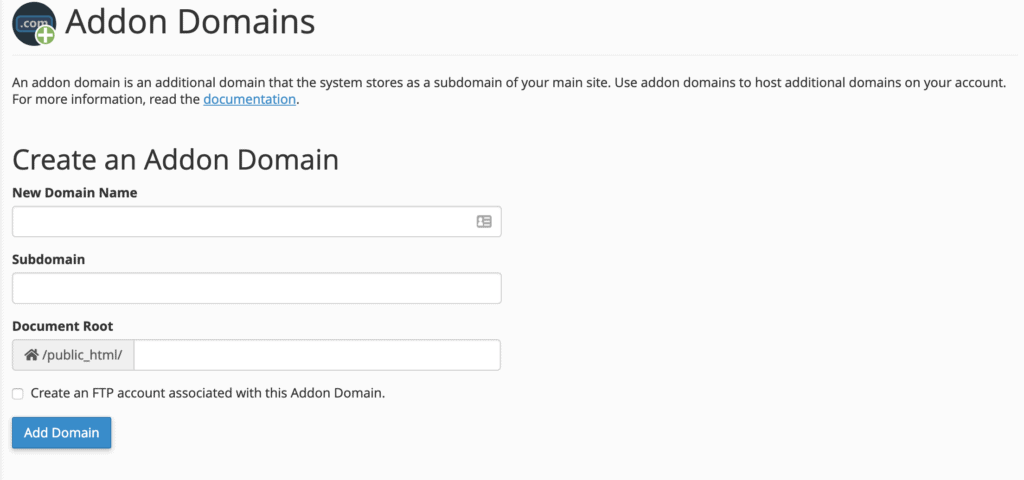
- New Domain Name – The exact domain name that you’ve registered – minus the
www.part. - Subdomain – This will be filled out automatically as soon as you enter your new domain name into the field above. It’s best to leave that intact. cPanel uses this for some internal routing that doesn’t have much relevance from a user point of view.
- Document Root – The location on the server where your new domain’s files will be. This is also filled out automatically. It’s best to stick with these recommended settings.
Click on “Add Domain” to finish up.
2. Editing/ Removing your Domain Name
On the same “Addon Domains” screen, there is a section titled “Modify Addon Domain” that allows you to manage any domains presently allocated to your account – this includes controlling them, configuring redirections, or altogether eliminating domains.

The use is clear in this case. On the right, you’ll find links for deleting and controlling redirections. By clicking on any of them, you’ll be sent to another settings panel where you may confirm the deletion or provide the location for the domain’s redirection.
3. Managing sub-domains
Each time you add a new domain to your account (as discussed above), cPanel automatically creates a related subdomain. According to one example, this is how it typically works:
- Assume your cPanel username is john and your host is 1byte.com. Your primary server domain will then be john.1byte.com. When you establish a new addon domain, for example, johnsworld.com, cPanel automatically creates a subdomain named johnsworld.john.1byte.com.
- What’s bad about this configuration is that this new subdomain frequently serves as a carbon copy of your primary website, which is accessible via johnsworld.com. In other words, you receive an identical website under two different URLs: johnsworld.com and johnsworld.john.1byte.com.
This is not optimal from an SEO standpoint. To resolve this, you should redirect the new subdomain to your primary domain. To put it another way, everyone visiting johnsworld.john.1byte.com after that will be automatically forwarded to johnsworld.com.
This is how you do it:
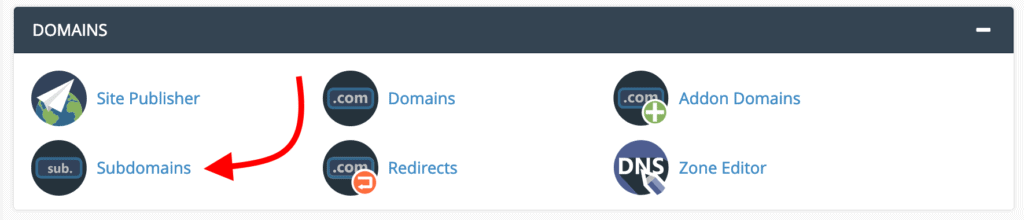
To begin, navigate to the “DOMAINS” section and click on “Subdomains”:
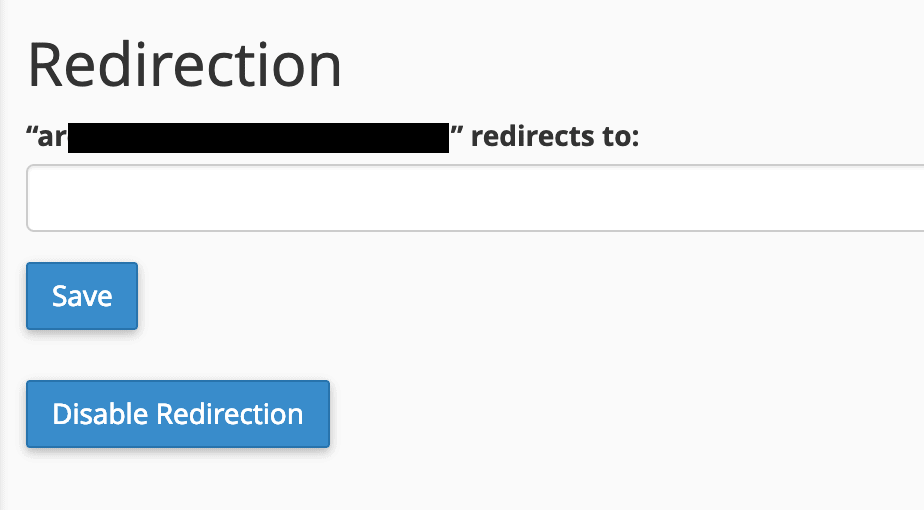
You’ll be taken to a panel where you can see all of your current subdomains that have been set up. At this stage, the “Redirection” column is likely blank.

To change this, click the “Manage Redirection” option next to the subdomain you wish to modify. On the following page, configure the redirection by entering the whole domain name to which you wish to redirect. That would be johnsworld.com in our scenario. When finished, click “Save.”
4. Creating a custom sub-domain
Subdomains are not just for generating little difficulties; they also allow you to creatively expand particular portions of your site.
For instance, if you want to add a new blog to your website, it’s a good idea to do so under a subdomain. For example, if your primary website is located at johnsworld.com, you may consider establishing a blog at blog.johnsworld.com.
In this instance, a blog is only an illustration. You are completely free to select any subdomain you like.
On the same panel where you managed the current subdomains, you can establish a new one. Simply complete the form at the top.
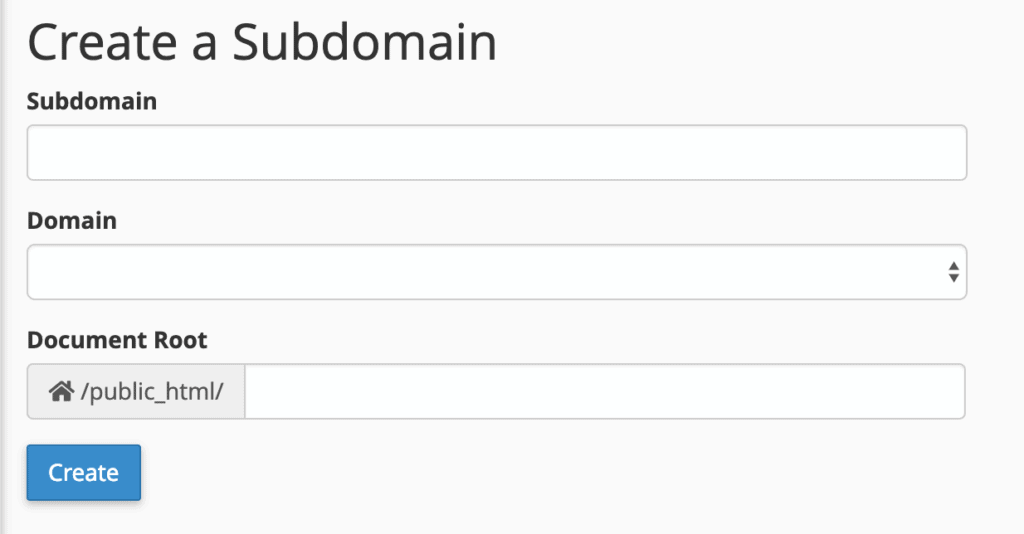
- Subdomain – The name of the subdomain you want to set. Keep it short, and use only letters, dashes, and numbers.
- Domain – The parent domain for the new subdomain.
- Document Root – The directory/folder on the server where the new subdomain’s files will be kept. It’s a good practice to input your full subdomain there. Example: blog.johnsworld.com
Click on “Create” to finalize the subdomain setup.