

You might want to expand your firm and add new websites if it’s expanding. Using a single server for all of your domains will save you money. This article will show you how to host many domains on the same server like Apache, NGINX, and IIS.
What Is a Web Server?
For a website, a web server stores and makes available content like text, photos, videos, and application data. Through the Hypertext Transfer Protocol (HTTP), a web browser and a web server can communicate. Hypertext Markup Language is used to encode the majority of web pages (HTML). Text and photos are examples of static content. Dynamic content includes lists of products that customers have marked for purchase. Most web servers allow the use of server-side scripting languages, which can be used to encrypt business logic and deliver dynamic content. Languages supported often include Active Server Pages (ASP), JavaScript, PHP, Python, and Ruby.
How Does a Web Server Work?
The client-server concept underlies how web servers operate. In this typical arrangement, the client asks the server for a resource or service.
When handling requests from web clients, web servers go through the following steps:
- The web browser sends an access request (HTTP request) over the internet when a user wishes to load material into the website.
- The web browser looks for the IP address of the requested website. The Domain Name System (DNS) or a cache search are used to translate the URLs of the online pages. The web server, which houses the site’s files, can be found via this procedure.
- The HTTP request is now handled by the web server’s HTTP server after it has been received.
- Once the request is accepted by its HTTP server, it will look through server files to find the necessary information.
- The web server sends the website files back to the requesting browser. The user then views the website’s content.
However, keep in mind that you will get an error message in the web browser if the HTTP server is unable to locate or execute the requested files. You can quickly learn how to host numerous web servers on one server now that you are familiar with the fundamental ideas behind web servers.
Steps to Host Multiple Websites on One Server -Apache
1. Create the Directory Structure
The site data is kept in the directory structure. The guests are then given it. The top-level directory is called the Document root. To provide content to visitors, Apache looks in the document root.
The document root is configured to be a specific directory inside /var/www. For any website you wish to host, you can build a directory.
Make a public_html folder in each of these directories. For greater flexibility, the site files themselves will be stored.
Create the /var/www folder, which will serve as the document root location, in this stage. Including domain names like domain.com and domain2.com
mkdir -p /var/www/domain.com/public_html
mkdir -p /var/www/domain2.com/public_html
2. Set Up Permissions
Give the necessary permissions after the folders have been created. The directories may be owned by the root user.
The web folders’ files should be able to be modified by an average user. Give the following permissions to alter the permissions:
chmod -R 755 /var/www
3. Set up an Index Page
You can make a demo index page to see content. Create an index.html file for each legitimate website domain.
vim /var/www/domain.com/public_html/index.html
Within the file, you can set something such as- example testing for domain.com.
Example testing for domain.com
Using the ESC tab and the command:wp, save the file and then shut it to exit.
Follow the same procedure for the second domain. The following command can be used:
vim /var/www/domain2.com/public_html/index.html
FURTHER READING: |
1. 20 Best Video Streaming Hosting Providers |
2. What is a Hosted Solution? – What You Need To Know |
4. Copy the Config File for Each Site
Apache provides the 000-default.conf virtual host file as a default.
To make a virtual host file for each website, you must copy it. You will always have a default copy for websites thanks to this.
cp/etc/apache2/sites-available/000-default.conf/etc/apache2/sites-available/domain.com.conf
cp/etc/apache2/sites-available/000-default.conf/etc/apache2/sites-available/domain2.com.conf
5. Edit the Config File for Each Site
The first domain’s components are modifiable. You can add more directives as well. Add two instructions like ServerName. It aids in creating the fundamental domain.
The second is Server Alias, a name that is different from the base domain. It assists in matching the hosts you specified, such www:
ServerName: domain.com Server Alias: www.domain.com
vim /etc/apache2/sites-available/domain.com.conf
After completion, the Apache virtual host file would look like this:
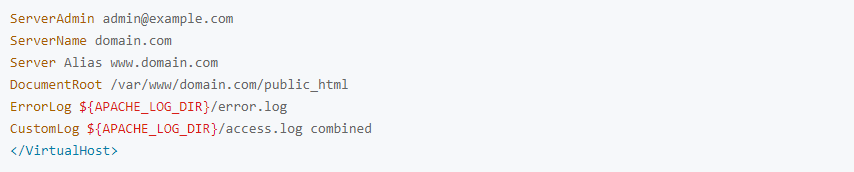
With :wq, save changes and leave. The process is then repeated for the domain2.com.conf file.
Add the ServerName, Server Alias, and DocumentRoot for your second domain.
6. Enable the Config File
Next, activate the virtual host configuration files with just several simple steps:
First, disable the default site defined in 000-default.conf:
a2dissite 000-default.conf
Tools that are provided by Apache to enable the new virtual host files. The a2ensite docs assists in enabling the new.conf files.
a2ensite domain.com.conf
a2ensite domain2.com.conf
To view the modifications, restart the configured Apache service. To confirm the modifications, run systemctl status.
systemctl restart apache2
7. Test / Verify Apache Configurations
You can check if the configurations are functioning by restarting Apache. Editing the domain or the /etc/host file are two common ways to check.
The index.html pages that were set up in the earlier steps should appear in the browser.
You’ve finished the process if both websites function properly. Two virtual hosts have now been set up on the same server.
Steps to Host Multiple Websites on One Server – NGINX
The easiest way to set up two virtual hosts on the same server is by using NGINX. We will show you how in this guide!
1. Create Document Root Directories
First, with each domain, you need to make two document root folders individually.
$ sudo mkdir /var/www/html/example1.com
$ sudo mkdir /var/www/html/example2.com
2. Create index.html files
After making individual document root folders, we need to create index.html files for each of the domains. The process applies with both example1 and example2 websites. Let’s start with example 1, you just need to add this command:
$ sudo vi /var/www/html/example1.com/index.html

To save the file, you just need to save and close it.
The same process applied for example2.com website.
3. Open NGINX Configuration file
The NGINX configuration file, /etc/nginx/nginx.conf, should be opened. The following command will enable you to do it:
$ sudo vi /etc/nginx/nginx.conf
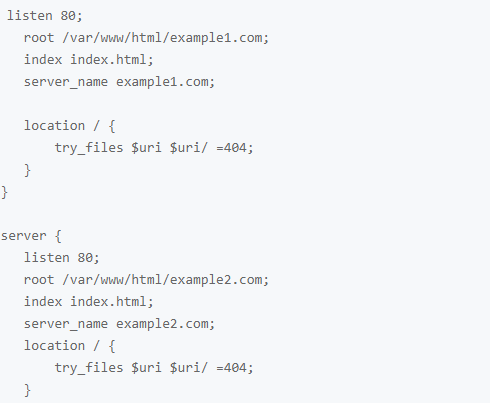
4. Create Server Blocks
Create two server blocks per domain.
The values for server_name and root are editable. You can add particular domain names. Include each domain’s document root locations as well.
5. Restart the NGINX Server
To make the modifications effective, restart the NGINX server. The command to use is:

To view the index page, check the web browser and type example1.com. For the domain example2.com, test the same adjustments.
NGINX has been used to configure two virtual hosts on a single server.
Steps to Host Multiple Websites on One Server – IIS
How to install IIS on a Windows server?
An empty Default Website is automatically created when IIS is installed on Windows and is listened to on the standard web HTTP port – TCP 80. Technically speaking, our website is connected to port TCP/80. To open this site, we must type the IIS server’s name (http://web-srv1) or its IP address (http://192.168.1.100) into your browser.
Step 1: Binding IIS Website
You can host several websites using a web IIS server that is operating on Windows Server. However, IIS only distributes HTTP requests correctly if each website must be uniquely identified. Three characteristics on the IIS website combine to provide a special mix for every website:
- a TCP port number
- an IP address
- a host header (hostname)
The ServerBindings element of the IIS Metabase contains information about the websites that are hosted, and it is formatted as follows: IP:Port:Hostname. Therefore, you must use a distinct Host header if you want to host many websites on a single server (same port and IP address).
You might be wondering what a host header is? An HTTP request includes a host header that identifies the website to which it is addressed. As a result, on the web server side, we must specify this host header. It should be noted that the IIS web server’s hostname and IP address match the right record in the DNS.
Step 2: Binding the second IIS website
You must create a new website in the Internet Information Service (IIS) Manager with the name TestSite and store it at C:\inetpub\TestSite using the Add Website window. Be careful not to enter the hostname just yet.
Open Internet Information Service (IIS) Manager after copying the site’s content to C:\inetpub\TestSite. Then, add the site to the wizard’s hostname.

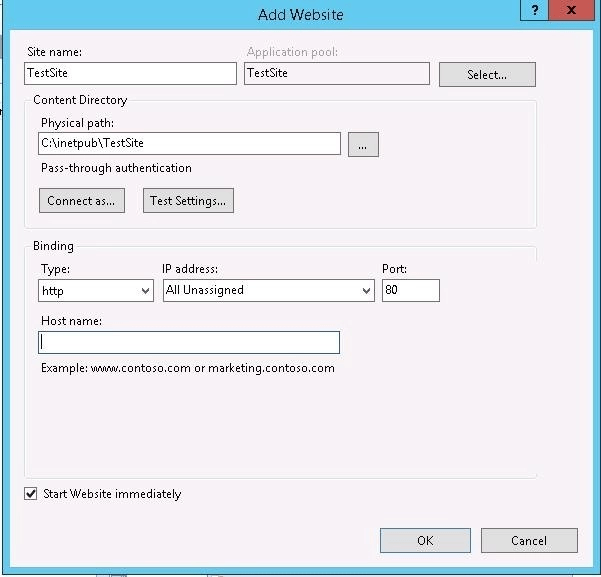
Add Website Window
You will notice a notification informing you that binding *:80 cannot be used for both of these websites after clicking Ok.

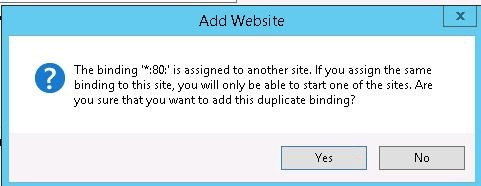
Check Binding
Once you accept this notice, a different website will be linked to port 80. Therefore, starting it requires stopping the original webpage. Pay close attention to the following image to gain a better understanding of this.
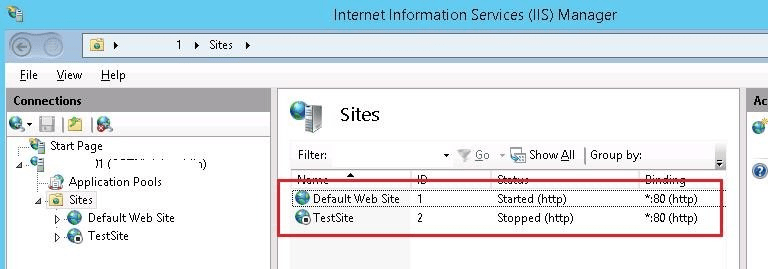
Assigning different binding port to websites
Hosting Multiple Websites on IIS server by Host Headers
To make a special binding, you must give the second IIS website a different name (Host Name). Right-click TestSite and choose Edit Bindings to accomplish this. Click Edit after selecting the necessary binding.
The following image shows how to define the user address’s distinctive hostname. Since we will be using TestSite in this tutorial, let’s enter it in the Hostname field.
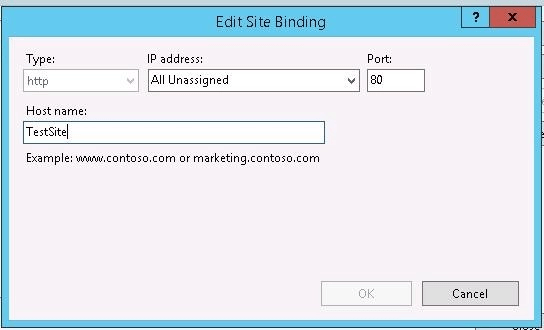
Edit Site Binding Window
The command prompt can be used to set up IIS site binding. When you run the command to configure the IIS Site binding, you should see something similar to the picture below if you are using IIS 7 or later:
C:\Windows\System32\inetsrv\appcmd.exe set site /site.name:testsite /+bindings.[protocol=’http’,bindingInformation=’*:80:testsite’]
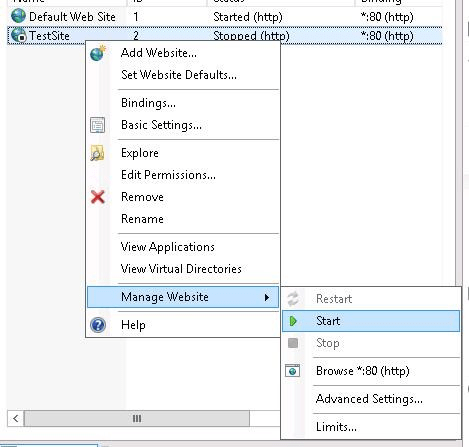
You can launch the second website in a manner similar to the first.
Manage Websites
At this stage, you must add a DNS alias (A or CNAME) for the server, referencing the IP Address or hostname of your IIS web server. You must create DNS entries on the domain controller if you utilize an Active Directory domain. You can use IIS to set the domain name of your IIS server as the FQDN target host and create a CNAME record for the name TestSite in the DNS console (dnsmgmt.msc).
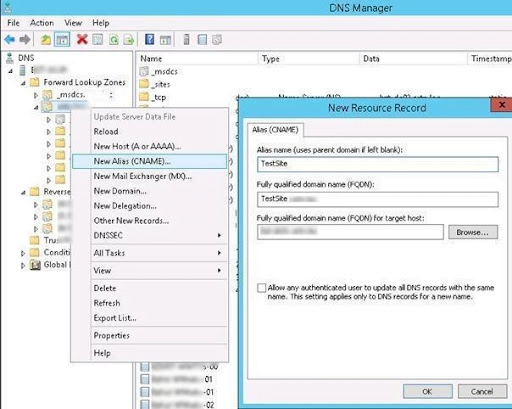
creating a CNAME record for the name TestSite in the DNS console
The following command can be used with PowerShell to generate this DNS record:
Add-DnsServerResourceRecordCName -HostNameAlias web-srv1.woshub.com -Name testsite -ZoneName woshub.com
Try launching the browser and going to http://TestSite. It should successfully open if everything is done as instructed.
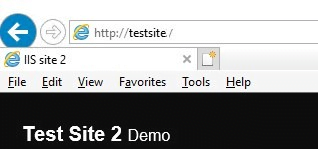
Final result of test site
Conclusion
You can effectively utilize server resources with virtual hosting. A combined virtualhost is offered by the VPS server for websites. One server can accommodate an infinite number of websites for your company. It will fulfill requests coming from the specified URLs.
Steps for hosting two websites were covered in the lesson. You can carry out them using NGINX or Apache.
You can successfully set up the websites on one server by following these instructions. Make that the server has sufficient resources for both domains.