
OpenLiteSpeed, the open-source edition of LiteSpeed, is a high-performance yet lightweight web server application. I will guide you through the process of installing and configuring an OpenLiteSpeed instance on your server. We will also install and configure MariaDB to facilitate interaction with many common web applications and services. WordPress will not be installed at this time. One more thing you should know is that, What Cloud Hosting does, Cloud Servers can do better. As a result, you can use everything you’ve learned from this tutorial to apply to Cloud Server without any problems at all
NOTE:
The OpenLiteSpeed and LiteSpeed web server are two distinct products. If you want to learn more about this specific difference, please refer to this post
Prerequisites
- Before you begin this guide, there are some important steps that you must complete to prepare your server
- A Centos OS7 x 64 servers (Cloud Hosting or Cloud Server) instance
FURTHER READING: |
| 1. Increase Upload Size WordPress in cPanel and aaPanel |
| 2. Install WordPress Site on Cloud Hosting Is Easy as Pie |
| 3. Is Wordpress Down? Current Status and Problems |
The 17 Detailed Steps to Install WordPress on Cloud Server using OpenLiteSpeed Web Server
Step 1: Reset your Cloud Server/ Cloud Hosting
You can skip this step if your Server (Cloud Hosting or Cloud Server) is brand new.
However, if your Server (Cloud Hosting or Cloud Server) was previously used for a specific purpose, such as putting up a website, building an application,…etc. Then these existing packages and current setup configurations are likely to conflict with packages and configurations that will be deployed in the future.
→ Reset your Server is a MUST and don’t forget to backup your data before RESETING
Step 2: Login into your Cloud Server/ Cloud Hosting
There are 2 ways to login
Step 3: Update the system and install some basic tools
Regardless of what you decide to do, you should first make sure that all of your packages is up to date.
#Run these commands one-by-one
yum install epel-release -y
yum clean all && sudo yum update -y && sudo shutdown -r now
After running the above command, you will get disconnected from the server, because the server is rebooting remember to log in to the server again to be able to perform the steps below
Afterward, we’ll need to install the wget, unzip, and nano packages. These commands will come in handy in the future.
If a package is already installed on the Server, skip that package and install the next one.
#Remember to run these commands one by one
rpm -q nano                     #Checking
sudo yum install nano -y #Installing- Nano: a command-line-based text editor
Step 4: Configure yum.conff
By default, 1Byte provides the Server with a configuration (yum command) that blocks you from installing certain packages. Unfortunately, several of the OpenLiteSpeed Web Server packages are among these, thus we will remove them from that configuration from yum command.
nano /etc/yum.conf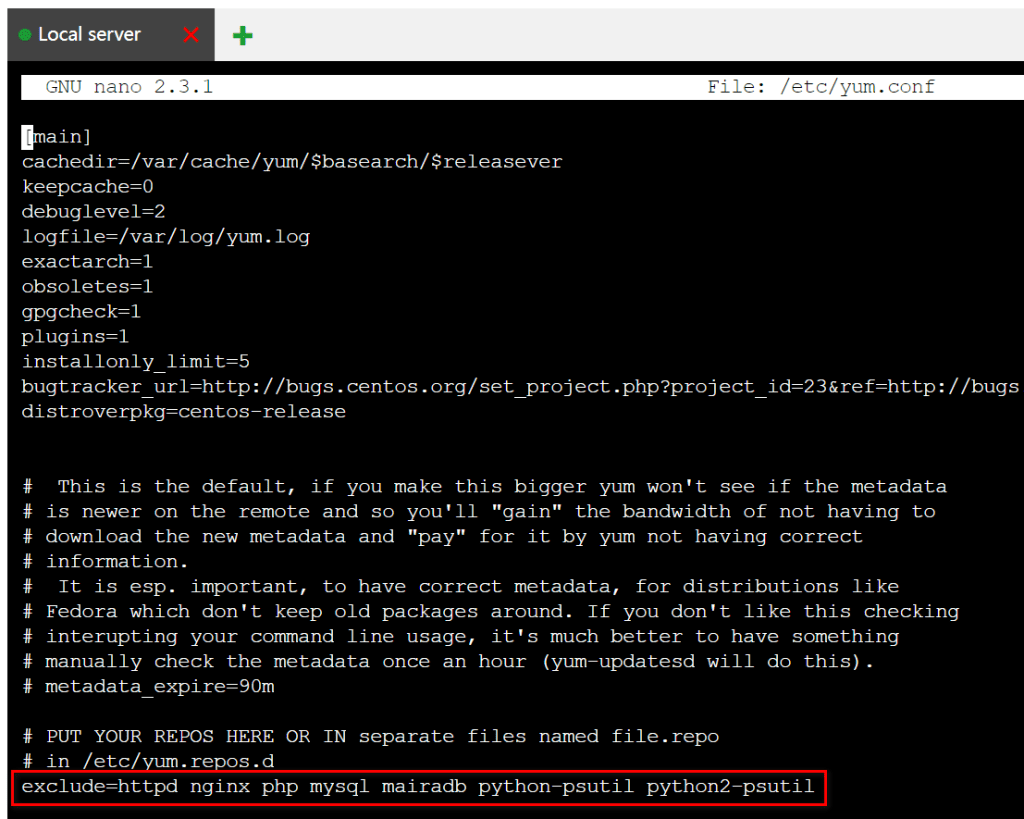
→ You must remove these packages from the exclude line (final line). If you’re still confused, check out the video below.
Step 5: Install OpenLiteSpeed Repository & Its Components
Add the repository
rpm -Uvh http://rpms.litespeedtech.com/centos/litespeed-repo-1.1-1.el7.noarch.rpmInstall OpenLiteSpeed from the repository
yum install openlitespeed -yThe following commands will install PHP 7.4 for OpenLiteSpeed from our repository with all commonly-used packages, and direct OpenLiteSpeed to use this PHP. This build of PHP should be enough to support the most commonly used web applications.
#Install PHP version 7.4
yum install lsphp74 lsphp74-json lsphp74-common lsphp74-gd lsphp74-imagick lsphp74-process lsphp74-mbstring lsphp74-mysqlnd lsphp74-xml lsphp74-opcache lsphp74-mcrypt lsphp74-pdo lsphp74-imap lsphp74-bcmath lsphp74-pecl-memcache lsphp74-pecl-memcached lsphp74-pecl-redis lsphp74-pgsql lsphp74-zip -y
#Link PHP of OpenLiteSpeed to the new PHP Version 7.4
ln -sf /usr/local/lsws/lsphp74/bin/lsphp /usr/local/lsws/fcgi-bin/lsphp74
With all of our components installed, we can now take care of some configurations.
Step 6: Change the Default Admin Password for OpenLiteSpeed
First, we should change the default administration password for OpenLiteSpeed. By default, this is set to “123456“. This password is very weak and easy to guess, so we must modify this value immediately.
To change the password, execute the following script:
/usr/local/lsws/admin/misc/admpass.shYou can optionally select a new username for the administrative account, or just press ENTER to accept the default value of admin. Afterward, you will have to supply and verify a password for the administrative user. Make sure to select a strong password because the administrative login screen is open to the web by default.
NOTE:
This username and password at this step will be used to login into WebAdmin Console
→ Please write down or keep note of your credential
If you are still confused, check the video below
Step 7: Install, Star, and Secure the MariaDB System
Next, we need to install MariaDB version 10.6 and start the MariaDB database system as well as do some simple configuration
#Add MariaDB into Repository
echo '[mariadb]
name = MariaDB
baseurl = http://yum.mariadb.org/10.5/centos7-amd64
gpgkey=https://yum.mariadb.org/RPM-GPG-KEY-MariaDB
gpgcheck=1' > /etc/yum.repos.d/MariaDB.repo
#removes the cache of repositories
yum clean all
#Update all packages again
yum update -y
#Install MariaDB version 10.6
yum install MariaDB-server MariaDB-client -y
#Start MariaDB
systemctl start mariadb
#Enable MariaDB after machine reboot
systemctl enable mariadb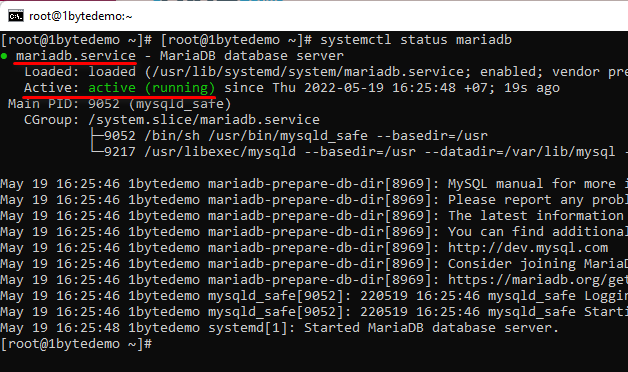
With MariaDB online, we can run a simple security script to set an administrative password and lock down some insecure defaults:
sudo mysql_secure_installationFirst, it will ask you for the MariaDB root password. Since we have not set one yet, just press ENTER to continue. The very next step asks you to set a root password. Select and confirm an administrative password for the database system.
For the remainder of the questions, you can just hit ENTER to accept the default suggestions. This will revert some insecure settings on our database system.
If you are still confused, check the video below
Finally, reset the MariaDB service to take effect
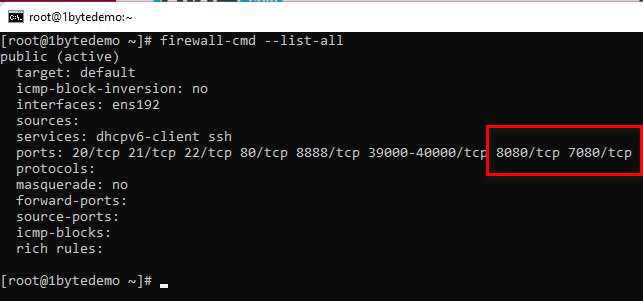
systemctl restart mariadbStep 8: Configure firewall-cmd
By default, the WebAdmin Console (admin page) runs on port 7080.
Therefore, allow yourself to access via port 7080 (WebAdmin Console). This port must be opened.
#Check all opened ports
firewall-cmd --list-all
#Allow port 7080 for WebConsole Admin Page
firewall-cmd --permanent --zone=public --add-port=7080/tcp
#Reload to take effect
firewall-cmd --reload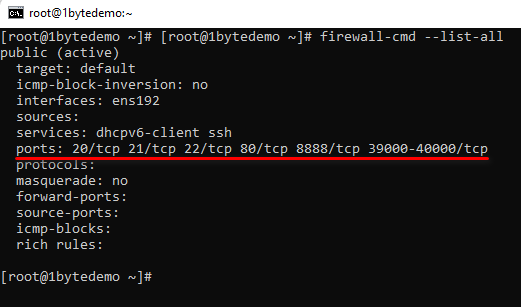
Step 9: Test Out the Default Web Page and Admin Interface
The OpenLiteSpeed server should already be up and running. If you need to start, stop, restart, or check the status of the server, use the standard service command with the lsws service name:
#Check Status server
sudo systemctl status lsws
#Start
sudo systemctl start lsws
#Stop
sudo systemctl stop lsws
#Restart
sudo systemctl restart lsws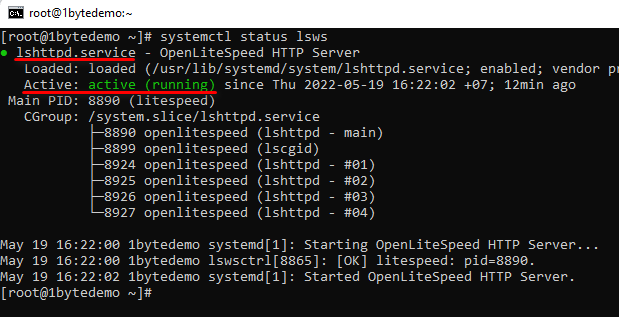
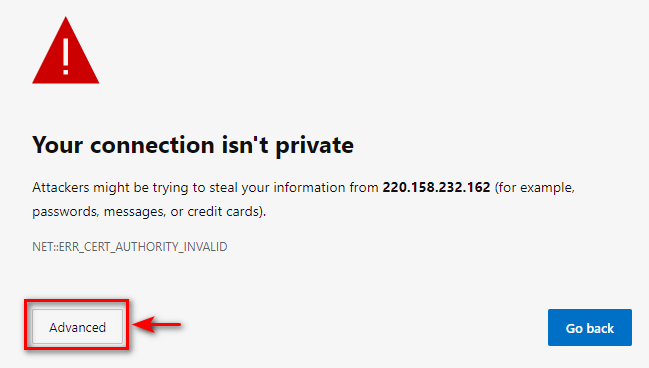
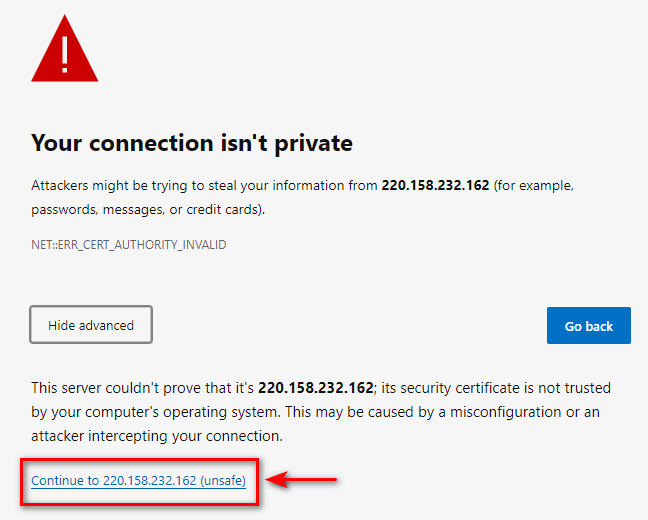
In your web browser, you can check out OpenLiteSpeed’s WebAdmin Console page. Navigate to your server’s IP address, followed by :7080 specifying the port:
http://:7080You will likely see a page warning you that the SSL certificate from the server cannot be validated. Since we have not installed an SSL certificate for this website, this is expected. Click through the options available to proceed to the site (in Chrome, you must click Advanced and then choose to Proceed to… )
You will be prompted to enter the administrator name and password that you selected in Step 6
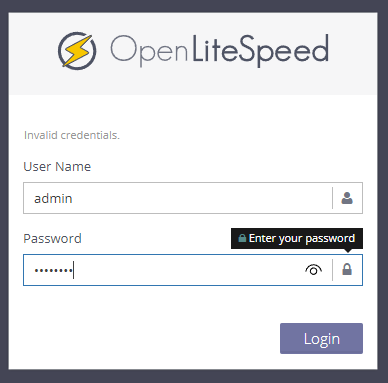
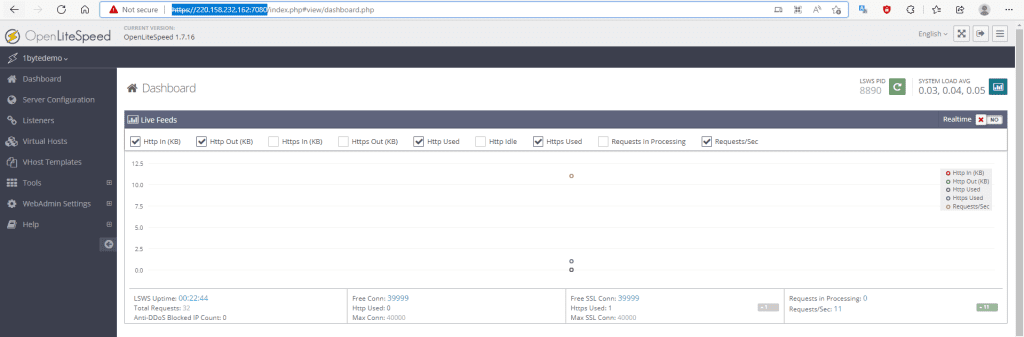
Once you correctly authenticate, you will be presented with the OpenLiteSpeed administration interface (WebConsole Admin)
Step 10: Change the port of the Default Page (Port 8080)
As explained above, we now will change the port that the default site is using from 8088 to the conventional port 80
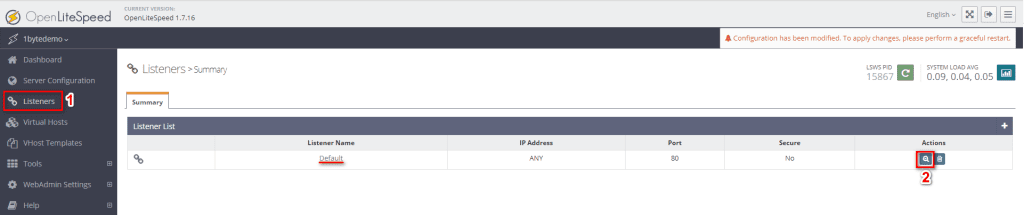
1) On the left-bar menu, choose the Listeners option
2) In column Listener Name, click on Default
3) Click the Edit button in the top-right corner of the Address Settings table to modify its values
4) Change port 8080 to port 80, and click on the icon Save
5) Finally, you need to click on the Graceful Restart button. It is a square button, green background with a white arrow icon, located on the top right-hand side
If you still get confused, please check out the video below
The default web page should now be accessible in your browser on port 80 instead of port 8088. Visiting your server’s domain name or IP address without providing a port will now display the site.
http://:80
#or you don't need to put :80
http://
You will see a page the default OpenLiteSpeed web page, that looks like this:
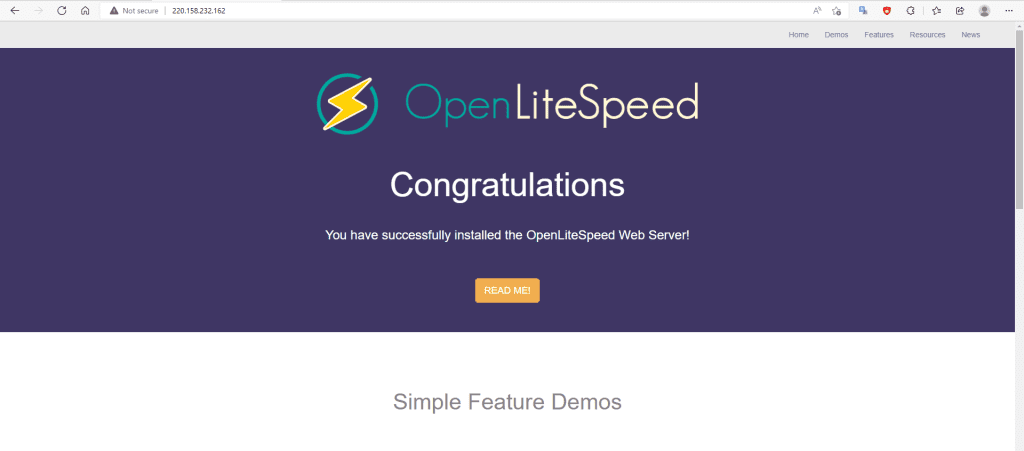
Bravo!!!
At this point, you should have OpenLiteSpeed, a customized version of PHP, and MariaDB installed and running on a CentOS 7 server. OpenLiteSpeed offers great performance, an easy-to-use interface, and pre-configured options for script handling. Dive in and learn the ropes to start leveraging these capabilities to serve your sites.
Up to now, the OpenLiteSpeed web server is still missing the following features:
1) No SSL Certificate yet
2) Haven’t installed WordPress yet
But Last for Not Least…
We will focus on how to get a WordPress instance set up and running on CentOS 7 using the OpenLiteSpeed web server. Before you begin this guide, there are some important steps that you must complete to prepare your server
- This guide will not cover installing OpenLiteSpeed or MySQL.
- A Centos OS7 x 64 servers (Cloud Hosting or Cloud Server) instance
If you have not had a Cloud Hosting Cloud Server or Domain Name. BUY RIGHT NOW so that you can start learning and practicing with 1Byte
When you are finished preparing your server using the guides linked above, you can proceed with this tutorial
Step 11: Login into your Cloud Server/ Cloud Hosting
Step 12: Login into WebAdmin Console and Configure OpenLiteSpeed
Log into OpenLiteSpeed’s administrative interface (WebConsole Admin)
https://:7080If prompted, log in using the username and password you configured for OpenLiteSpeed above. Next, we will configure External App
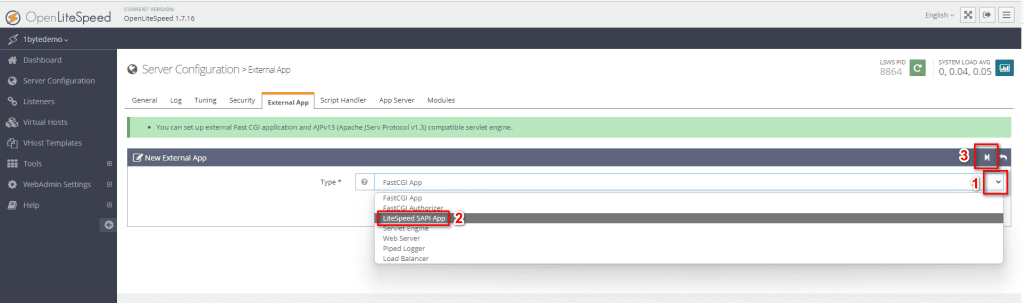
1) Go to Server Configuration on the left menu bar
2) Select the External App tab
3) Click on Add button
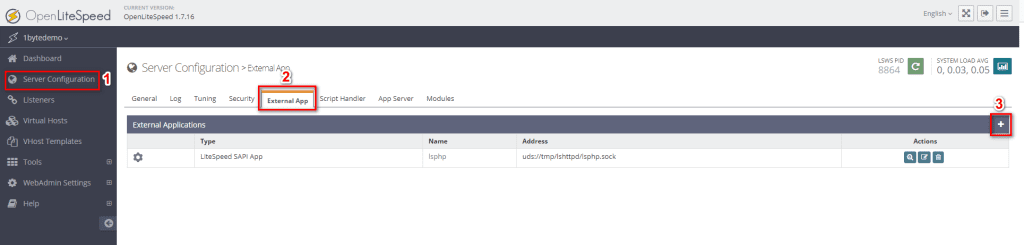
Remember to select LSPHP setup and select LiteSpeed SAPI APP to optimize PHP for best performance
Setting parameters for LiteSpeed SAPI App
There are many parameters:value that need to be set up for this step. Please input the values (to the right of the colon) corresponding to the parameters (to the left of the colon) based on Sample Data in the code block below
#Sample Data
Name: lsphp74
Address: uds://tmp/lshttpd/lsphp74.sock
Max Connections: 50
Environment:
PHP_LSAPI_CHILDREN=50
LSAPI_AVOID_FORK=200M
Initial Request Timeout (secs): 60
Retry Timeout : 0
Response Buffering: no
Start By Server: yes (Thorough CGI daemon)
Command: $SERVER_ROOT/lsphp74/bin/lsphp
Back Log: 100
Instances: 1
Memory Soft Limit (bytes): 2047M
Memory Hard Limit (bytes): 2047M
Process Soft Limit: 1400
Process Hard Limit: 1500
If you are still confused, please check out this video
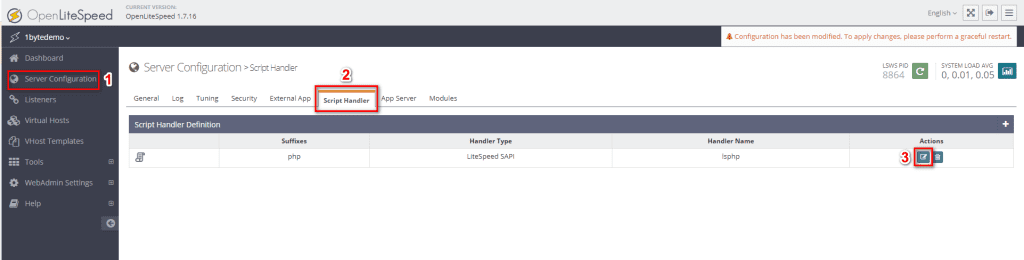
After that, configuring Script Handler is a MUST
1) Go to Server Configuration on the left menu bar
2) Select the Script Hander tab
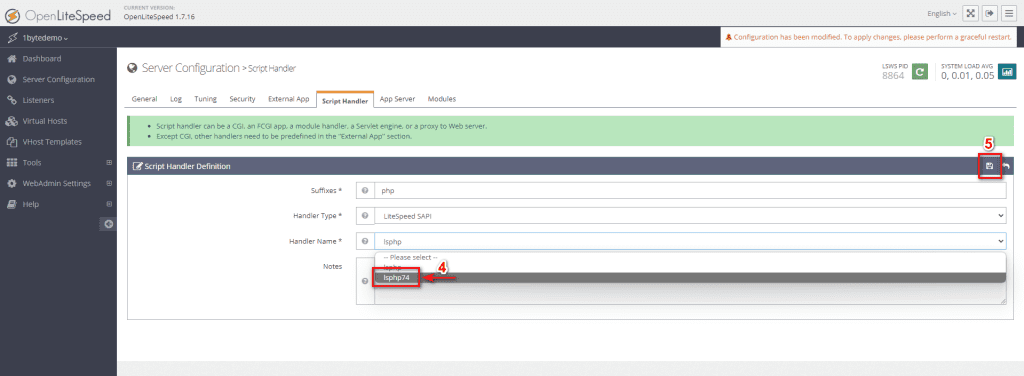
3) Click on the Edit button
4) Switch to lsphp74 from Handler Name
5) Click the Save button
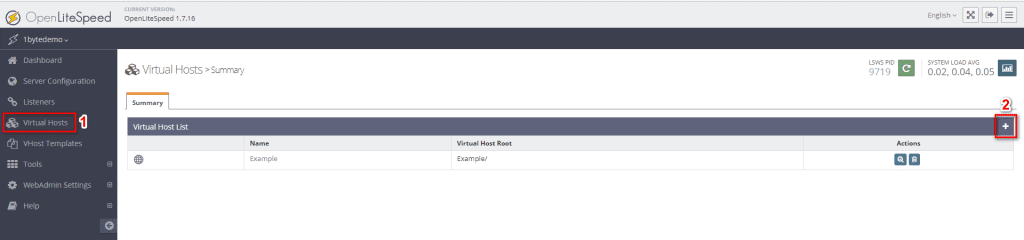
Step 13: Configure the Virtual Host for WordPress
We will be modifying the default virtual host that is already present in the OpenLiteSpeed configuration so that we can use it for our WordPress installation.
1) Go to Virtual Hosts on the left menu bar
2) Click on Add button
Next, we need to set parameter:value for this new Virtual Host. Please input the values (to the right of the colon) corresponding to the parameters (to the left of the colon) based on Sample Data in the code block below
#Sample Data
Virtual Host Name : 1byte-demo.com
Virtual Host Root : $SERVER_ROOT/1byte-demo.com/
Config File: $SERVER_ROOT/conf/vhosts/$VH_NAME/1byte-demo.com.conf
Follow Symbolic Link: Yes
Enable Scripts/ExtApps: Yes
Max Keep-Alive Requests: 1000
Restrained: Yes
ExtApp Set UID Mode: Server UID
NOTE:
When you press the Save button, the system will report an error on line 4, the file .conf does not exist, so we will click on CLICK TO CREATE to let the system create this file for you.
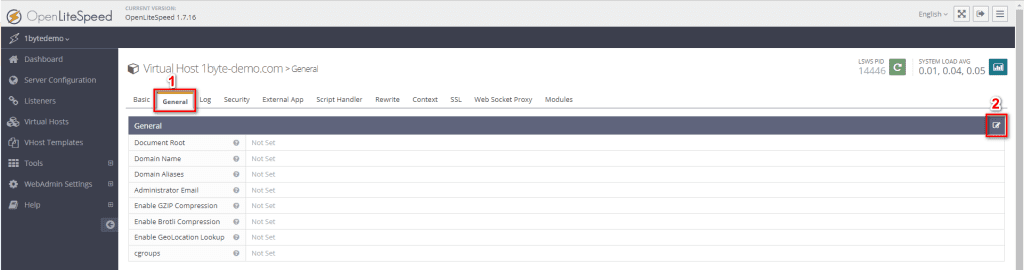
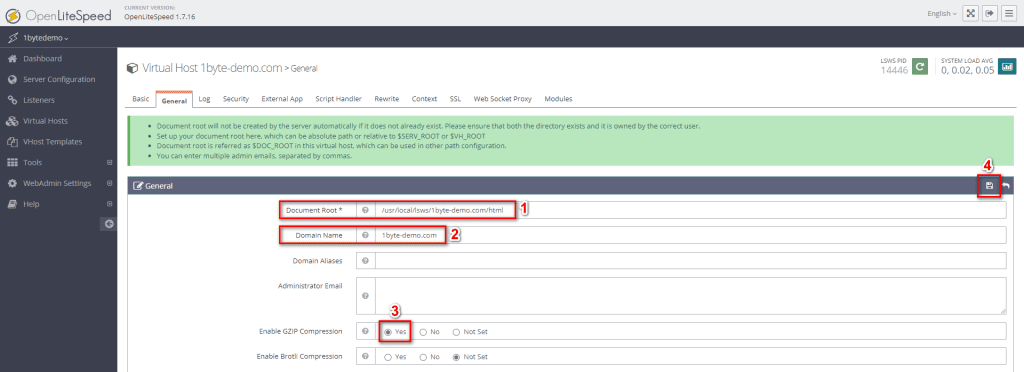
Next, we need to configure the General section in the General tab, in your Virtual Host
Same as above, configure the Index Files section in the General tab of your Virtual Host

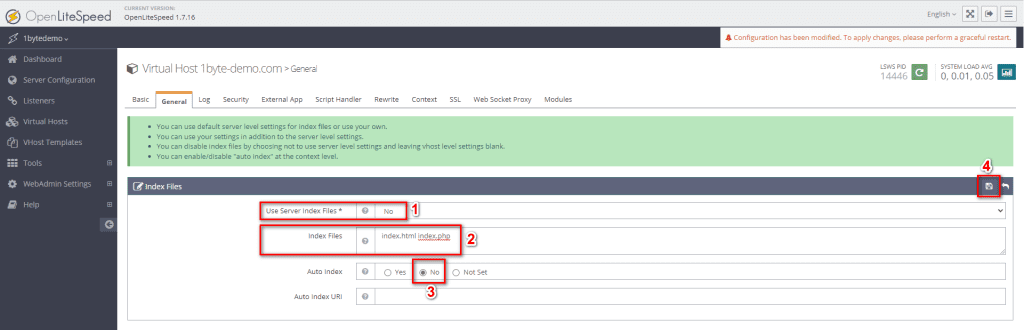
NOTE:
It should be noted that the space between index.php and index.html is 1 space, they are separated by 1 space. Not separated by commas
Continue to configure Expires Settings in the General tab of your Virtual Host

#copy the following declaration into "Expires By Type"
image/*=A31536000, text/css=A31536000, application/x-javascript=A31536000, application/javascript=A31536000, font/*=A31536000, application/x-font-ttf=A31536000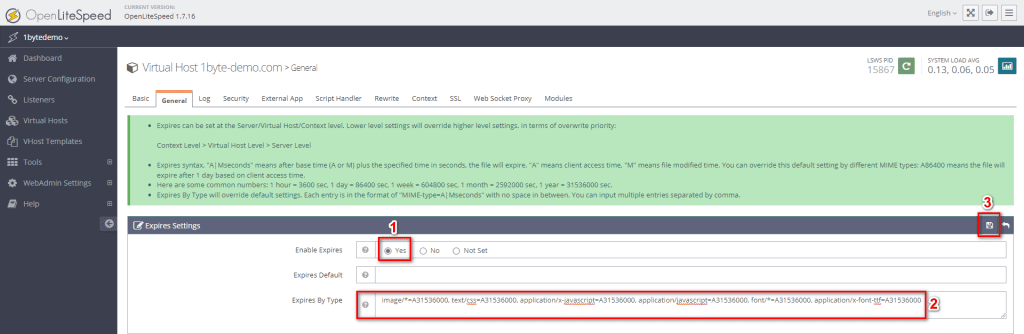
Configure Virtual Host Log in Log tab
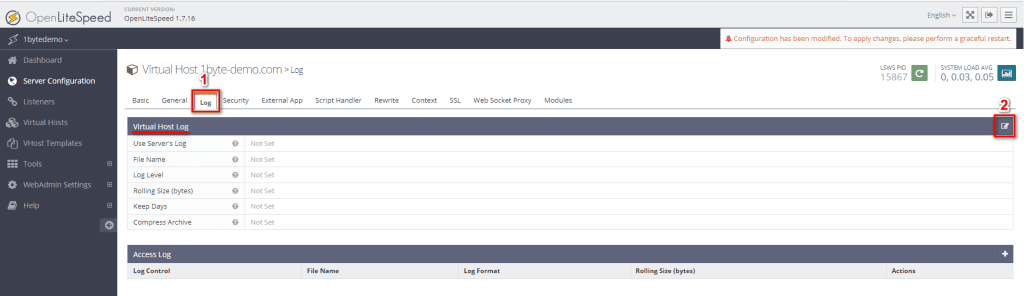
#Sample Data
Use Servers Log: Yes
File Name: $VH_ROOT/logs/error.log
Log Level: ERROR
Rolling Size (bytes): 10M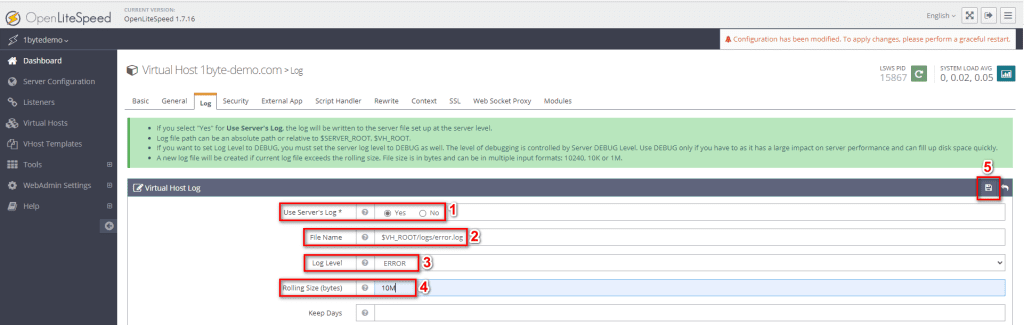
Switch to Access Log and modify as the Sample Data in the block code does
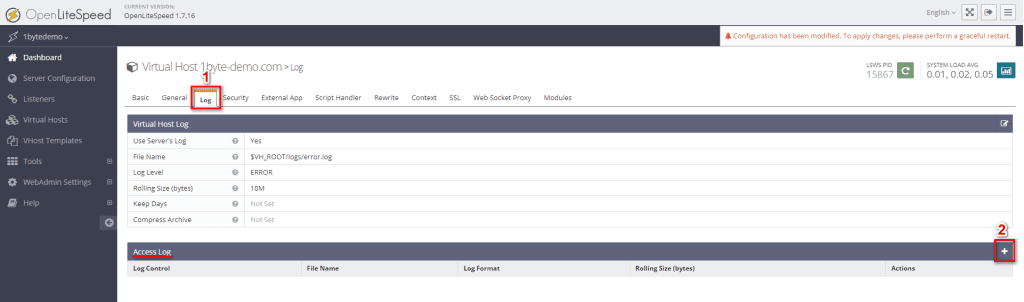
#Sample Data
Log Control: Own Log File
File Name: $VH_ROOT/logs/access.log
Piped Logger: Not Set
Log Format: Not Set
Log Headers: Not Set
Rolling Size (bytes): 10M
Keep Days: 30
Bytes log: Not Set
Compress Archive: Yes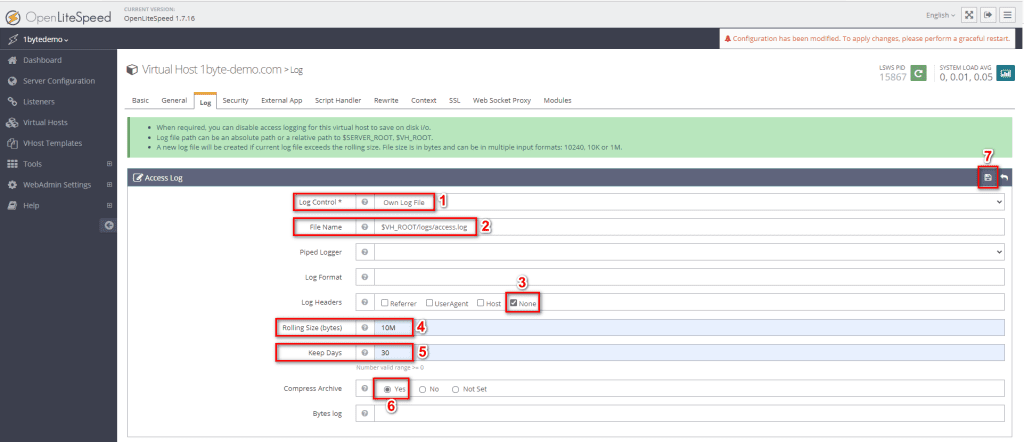
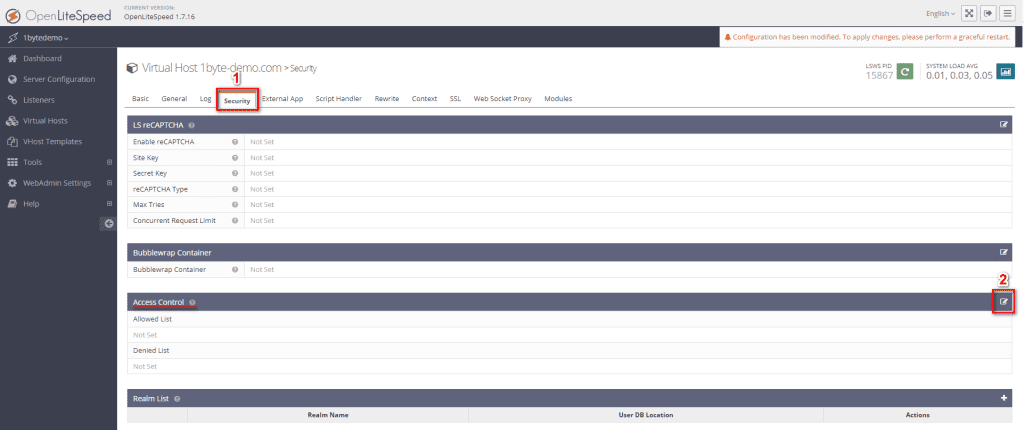
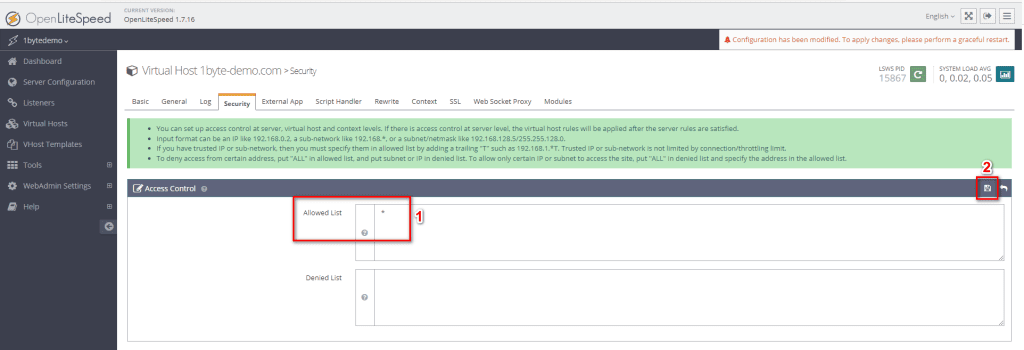
Configure Access Control in the Security tab
Navigate to the Rewrite tab, and add the following rules in the Rewrite Rules section
#Remember to change your domain name in here
rewriteFiler /usr/local/lsws/1byte-demo.com/html/.htaccess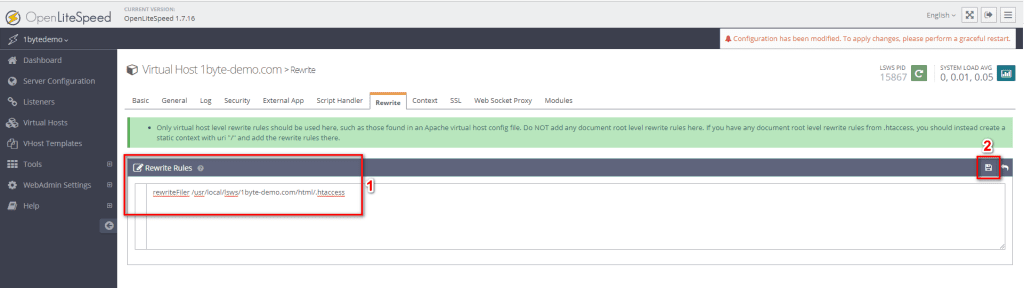
Also in the same Rewrite tab, configure the Rewrite Control section based on Sample Data in the code block
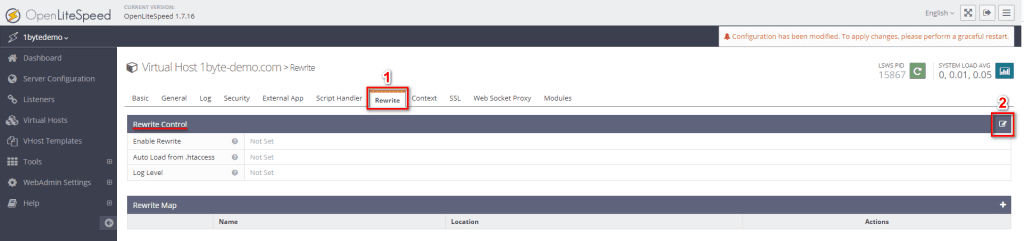
#Sample Data Enable Rewrite: Yes
Auto Load from .htaccess: Yes
Log Level: Not Set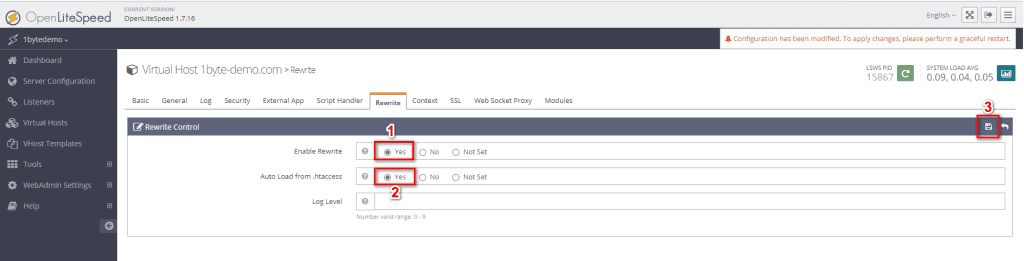
Finally, we need to connect our Virtual Host file to port 80
#Sample Data
Enable Rewrite: Yes
Auto Load from .htaccess: Yes
Log Level: Not Set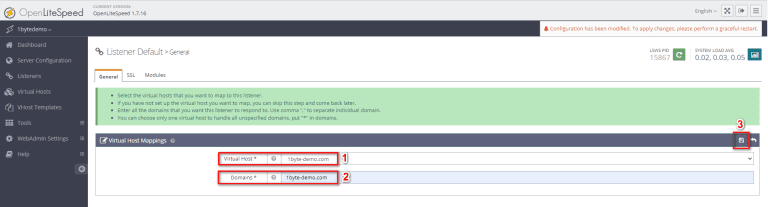
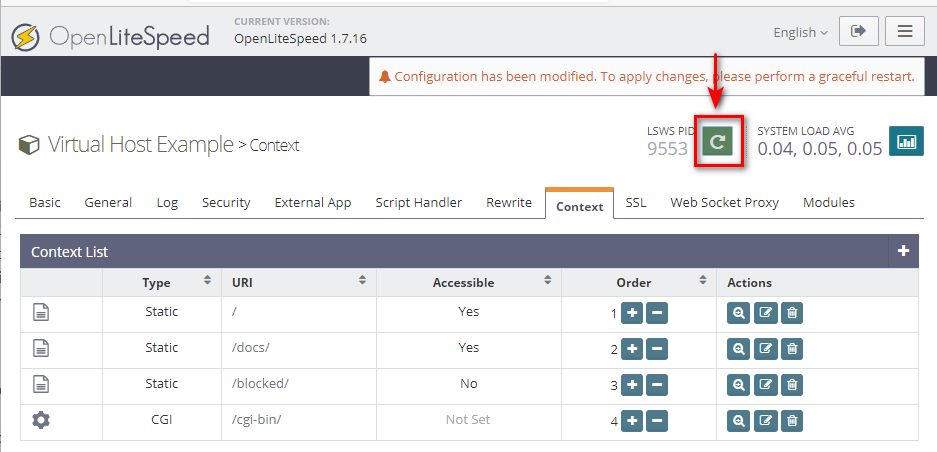
With all of the above configurations out of the way, we can now gracefully restart the OpenLiteSpeed server to enable our changes. It is a square button, green background with a white arrow icon, located on the top right-hand side
Step 14: Prepare the Virtual Host and Document Root Directories
Back to your terminal, now we will create the website’s root directory
mkdir /usr/local/lsws/1byte-demo.com/
mkdir /usr/local/lsws/1byte-demo.com/{html,logs}
NOTE:
/usr/local/lsws/1byte-demo.com/html/ → This absolute path is where all your website data is stored
Next, create .htaccess file
cd /usr/local/lsws/1byte-demo.com/html
nano .htaccess
#Copy these line into your .htaccess file
RewriteEngine On
RewriteBase /
RewriteRule ^index.php$ - [L]
RewriteCond %{REQUEST_FILENAME} !-f
RewriteCond %{REQUEST_FILENAME} !-d
RewriteRule . /index.php [L]
Now you need to grant control for your web root directory
chown -R nobody:nobody /usr/local/lsws/1byte-demo.com/htmlStep 15: Create a Database and Database User for WordPress
We will start by creating a database and database user for WordPress to use
mysql -u root -pYou will be prompted to enter the MariaDB administrative password that you already created in Part 1 – Step 7. Afterward, you will be dropped into a MariaDB prompt
Running these commands to create <db_user>, <db_password>, and <db_name>
#create  named "wordpress"
CREATE DATABASE wordpress;
#create  named "wordpressuser"
#create  has value is "password"
#Grant access right of  to
GRANT ALL ON wordpress.* TO wordpressuser@localhost IDENTIFIED BY 'password';
#Flush the changes you’ve made to make them available to the current MariaDB process
FLUSH PRIVILEGES;
#exit out of the MariaDB prompt to get back to your regular shell
exit
NOTE:
As a goal of maintaining things simple, I’ve set the values as follows:
<db_name> = wordpress
<db_password> = password
<db_user> = wordpressuser
You should change these values to your liking, especially since the value for <db_password> needs to be a strong password and not be easily guessed.
If you are still confused, please check out the video below
Step 16: Install and Configure WordPress
We are now ready to download and install WordPress. Move to your home directory and download the latest version of WordPress by typing
#Move into the virtual host root directory
cd /usr/local/lsws/Example/html/
#Download wordpress
wget http://wordpress.org/latest.zip
#Extract the arrchive
unzip latest.zip
#Grant the webserver user write permission to create wp-config.php
chown -R nobody:nobody wordpress
Extract the archive and enter the directory by typing
tar xzvf latest.tar.gz
cd wordpress
You can copy the sample WordPress configuration file to wp-config.php, the file that WordPress actually reads and processes. This is where we will put our database connection details
cp wp-config-sample.php wp-config.phpOpen the configuration file so that we can add our database credentials
nano wp-config.phpYou need to find the settings for DB_NAME, DB_USER, and DB_PASSWORD so that WordPress can authenticate and utilize the database that we already did in Step 2. Please replace these values with yours, not mine
#Put  in Step 2 at here
define('DB_NAME', 'wordpress');
#Put  in Step 2 at here
define('DB_USER', 'wordpressuser');
#Put  in Step 2 at here
define('DB_PASSWORD', 'password');
Remember to save (Ctrl + O), and exit (Ctrl +X) when you are finished
If you are still confused, please check out this video
Now, we are ready to copy the files into our document root. To do this, type
sudo cp -r ~/wordpress/* /usr/local/lsws/Example/html/Give permission for the entire directory structure to the user that the web server runs under so that changes can be made through the WordPress interface
sudo chown -R nobody:nobody /usr/local/lsws/Example/htmlStep 17: Finish the Installation Through the WordPress Interface
We are now ready to download and install WordPress. Move to your home directory and download the latest version of WordPress by typing
cd ~
wget https://wordpress.org/latest.tar.gz
Give permission of the entire directory structure to the user that the web server runs under so that changes can be made through the WordPress interface