
មុនពេលដំឡើងវិញ្ញាបនបត្រ ត្រូវប្រាកដថា CSR ត្រូវបានបង្កើតឡើង និងវិញ្ញាបនបត្រត្រូវបាន បានធ្វើឱ្យសកម្ម, បានធ្វើឱ្យមានសុពលភាព, និងបានចេញឪ្យប្រើប្រាស់។
របៀបដំឡើងវិញ្ញាបនបត្រ SSL នៅលើ XAMPP
ទាញយកវិញ្ញាបនបត្រ ពីគណនី ឬអ៊ីមែលរបស់អ្នក ហើយបន្ទាប់មកប្រើឯកសារដែលបានផ្តល់សម្រាប់ការដំឡើង។
សម្រាប់ដំណើរការដំឡើងពិសេសនេះ អ្នកនឹងត្រូវការឯកសារបី៖
FURTHER READING: |
| 1. ការដំឡើងវិញ្ញាបនបត្រ SSL នៅលើ Citrix NetScaler VPX |
| 2. ការដំឡើងវិញ្ញាបនបត្រ SSL នៅលើ SonicWall |
| 3. ការដំឡើងវិញ្ញាបនបត្រ SSL នៅលើ Google App Engine |
ជំហានទី 1
ដែន វិញ្ញាបនប័ត្រ SSL (ឯកសារ .crt ឬ 'វិញ្ញាបនបត្រសុវត្ថិភាព') ពីប័ណ្ណសារដែលបានទាញយក។
ជំហានទី 2
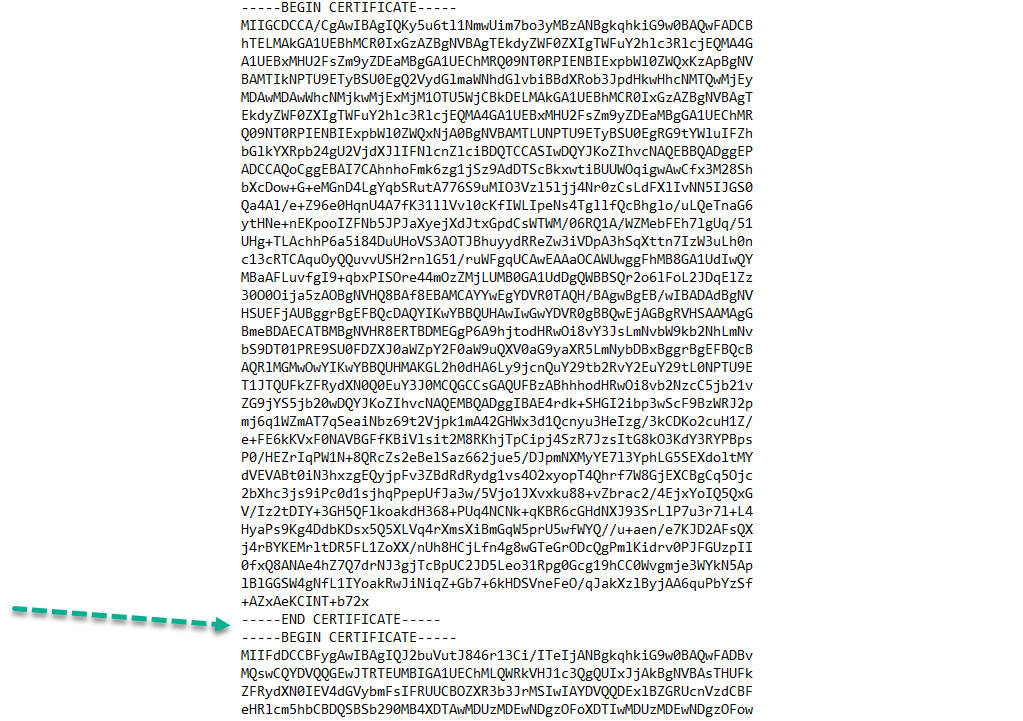
កញ្ចប់អាជ្ញាធរវិញ្ញាបនប័ត្រ (ឯកសារ .ca-bundle) ដែលអាចមានទីតាំងនៅក្នុងប័ណ្ណសារដែលអ្នកទទួលបានពីគណនី 1Byte របស់អ្នក។ ប្រសិនបើអ្នកទាញយកប័ណ្ណសារវិញ្ញាបនបត្រពីអ៊ីមែលដែលបានផ្ញើដោយ COMODOឯកសារអាចនឹងត្រូវបំបែកជាបីផ្នែក ដូចជា COMODORSADomainValidationSecureServerCA.crt, COMODORSAAddTrustCA.crt និង AddTrustExternalCARoot.crt ។ ក្នុងករណីនេះ វានឹងចាំបាច់ក្នុងការបញ្ចូលពួកវាទៅក្នុងឯកសារ .crt តែមួយតាមលំដាប់ដូចខាងក្រោម៖
- COMODORSADomainValidationSecureServerCA.crt
- COMODORSAAddTrustCA.crt
- AddTrustExternalCARoot.crt ។
អ្នកអាចប្រើកម្មវិធីកែអត្ថបទធម្មតានៅលើកុំព្យូទ័ររបស់អ្នកដើម្បីផ្សំពួកវា ប៉ុន្តែវាចាំបាច់ណាស់ក្នុងការធ្វើឱ្យប្រាកដថាមិនមានចន្លោះទទេរវាងកូដទាំងបីដូចដែលបានបង្ហាញខាងក្រោម៖
ជំហានទី 3
Private Key. កូដនេះគួរតែត្រូវបានបង្កើតនៅលើ Server របស់អ្នក រួមជាមួយនឹងលេខកូដ CSR ដែលត្រូវបានប្រើសម្រាប់ការធ្វើឱ្យសកម្មវិញ្ញាបនបត្រ។ លេខកូដនេះគឺសម្ងាត់. វាមិនត្រូវបានផ្តល់ឱ្យយើងនៅដំណាក់កាលណាមួយនៃដំណើរការវិញ្ញាបនបត្រទេ ដូច្នេះវាអាចត្រូវបានរកឃើញតែនៅលើ Server ឬទីតាំងផ្សេងទៀតដែល CSR ត្រូវបានបង្កើតឡើង។
នៅពេលដែលអ្នកមានឯកសារដែលត្រូវការទាំងអស់ ហើយប្រាកដថាវិញ្ញាបនបត្រត្រូវគ្នានឹង Private Key របស់អ្នក (ដែលអាច ពិនិត្យដោយប្រើឧបករណ៍នេះ) អ្នកអាចចាប់ផ្តើមការដំឡើងដោយធ្វើតាមជំហានខាងក្រោម។
1) ផ្ទុកឡើងឯកសារដែលបានរៀបរាប់ខាងលើទៅ Server ។ វាប្រហែលជាងាយស្រួលជាងក្នុងការប្រើថតតែមួយដើម្បីរក្សាទុកឯកសារ (ដូចជា xampp\apache\ssl) ទោះយ៉ាងណាក៏ដោយ អ្នកអាចផ្ទុកឯកសារទៅថតណាមួយនៅលើ Server ដែលងាយស្រួលសម្រាប់អ្នក។
2) កំណត់ទីតាំងឯកសារកំណត់រចនាសម្ព័ន្ធសម្រាប់គេហទំព័ររបស់អ្នក។ មានវិធីពីរយ៉ាងដើម្បីកំណត់ទីតាំង៖
- ដោយផ្ទាល់ពីផ្ទាំងបញ្ជា XAMPP៖
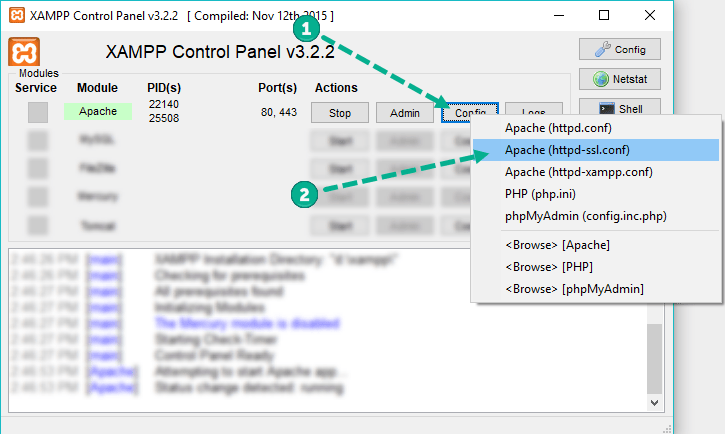
- ដោយប្រើកម្មវិធីរុករកឯកសារ។ ផ្លូវទៅកាន់ឯកសារកំណត់រចនាសម្ព័ន្ធអាស្រ័យលើថតដែលអ្នកបានជ្រើសរើសកំឡុងពេលដំឡើងផ្ទាំងបញ្ជា XAMPP។ អ្នកអាចឃើញថតនៃការដំឡើងនៅពេលបើកបន្ទះ៖
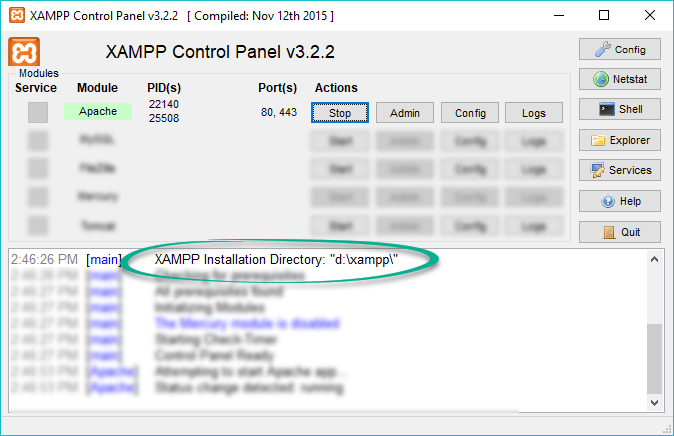
ទីតាំងដែលបានបញ្ជាក់គួរតែមាន កម្មវិធី Apache folder។ ពីទីនោះចូលរកទៅ conf ថត >> extra ថត >> httpd-ssl.conf file. អ្នកអាចបើកឯកសារដោយប្រើកម្មវិធីកែប្រែអត្ថបទណាមួយ។
ពាក្យបញ្ជាខាងក្រោមអាចមានប្រយោជន៍ក្នុងការស្វែងរកឯកសារកំណត់រចនាសម្ព័ន្ធទាំងអស់ដែល Apache អាន Virtual Hosts៖
“D:\xampp\apache\bin\httpd.exe” -S
សូមប្រាកដថាប្រើផ្លូវផ្ទាល់ខ្លួនរបស់អ្នកទៅកាន់ថត XAMPP នៅក្នុងពាក្យបញ្ជា។
- កែសម្រួលឯកសារកំណត់រចនាសម្ព័ន្ធជាមួយ Virtual Host សម្រាប់ port 443 និងរក្សាទុកការផ្លាស់ប្តូរ។ នេះគឺជាឧទាហរណ៍នៃប្លុកដែលគួរតែត្រូវបានបន្ថែម:
DocumentRoot “/var/www”
ServerName yoursite.com
ServerAlias www.yoursite.com
SSLEngine បើក
SSLCertificateFile “D:/xampp/apache/ssl/yourdomain_com.crt”
SSLCertificateKeyFile “D:/xampp/apache/ssl/yourdomain_com.key”
SSLCACertificateFile “D:/xampp/apache/ssl/yourdomain_com.ca-bundle”
សូមប្រាកដថាប្រើផ្លូវផ្ទាល់ខ្លួន និងឈ្មោះឯកសាររបស់អ្នកនៅក្នុងការណែនាំវិញ្ញាបនបត្រ។
ចំណាំ (Note)៖ ជាធម្មតា មានវិញ្ញាបនបត្រ self-signed បានដំឡើងរួចហើយនៅលើ Server ។ ក្នុងស្ថានភាពនេះ វាមិនចាំបាច់ក្នុងការបន្ថែម Virtual Host ផ្សេងទៀតទេ។ ច្រកដែលមានស្រាប់សម្រាប់ Port 443 គួរតែត្រូវបានកែសម្រួលជាមួយនឹងផ្លូវទៅកាន់វិញ្ញាបនបត្រ Trusted ថ្មី Bundle និង Private Key របស់អ្នក។
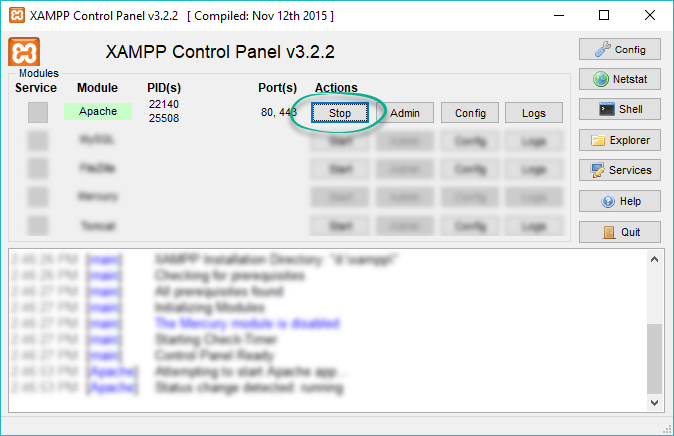
- បន្ទាប់ពីការផ្លាស់ប្តូរត្រូវបានរក្សាទុក សូមចាប់ផ្តើម Server ឡើងវិញ។ នេះអាចត្រូវបានធ្វើតាមរយៈផ្ទាំងបញ្ជា XAMPP ដោយបញ្ឈប់កម្មវិធី Apache៖
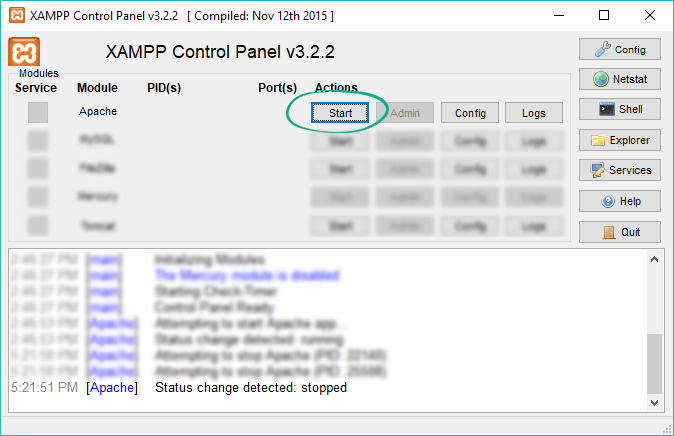
ហើយបន្ទាប់មកចាប់ផ្តើមវាម្តងទៀត៖
នៅពេលដែលជំហានខាងលើត្រូវបានបញ្ចប់អ្នកអាចពិនិត្យមើលការដំឡើងដោយប្រើ ឧបករណ៍ពិនិត្យ SSL ពី 1Byte.