កំឡុងពេលដំឡើង SSL ប្រសិនបើអ្នកកំពុងប្រើប្រព័ន្ធដែលមានមូលដ្ឋានលើ Windows វាអាចមានពេលខ្លះដែលអ្នកត្រូវបង្កើតសំណើសុំចុះហត្ថលេខាលើវិញ្ញាបនបត្រ (CSR) និង Private Key នៅខាងក្រៅ Windows keystore។ វាអាចមានប្រយោជន៍ ជាឧទាហរណ៍ ប្រសិនបើអ្នកចង់បម្រុងទុកវិញ្ញាបនបត្រ SSL របស់អ្នក ឬនាំចូលវាទៅ Server ច្រើន។ នេះជាជំហានដែលអ្នកនឹងធ្វើតាមដើម្បីបង្កើត CSR ដោយប្រើឧបករណ៍កម្មវិធី OpenSSL៖
ជំហានទី 1: ដំឡើង OpenSSL នៅលើ Windows PC របស់អ្នក
1.1. ចុច នៅទីនេះ និងរុករកទៅកាន់ឯកសារ ការចែកចាយប្រព័ន្ធគោលពីរពាក់ព័ន្ធ OpenSSL ភាគីទីបី តារាង។
ចំណាំ (Note)៖ យើងណែនាំបញ្ជី Binaries នេះព្រោះវាផ្តល់ជម្រើសដើម្បីទាញយកឯកសារកម្មវិធីដែលអាចប្រតិបត្តិបានរួចរាល់។ វាងាយស្រួលជាងការទាញយក ឯកសារគោលពីរ ពីទំព័រ គេហទំព័រផ្លូវការ.
១.២. ជ្រើសរើសមួយក្នុងចំណោម OpenSSL សម្រាប់ Windows ជម្រើសដោយជ្រើសរើសការពិពណ៌នាដែលអនុវត្តចំពោះអ្នក។
១.៣. អ្នកនឹងឃើញផ្នែកទាញយកដូច ឧទាហរណ៍ កន្លែងដែលអ្នករំកិលចុះក្រោមហើយមើល ទាញយក Win32/Win64 OpenSSL។ ទាញយក Light OpenSSL ចុងក្រោយបំផុត អាស្រ័យលើកំណែ Windows របស់អ្នក ពោលគឺ 'Win32' ឬ 'Win64'។ ប្រសិនបើអ្នកមិនដឹងថាអ្នកមានវីនដូអ្វីទេ សូមទាញយក OpenSSL 32 ប៊ីត។
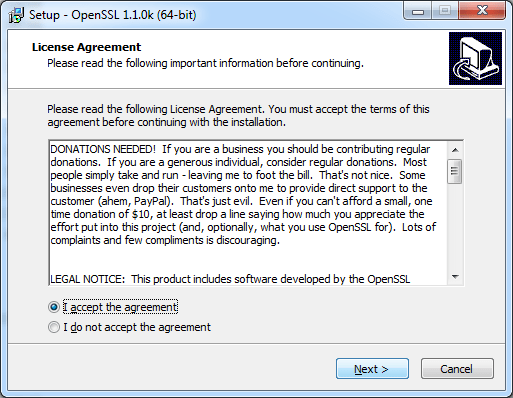
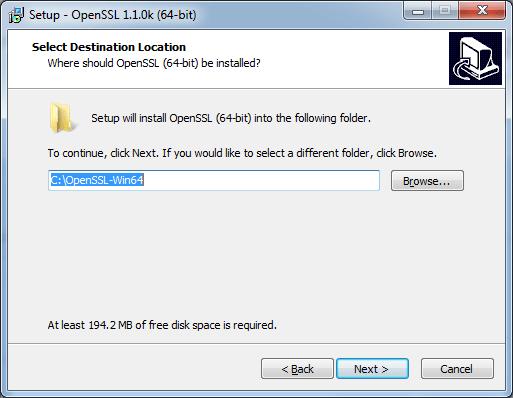
១.៤. ចុចពីរដងដើម្បីចាប់ផ្តើមការដំឡើង ហើយធ្វើតាមជំហាន។ នៅពេលរួចរាល់ អ្នកនឹងដំឡើងកម្មវិធី OpenSSL នៅលើ Server ។ នេះគឺជាអេក្រង់ដំឡើងមួយចំនួនដែលអ្នកនឹងឃើញ៖
ចំណាំ (Note)៖ តាមលំនាំដើម ថតមូលដ្ឋាន OpenSSL នឹងត្រូវបានទាញយកទៅ C Drive នៅលើកុំព្យូទ័ររបស់អ្នក។ វានឹងត្រូវបានដាក់ឈ្មោះតាមកំណែ OpenSSL ដែលអ្នកបានជ្រើសរើស។
FURTHER READING: |
| 1. ការបង្កើត CSR ដោយប្រើ WHM |
| 2. ការបង្កើត CSR នៅលើ Webmin |
| 3. ការបង្កើត CSR នៅក្នុង Vesta CP |
ជំហានទី 2៖ ជំហានកំណត់រចនាសម្ព័ន្ធ OpenSSL
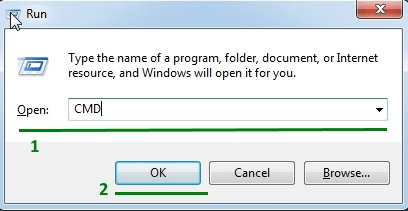
2.1 ។ បើក Cmd (បន្ទាត់ពាក្យបញ្ជាវីនដូ) ។ ដើម្បីធ្វើដូចនេះចុច ឈ្នះ + R នៅលើក្តារចុចរបស់អ្នក។ បន្ទាប់មកវាយ cmd ហើយចុច OK.
បន្ទាប់អ្នកនឹងឃើញ cmd terminal៖
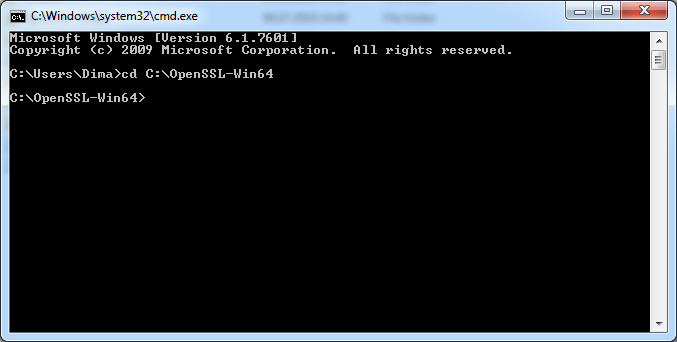
២.២. ចូលទៅកាន់ថតឯកសារមូលដ្ឋាន OpenSSL ដោយដំណើរការ (បន្ថែម) ពាក្យបញ្ជាខាងក្រោមក្នុង cmd៖
ស៊ីឌី * ថតមូលដ្ឋាន OpenSSL *
ចំណាំ (Note)៖ ផ្លូវទៅកាន់ទីតាំងនៃថតឯកសារមូលដ្ឋាន OpenSSL ដែលបានដំឡើងនៅក្នុងកុំព្យូទ័ររបស់អ្នកនឹងមើលទៅដូច C:\OpenSSL-Win32 ឬ C:\OpenSSL-Win64 ។
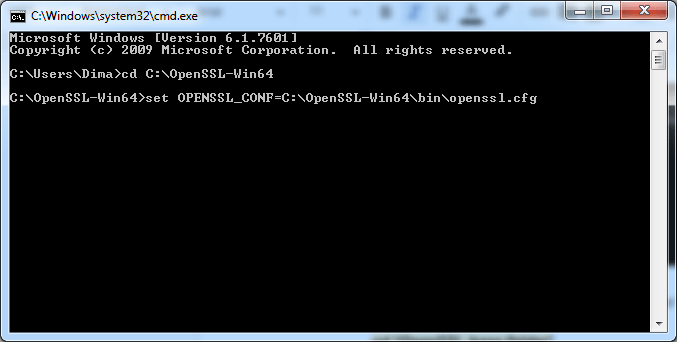
២.៣. ឥឡូវដំណើរការពាក្យបញ្ជាខាងក្រោមក្នុង cmd៖
កំណត់ OPENSSL_CONF=*OpenSSL base folder*\bin\openssl.cfg
2.4. ចាប់ផ្ដើមកុំព្យូទ័ររបស់អ្នកឡើងវិញ ដើម្បីអនុវត្តការផ្លាស់ប្តូរ។
ជំហានទី 3៖ បង្កើត CSR Code
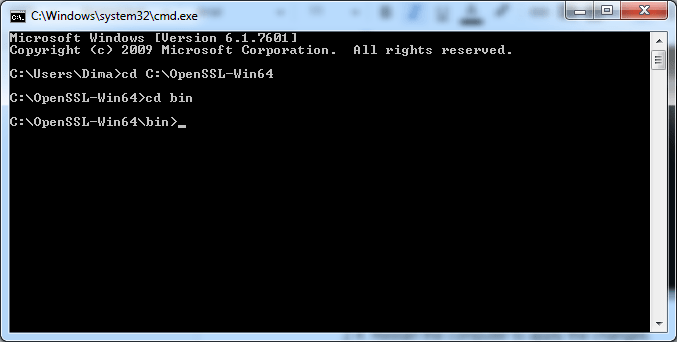
៣.១. ចូលទៅកាន់ថតរង \bin នៃថត OpenSSL របស់អ្នកដោយដំណើរការពាក្យបញ្ជានេះ៖
cd bin
៣.២. បង្កើតលេខកូដ CSR និង Private key សម្រាប់វិញ្ញាបនបត្ររបស់អ្នកដោយដំណើរការពាក្យបញ្ជានេះ៖
openssl req -new -newkey rsa:2048 -nodes -keyout server.key -out server_csr.txt
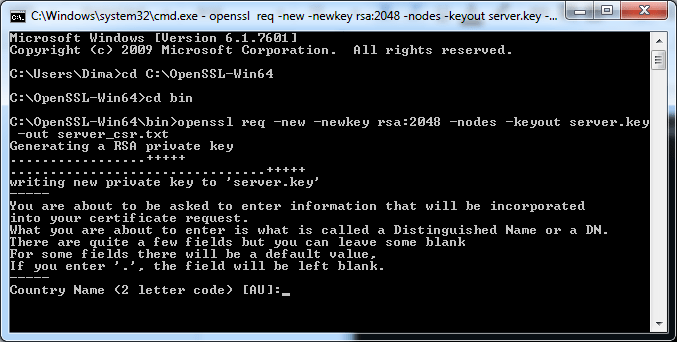
ចំណាំ (Note)៖ server.key និង server_csr.txt គឺជា Private Key និងឯកសារកូដ CSR ។ មានអារម្មណ៍សេរីក្នុងការប្រើប្រាស់ឈ្មោះឯកសារណាមួយ ដរាបណាអ្នករក្សាផ្នែកបន្ថែម .key និង .txt ។
Tip៖ ប្រសិនបើអ្នកចង់បង្កើតកូន Private Key និងលេខកូដ CSR នៅក្នុងទីតាំងផ្សេងទៀតពី get go សូមរំលងជំហាន 3.1។ ហើយជំនួសផ្នែក openssl នៃពាក្យបញ្ជាដោយ * OpenSSL base folder*\bin\openssl.exe:
*OpenSSL base folder*\bin\openssl.exe req -new -newkey rsa:2048 -nodes -keyout *Some path*\server.key -out *Some path*\server_csr.txt
៣.៣. បំពេញផ្នែកដែលត្រូវការ៖
- ប្រទេស (Country): ប្រើអក្សរ 2 ត្រឹមត្រូវ លេខកូដប្រទេស.
- រដ្ឋឬខេត្ត៖ ប្រើឈ្មោះរដ្ឋ ឬខេត្តរបស់អ្នក ឬប្រើឈ្មោះតំបន់ ប្រសិនបើអ្នកមិនមាន។
- តំបន់ ឬទីក្រុង: ប្រើទីក្រុង ទីក្រុង ឬឈ្មោះតំបន់ផ្សេងទៀត។
- ក្រុមហ៊ុន: ប្រើឈ្មោះក្រុមហ៊ុន/អង្គការរបស់អ្នក ឬដាក់ NA (មិនអាចអនុវត្តបាន)។
- Organizational Unit: ប្រើអង្គភាព ឬឈ្មោះនាយកដ្ឋានរបស់អ្នក ឬដាក់ NA (មិនអាចអនុវត្តបាន)។
- Common Name: ដាក់ domain របស់អ្នកនៅទីនេះ (ឧ. www.example.com ឬ example.com), ដាក់ *.domain_name (ឧ. *.example.com) ប្រសិនបើអ្នកកំពុងប្រើ Wildcard type SSL។
ចំណាំ (Note)៖ សម្រាប់ 'អាសយដ្ឋានអ៊ីមែល', 'ពាក្យសំងាត់ប្រកួតប្រជែង' និង 'ឈ្មោះក្រុមហ៊ុនជាជម្រើស' គ្រាន់តែចុច Enter ដើម្បីទុកពួកវាឱ្យនៅទទេ ព្រោះទាំងនេះគឺជា legacy fields ។
ជាជម្រើស អ្នកអាចដំណើរការពាក្យបញ្ជាខាងក្រោមជាមួយនឹងប៉ារ៉ាម៉ែត្រទាំងអស់ដែលបានរាយបញ្ជីរួចហើយ។ ជំនួសព័ត៌មានលំនាំដើមជាមួយនឹងតម្លៃជាក់ស្តែងនៅក្នុងពាក្យបញ្ជា មុនពេលអ្នកចម្លង-បិទភ្ជាប់វាទៅ cmd ហើយចុច Enter:
openssl req -new -newkey rsa:2048 -nodes -keyout server.key -out server_csr.txt -subj “/C=*Country*/ST=*State or Province*/L=*Locality or City*/O=*Company*/OU=*Organizational unit*/CN=*Common Name*”
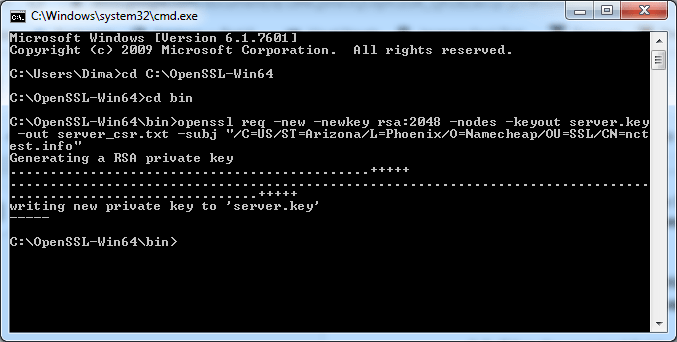
៣.៤. វានឹងបង្កើត Private Key (.key) និងកូដ CSR (.txt) នៅក្នុងឯកសារ * OpenSSL base folder*\bin។ បើកឯកសារ CSR ដោយផ្ទាល់ជាមួយកម្មវិធីកែប្រែអត្ថបទ ឬជាមួយ Notepad ការប្រើប្រាស់ពាក្យបញ្ជានេះ៖
notepad server_csr.txt
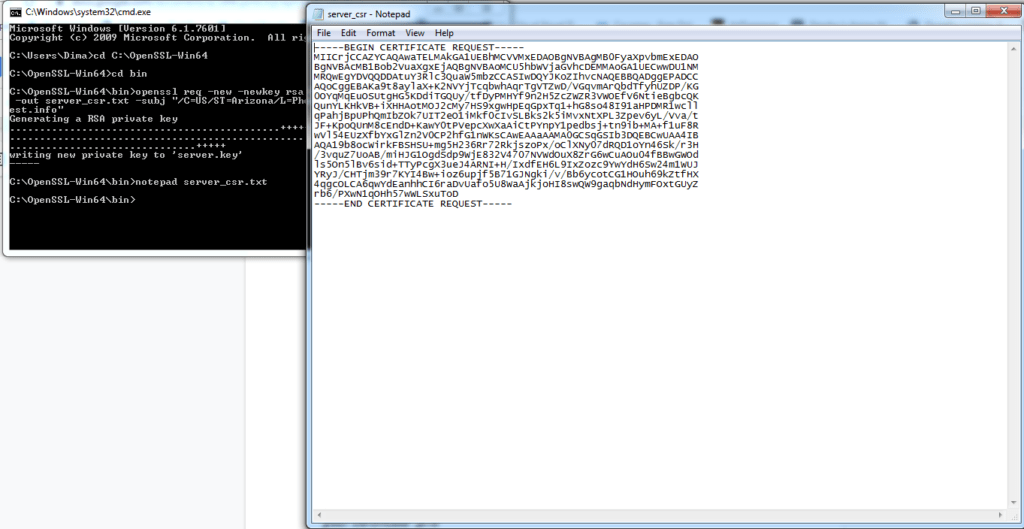
៣.៥. ចម្លងកូដដែលបានបង្កើត រួមទាំង —–ចាប់ផ្តើមការស្នើសុំចុះហត្ថលេខាលើវិញ្ញាបនបត្រ—– និង —– បញ្ចប់ការស្នើសុំចុះហត្ថលេខាលើវិញ្ញាបនបត្រ—– ទៅ បើកដំណើរការវិញ្ញាបនបត្រ SSL របស់អ្នក។.
ចំណាំ (Note)៖ ប្រសិនបើ CSR ត្រូវបានបង្កើតតាមវិធីនេះ ប៉ុន្តែវិញ្ញាបនបត្រត្រូវការដំឡើងនៅលើ Windows Server (ឧ. IIS) អ្នកនឹងត្រូវបង្កើតឯកសារ PFX ពីវិញ្ញាបនបត្រ និង Private Key ។ ដើម្បីធ្វើដូច្នេះ ប្រើពាក្យបញ្ជានេះ៖
openssl pkcs12 -export -out *វិញ្ញាបនបត្ររបស់អ្នក*.pfx -inkey server.key -in *វិញ្ញាបនបត្ររបស់អ្នក*.p7b
ឬជំនួសឱ្យពាក្យបញ្ជានោះ អ្នកអាចប្រើឧបករណ៍អនឡាញដូចនេះ https://ssl-checker.1byte.com/ssl-converter។ បន្ទាប់មកទៅមុខនិង ទាញចូល វាទៅក្នុង Windows server.

