
សេវាគេហទំព័រ Amazon ផ្តល់នូវការបង្ហោះដែលសមរម្យសម្រាប់ការបង្ហោះទាំង Server និងកម្មវិធីទូទៅ ក៏ដូចជាសេវាកម្មបន្ថែមមួយចំនួន។ ដូច្នេះហើយ មានជម្រើសផ្សេងៗសម្រាប់ដំឡើងវិញ្ញាបនបត្រ SSL នៅលើ AWS។
អត្ថបទនេះរៀបរាប់អំពីជំហានក្នុងការដំឡើងវិញ្ញាបនបត្រ SSL របស់អ្នកនៅលើកម្មវិធី ឬសេវាកម្មដែលទាក់ទងនឹង Amazon ជាក់លាក់មួយចំនួន។
ព័ត៌មានចាំបាច់មួយចំនួន
សម្រាប់ការដំឡើង SSL ជាទូទៅអ្នកត្រូវការសមាសភាគបី៖ វិញ្ញាបនបត្រ ខ្សែសង្វាក់វិញ្ញាបនបត្រកម្រិតមធ្យម (CA-bundle) និង Private Key។
- វិញ្ញាបនបត្រ SSL ត្រូវបានផ្ញើជាឯកសារទម្រង់ PEM ជាមួយ .crt extension. ប្រសិនបើផ្នែកបន្ថែមមិនត្រូវបានបង្ហាញនៅក្នុងប្រព័ន្ធរបស់អ្នកតាមលំនាំដើមសម្រាប់ឯកសារទាំងអស់នោះ SSL នឹងមាន "វិញ្ញាបនបត្រសុវត្ថិភាព” នៅក្នុងការពិពណ៌នាឯកសារ។ ឯកសារដូចគ្នាក៏អាចទាញយកបានដែរ ផ្លូវនេះ.
នៅខាងក្នុងឯកសារមានកូដដូចនេះ៖
- An ខ្សែសង្វាក់វិញ្ញាបនបត្រកម្រិតមធ្យម (CA-bundle) ត្រូវបានផ្ញើជាឯកសារទម្រង់ PEM ផងដែរ ប៉ុន្តែឯកសារនេះមាន .ca-bundle extension មួយ។ នៅក្នុងឯកសារ ជាធម្មតាមានលេខកូដមួយ ឬពីរស្រដៀងនឹងវិញ្ញាបនបត្រ។ កញ្ចប់ CA ដូចនឹងវិញ្ញាបនបត្រដែរ ជាធម្មតានៅក្នុងប័ណ្ណសារ SSL ដែលអ្នកទទួលបានបន្ទាប់ពីការធ្វើឱ្យសកម្ម SSL ។
- A Private Key ត្រូវបានបង្កើតរួមជាមួយសំណើចុះហត្ថលេខាលើវិញ្ញាបនបត្រ (CSR) ដែលប្រើដើម្បីធ្វើឱ្យ SSL របស់អ្នកសកម្ម។ ប្រសិនបើអ្នកបានបង្កើត CSR នៅលើ Server របស់អ្នក គន្លឹះត្រូវបានរក្សាទុកនៅកន្លែងតែមួយ។ វាមាន.key extension។
វាមានលេខកូដដូចនេះ៖
នៅលើ Server របស់អ្នក មាតិកានៃឯកសារអាចត្រូវបានពិនិត្យដោយប្រើពាក្យបញ្ជា cat (បញ្ជាក់ឈ្មោះឯកសារពិតប្រាកដនៅក្នុងពាក្យបញ្ជារបស់អ្នក)៖
ឆ្មា example.crt
នៅលើម៉ាស៊ីនមូលដ្ឋាន អ្នកអាចចុចកណ្ដុរស្ដាំលើឯកសារ ជ្រើសរើស Open withហើយជ្រើសរើសកម្មវិធីនិពន្ធអត្ថបទធម្មតាណាមួយ។
សមាសធាតុ SSL ដែលបានរៀបរាប់ខាងលើ ជួនកាលនឹងត្រូវបញ្ចូលជាឯកសារ ឬបង្ហោះជាកូដ អាស្រ័យលើសេវាកម្ម Amazon ពិសេសដែលអ្នកប្រើ។
FURTHER READING: |
| 1. ការដំឡើងវិញ្ញាបនបត្រ SSL ដោយប្រើ DirectAdmin |
| 2. ការដំឡើងវិញ្ញាបនប័ត្រ SSL នៅលើ Tomcat |
| 3. ការដំឡើងវិញ្ញាបនបត្រ SSL នៅលើ Nginx |
Elastic Compute Cloud (EC2)
ប្រសិនបើអ្នកមាន EC2 ជាទូទៅវាមានន័យថាបណ្តាញ សំបុត្រ ឬ Server កម្មវិធីដាច់ដោយឡែកត្រូវបានដំឡើង ហើយ SSL គួរតែត្រូវបានដំឡើងនៅលើ Server នោះ។ សម្រាប់ព័ត៌មានបន្ថែមអំពីការដំឡើងវិញ្ញាបនបត្រ SSL អ្នកអាចយោងទៅការណែនាំ នៅទីនេះ.
អ្វីៗនឹងខុសគ្នាបន្តិចបន្តួច ប្រសិនបើអ្នកប្រើ Amazon Linux AMI ។
Amazon Linux គឺជាការចែកចាយ Linux ជាក់លាក់ដែលផ្តល់ដោយ Amazon ។ ជាធម្មតាវាផ្អែកលើ CentOS Linux ជាមួយនឹង Apache Server ដែលបានដំឡើង (ទោះបីជាកំណែដែលមានមូលដ្ឋានលើ Debian ក៏មានដែរ)។
នៅលើ Amazon Linux 2 ដំណើរការដំឡើងគឺដូចគ្នាទៅនឹង ការដំឡើង SSL នៅលើ Apache Server នៅលើ CentOS ។
សម្រាប់កំណែផ្សេងទៀតនៃ Amazon Linux មានលក្ខណៈពិសេសមួយ។ ដើម្បីដំណើរការការតភ្ជាប់ HTTPS ដែលបានអ៊ិនគ្រីបនៅលើ Apache Webserver mod_ssl ចាំបាច់ត្រូវដំឡើងដោយមានជំនួយពីពាក្យបញ្ជាខុសគ្នាបន្តិចបន្តួចចំពោះពាក្យបញ្ជាដែលជាធម្មតាប្រើនៅលើ Apache៖
sudo yum ដំឡើង -y mod24_ssl
ទីតាំងឯកសារកំណត់រចនាសម្ព័ន្ធ SSL លំនាំដើមនៅលើ Linux AMI គឺ /etc/httpd/conf.d/ssl.conf. ការផ្លាស់ប្តូរទាំងអស់ដែលត្រូវការដើម្បីដំឡើង SSL អាចត្រូវបានធ្វើឡើងនៅក្នុងឯកសារនេះ។
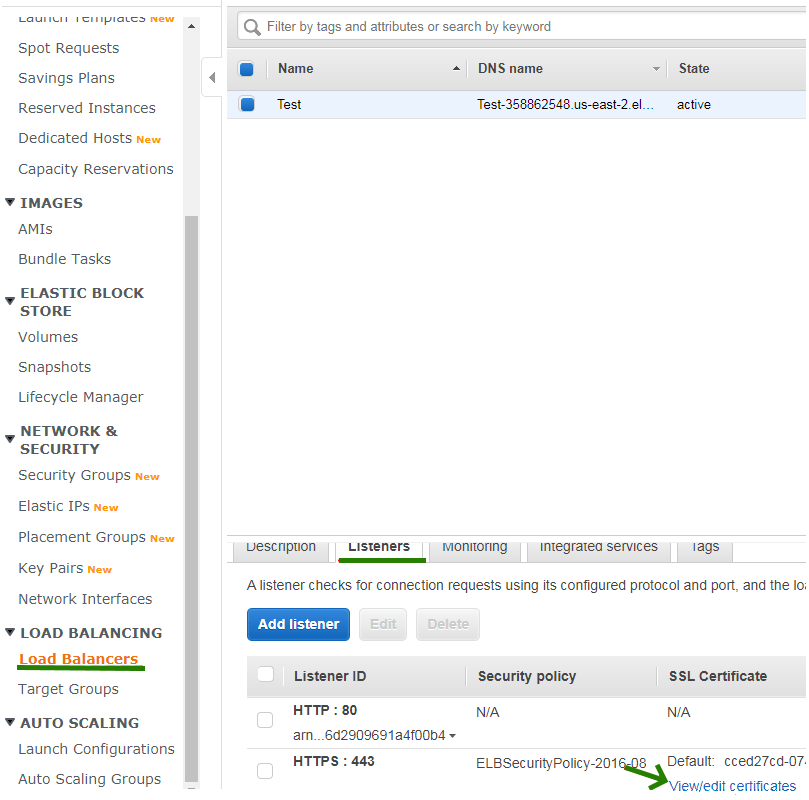
Elastic Load Balancer (ELB)
Load Balancer គឺជាសេវាកម្មជាក់លាក់មួយដែលអនុញ្ញាតឱ្យគ្រប់គ្រងចរាចរឆ្លងកាត់ករណីបង្ហោះជាច្រើន។ Amazon ផ្តល់សេវាតុល្យភាពបន្ទុកដែលអាចធានាបានជាមួយនឹងវិញ្ញាបនបត្រ SSL ។
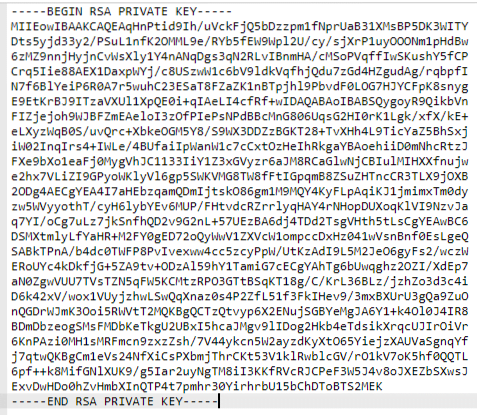
អ្នកអាចធ្វើបាន បង្ហោះ SSL ដោយផ្ទាល់តាមរយៈចំណុចប្រទាក់ក្រាហ្វិកទៅកាន់អ្នកគ្រប់គ្រងវិញ្ញាបនបត្រ AWS (ACM) (1) ឬធ្វើវា តាមរយៈបន្ទាត់ពាក្យបញ្ជានៅក្នុង AWS Identity & Access Management (IAM) (2).
- ជម្រើសដំបូងគឺសាមញ្ញណាស់។ កំឡុងពេលបង្កើត Load balancer អ្នកអាចនាំចូលវិញ្ញាបនបត្រថ្មីក្នុងជំហានទីពីរនៃការដំឡើង៖
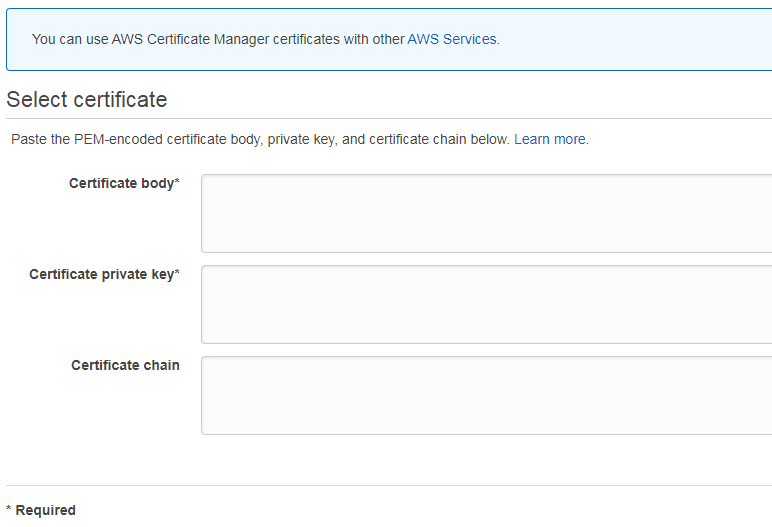
គ្រាន់តែជ្រើសរើសផ្ទុកវិញ្ញាបនបត្រទៅ ACM (ជម្រើសនេះកំណត់ SSL លំនាំដើមសម្រាប់ករណីដែលមិនបានចាត់តាំងទាំងអស់) ឬ IAM (វាអនុញ្ញាតឱ្យអ្នកបន្ថែម SSLs ច្រើន) ហើយបិទភ្ជាប់សមាសធាតុ SSL ទាំង 3 ជាកូដ៖
- ចំពោះ Certificate នៅក្នុងទម្រង់ "Certificate body";
- CA-bundle នៅក្នុងទម្រង់ "Certificate Chain";
- និង Private Key នៅក្នុងទម្រង់ "Private Key" ។
ជ្រើសរើសគោលការណ៍សុវត្ថិភាពពីបញ្ជីទម្លាក់ចុះ (លំនាំដើមនឹងដំណើរការល្អ) ហើយបន្តការដំឡើងឧបករណ៍ Load Balancer។
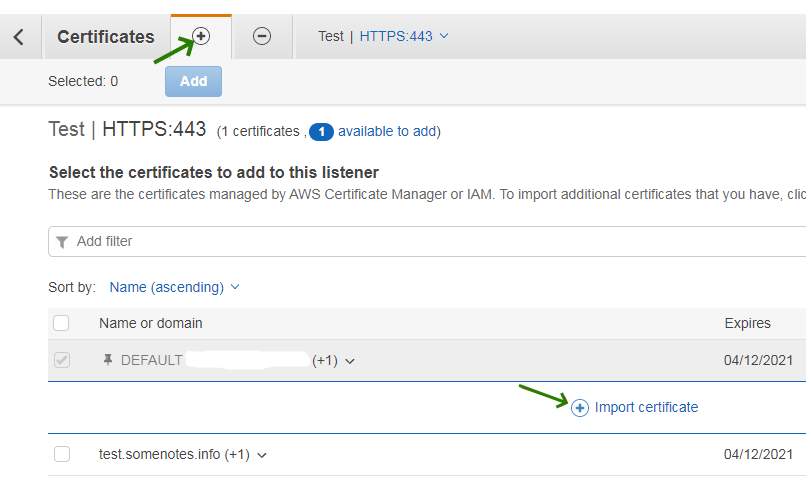
SSL ក៏អាចត្រូវបានបន្ថែមនៅពេលក្រោយដោយចូលទៅកាន់ Load Balancers ម៉ឺនុយ >> Listeners >> មើល/កែសម្រួលវិញ្ញាបនបត្រ.
ចុចលើប៊ូតុង + (បូក) ដើម្បីបន្ថែមវិញ្ញាបនបត្រថ្មី ហើយបើកវិញ្ញាបនបត្រផ្ទាំង Import certificate ។
ទម្រង់សម្រាប់ការផ្ទុកឡើង SSL នឹងបង្ហាញ៖
- សម្រាប់ ជម្រើសទីពីរផ្ទុកឡើងវិញ្ញាបនបត្រ Private Key និងកញ្ចប់ CA ទៅ Server របស់អ្នក ហើយបើកបន្ទាត់ពាក្យបញ្ជា។ ឯកសារទាំងបីអាចត្រូវបានដំឡើងដោយប្រើពាក្យបញ្ជាតែមួយ៖
aws iam upload-server-certificate –server-certificate-name certificate_object_name –certificate-body file://*path to your certificate file* –private-key file://*path to your private key file* –certificate-chain file://*path to your CA-bundle file*
ចំណាំ: នៅពេលអ្នកបញ្ជាក់ឯកសារជាប៉ារ៉ាម៉ែត្រ (ឧទាហរណ៍សម្រាប់ លិខិតបញ្ជាក់ និង កូនសោឯកជន parameters), file:// គួរតែត្រូវបានរួមបញ្ចូលជាផ្នែកនៃឈ្មោះឯកសារ។
ចំណាំ: ចំពោះ certificate_object_name ប៉ារ៉ាម៉ែត្រត្រូវបានប្រើដើម្បីផ្តល់ឈ្មោះផ្ទាល់ខ្លួនរបស់អ្នកទៅវិញ្ញាបនបត្រ ដូច្នេះអ្នកអាចកំណត់អត្តសញ្ញាណវាបន្ថែមទៀត។
នៅពេលអ្នកផ្ទុកឡើងឯកសារវិញ្ញាបនបត្ររបស់អ្នក IAM នឹងធ្វើឱ្យឯកសារមានសុពលភាព ប្រសិនបើលក្ខខណ្ឌខាងក្រោមត្រូវបានបំពេញ៖
- វិញ្ញាបនប័ត្រគួរតែជាទម្រង់ X.509 PEM ។
- កាលបរិច្ឆេទបច្ចុប្បន្នគួរតែស្ថិតនៅចន្លោះការចេញវិញ្ញាបនបត្រ និងកាលបរិច្ឆេទផុតកំណត់។
- វិញ្ញាបនបត្រ និងឯកសារសោឯកជនគួរតែមានធាតុតែមួយ មានន័យថាឯកសារវិញ្ញាបនបត្រមួយ និងសោដែលត្រូវគ្នាមួយ។
- Private Key គួរតែត្រូវគ្នានឹងវិញ្ញាបនបត្រ។
- Private Key គួរតែជាទម្រង់ PEM ដូចជាវិញ្ញាបនបត្រដែរ។ ទម្រង់ត្រឹមត្រូវនៃអត្ថបទនៅក្នុងឯកសារគន្លឹះគួរតែចាប់ផ្តើមដោយ —–BEGIN RSA PRIVATE KEY—– ហើយបញ្ចប់ដោយ —–END RSA PRIVATE KEY—– ។
- Private Key មិនគួរត្រូវបានអ៊ិនគ្រីបដោយប្រើពាក្យសម្ងាត់ទេ។
នៅពេលដែលឯកសារត្រូវបានផ្ទុកឡើង អ្នកអាច ផ្ទៀងផ្ទាត់ព័ត៌មានវិញ្ញាបនបត្រ នៅក្នុង IAM ដោយប្រើពាក្យបញ្ជាខាងក្រោម៖
aws iam get-server-certificate –server-certificate-name certificate_object_name
លទ្ធផលគួរតែមើលទៅដូចនេះ:
arn:aws:iam::Your_AWS_Account_ID:server-certificate/Your_Certificate_Object_Name Certificate_Object_GUID
Your_AWS_Account_IDគឺជាឈ្មោះធនធាន Amazon តែមួយគត់ (ARN) និង Certificate_Object_GUID គឺជាអត្តសញ្ញាណប័ណ្ណនៃវិញ្ញាបនបត្រ។
នេះជាឧទាហរណ៍មួយ:
arn:aws:iam::123456789012:server-certificate/certificate_object_name ADGTHexampleLKBASAH
ខ្ទង់នៅក្នុងជួរទីមួយគឺ ARN ហើយបន្ទាត់ទីពីរគឺជាលេខសម្គាល់វិញ្ញាបនបត្រ។
- ប្រសិនបើអ្នកត្រូវការ បច្ចុប្បន្នភាព វិញ្ញាបនបត្រសម្រាប់ HTTPS ផ្ទុកតុល្យភាពអ្នកនឹងត្រូវប្រើ ARN នៃវិញ្ញាបនបត្រ។ ពាក្យបញ្ជាខាងក្រោមត្រូវបានប្រើក្នុងករណីបែបនេះដើម្បីកំណត់វិញ្ញាបនបត្រសម្រាប់ឧបករណ៍ Load Balancer៖
aws elb set-load-balancer-listener-ssl-certificate –load-balancer-name my-loadbalancer –load-balancer-port 443 –ssl-certificate-id arn:aws:iam::123456789012:server-certificate/certificate_object
ប៉ារ៉ាម៉ែត្រ my-loadbalancer គឺជាឈ្មោះនៃ Load Balancer របស់អ្នក។
សម្រាប់ព័ត៌មានលម្អិតអំពីការបង្កើត HTTPS Load Balancer និងការកំណត់ឈ្មោះរបស់វា សូមពិនិត្យមើល តាមការណែនាំ.
AWS API Gateway
តាមលំនាំដើម Amazon API ប្រើ តំណចូលដំណើរការលំនាំដើម ដែលមើលទៅដូចនេះ៖
https://api-id.execute-api.region.amazonaws.com/stage
ក្នុងករណីខ្លះ វាកាន់តែងាយស្រួលក្នុងការដំឡើងឈ្មោះម៉ាស៊ីនផ្ទាល់ខ្លួនសម្រាប់វាជំនួសវិញ។ តំណភ្ជាប់ផ្ទាល់ខ្លួនក៏អាចមានសុវត្ថិភាពជាមួយនឹងវិញ្ញាបនបត្រ SSL ផងដែរ។
ដំណើរការគឺស្រដៀងគ្នាទៅនឹងការធានា Load Balancer។
- ចូលទៅកុងសូលកម្មវិធីគ្រប់គ្រងវិញ្ញាបនប័ត្រ AWS ។
- ជ្រើសរើសជម្រើស នាំចូលវិញ្ញាបនបត្រ។
- ទម្រង់ស្រដៀងគ្នាសម្រាប់ការបង្ហោះ SSL នឹងបើក។
- បិទភ្ជាប់កូដឯកសារវិញ្ញាបនបត្រជា "Certificate Body" កូដកញ្ចប់ CA ជា "Certificate chain" និងលេខកូដ Private Key ជា "Certificate Private key" ហើយចុច Next.
- រក្សាទុកការផ្លាស់ប្តូរដោយជ្រើសរើសជម្រើស Review and import ។
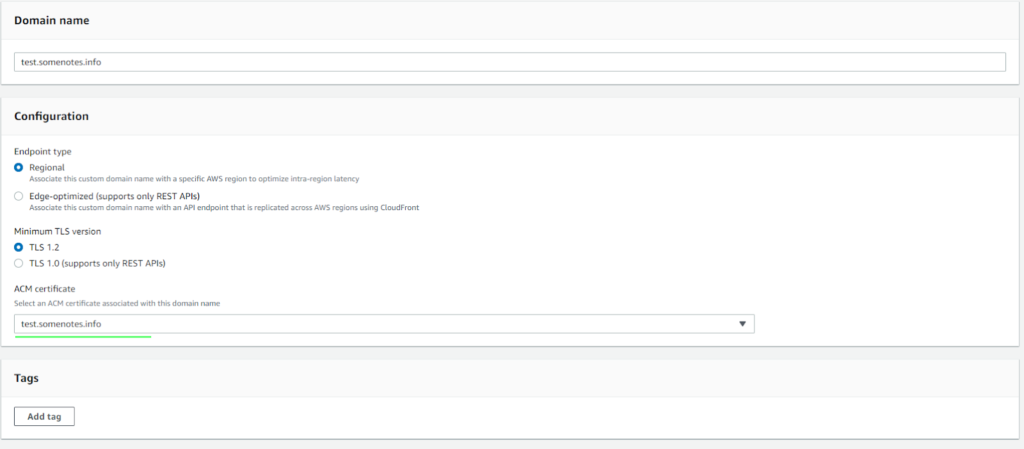
- ជ្រើស Custom domain ផ្ទាល់ខ្លួន ពី API Gateway ម៉ឺនុយ។
- ជ្រើសរើសឈ្មោះដែនផ្ទាល់ខ្លួនរបស់អ្នក។
- ចុច Edit.
- ជ្រើសរើស SSL ដែលត្រឹមត្រូវពីបញ្ជីទម្លាក់ចុះ ហើយរក្សាទុកការផ្លាស់ប្តូរ។
នៅចាំ! វិញ្ញាបនបត្រអាចចំណាយពេលរហូតដល់ 40 នាទីដើម្បីអនុវត្ត។
ជាជម្រើស អ្នកក៏អាចដំឡើង SSL តាមរយៈឈ្មោះដែន៖ ធ្វើបច្ចុប្បន្នភាព API-call តាមរយៈបន្ទាត់ពាក្យបញ្ជា។
ការស្នើសុំខ្លួនវានឹងមើលទៅដូចនេះ៖
បំណះ /domainឈ្មោះ/* API របស់អ្នក។ domain ឈ្មោះ*
{
“patchOperations”: [ {
"op": ជំនួស,
“ផ្លូវ”៖ *ប៉ារ៉ាម៉ែត្រប្រើដើម្បីកំណត់អត្តសញ្ញាណ SSL*,
"តម្លៃ": *តម្លៃប៉ារ៉ាម៉ែត្រ*,
"ពី" : // ប៉ារ៉ាម៉ែត្រជម្រើសដែលអ្នកអាចបញ្ជាក់ថាតើផ្នែកជាក់លាក់នៃកម្មវិធីគួរប្រើ SSL ។
} ]
}
ព័ត៌មានលម្អិតបន្ថែមអំពីពាក្យបញ្ជាអាចរកបាន នៅទីនេះ.
Amazon CloudFront
Amazon CloudFront គឺជាសេវាកម្មគេហទំព័រដែលអនុញ្ញាតឱ្យអ្នកបង្កើនល្បឿននៃការចែកចាយមាតិកានៅក្នុងទីតាំងផ្សេងៗគ្នាដោយរក្សាទុកវាមួយចំនួននៅក្នុងកន្លែងផ្ទុកពិសេស។
អ្នកអាចបង្ហោះវិញ្ញាបនបត្រ SSL តាមរយៈអ្នកគ្រប់គ្រង SSL ឬតាមរយៈបន្ទាត់ពាក្យបញ្ជា ដូចដែលបានពិពណ៌នាខាងលើនៅក្នុងផ្នែក "AWS API Gateway"។
បន្ទាប់ពីបន្ថែម SSL ការកំណត់ CloudFront ចាំបាច់ត្រូវធ្វើបច្ចុប្បន្នភាពដូចខាងក្រោម៖
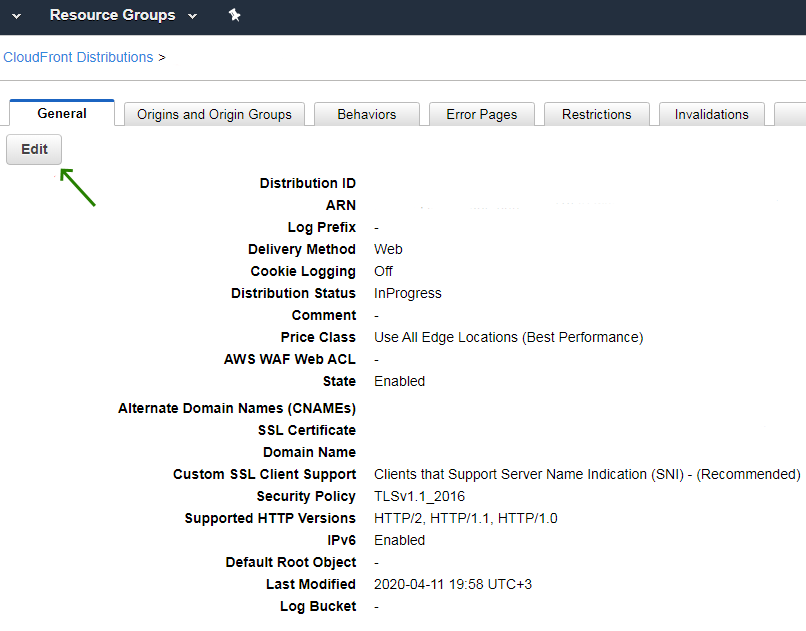
- បើកកុងសូល AWS របស់អ្នកហើយចូលទៅកាន់ កុងសូល CloudFront.
- ជ្រើសរើស ID របស់អង្គភាព CloudFront ដែលត្រូវការធ្វើបច្ចុប្បន្នភាព។
- ចូលទៅ General ផ្ទាំងហើយជ្រើស Edit.
ធ្វើបច្ចុប្បន្នភាព ឈ្មោះដែនជំនួស (CNAMEs) ជាមួយឈ្មោះដែន SSL របស់អ្នក ហើយជ្រើសរើស SSL ត្រឹមត្រូវពីបញ្ជី។
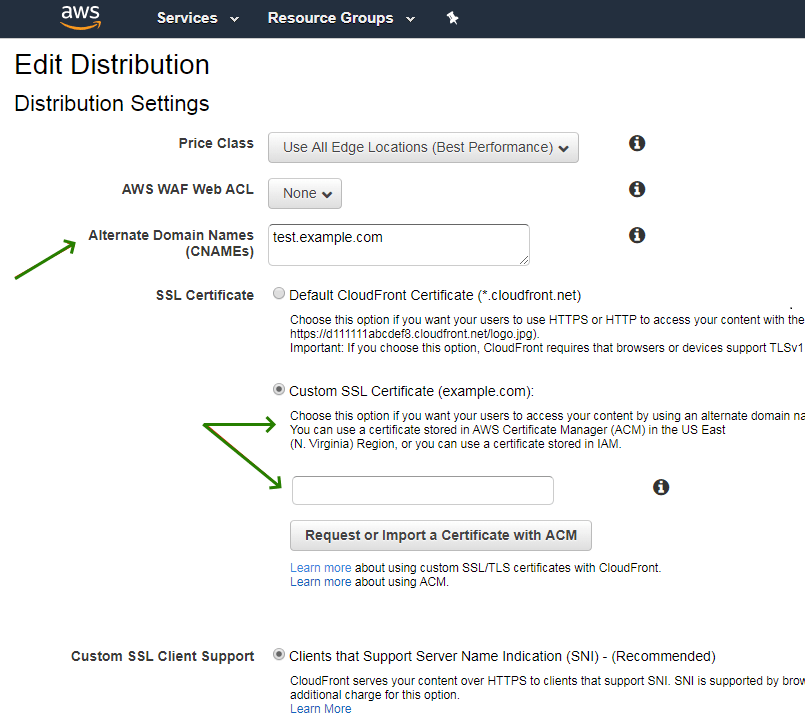
5. ចុច បាទ កែសម្រួល.
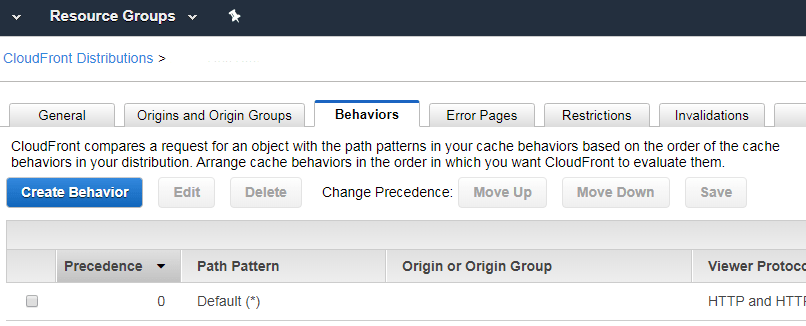
6. បន្ទាប់ពីនេះអ្នកអាចទៅ Behavior tab ហើយកំណត់ការបញ្ជូនបន្តពី HTTP ទៅ HTTPS ឬកំណត់ Cloudfront ទៅ HTTPS ប៉ុណ្ណោះ។
SSL អាចត្រូវបានតំឡើងកំឡុងពេលបង្កើតអង្គភាព CloudFront ផងដែរ។
ចំណាំ (Note)៖ ប្រសិនបើអ្នកចង់ប្រើវិញ្ញាបនបត្រ ACM ជាមួយ Amazon CloudFront សូមប្រាកដថាអ្នកនាំចូលវិញ្ញាបនបត្រដែលរក្សាទុកនៅក្នុងតំបន់ US East (N. Virginia) ។ បើមិនដូច្នេះទេ សូមប្រើវិញ្ញាបនបត្រដែលបាននាំចូលទៅ IAM ។
អ្នកអាចផ្ទៀងផ្ទាត់ថាវិញ្ញាបនបត្រត្រូវបានដំឡើងត្រឹមត្រូវដោយពិនិត្យដោយផ្ទាល់ ឬប្រើកម្មវិធីត្រួតពិនិត្យតាមអ៊ីនធឺណិត ដូចជា មួយនេះ.