
ចំណាំ៖ ប្រសិនបើអ្នកជាអ្នកប្រើប្រាស់នៃ VM (Virtual Machine) សូមយោងទៅលើ ការណែនាំអំពីការដំឡើង SSL. អ្នកក៏ប្រហែលជាចង់ពិគ្រោះជាមួយ ឯកសារផ្លូវការ សម្រាប់ម៉ាស៊ីន VM សម្រាប់ព័ត៌មានបន្ថែម។
របៀបដំឡើងវិញ្ញាបនបត្រ SSL នៅលើ Google App Engine
ដើម្បីដំឡើងវិញ្ញាបនបត្រ SSL សម្រាប់ Google App Engine អ្នកត្រូវបំពេញតាមតម្រូវការខាងក្រោម៖
- មានឈ្មោះដែនដែលបានចុះឈ្មោះដែលនឹងត្រូវបានប្រើសម្រាប់កម្មវិធីបណ្តាញ
- ចង្អុលឈ្មោះដែនទៅកាន់ App Engine Web Application របស់អ្នក។ ការណែនាំអំពីបញ្ហានេះអាចរកបាននៅក្នុង ការបន្ថែមដែនផ្ទាល់ខ្លួនសម្រាប់កម្មវិធីរបស់អ្នក។ ផ្នែកនៃ អត្ថបទនេះពី Google
- ទទួលបានឯកសារវិញ្ញាបនបត្រ SSL ពី Certificate Authority
- កំណត់ទីតាំង Private Key ដែលបានបង្កើតកំឡុងពេល ការបង្កើត CSR
FURTHER READING: |
| 1. ការដំឡើងវិញ្ញាបនប័ត្រ SSL នៅលើ Zimbra |
| 2. ការដំឡើងវិញ្ញាបនបត្រ SSL នៅលើកម្មវិធី Server GlassFish |
| 3. ការដំឡើងវិញ្ញាបនប័ត្រ SSL នៅលើកម្មវិធី Microsoft Azure Web |
ជំហានទី 1
នៅពេលដែលប័ណ្ណសារ ZIP ជាមួយឯកសារវិញ្ញាបនបត្រត្រូវបានទទួលតាមរយៈអ៊ីមែល ឬ ទាញយកពីគណនី 1Byte របស់អ្នកអ្នកអាចបន្តការដំឡើងដូចខាងក្រោមៈ
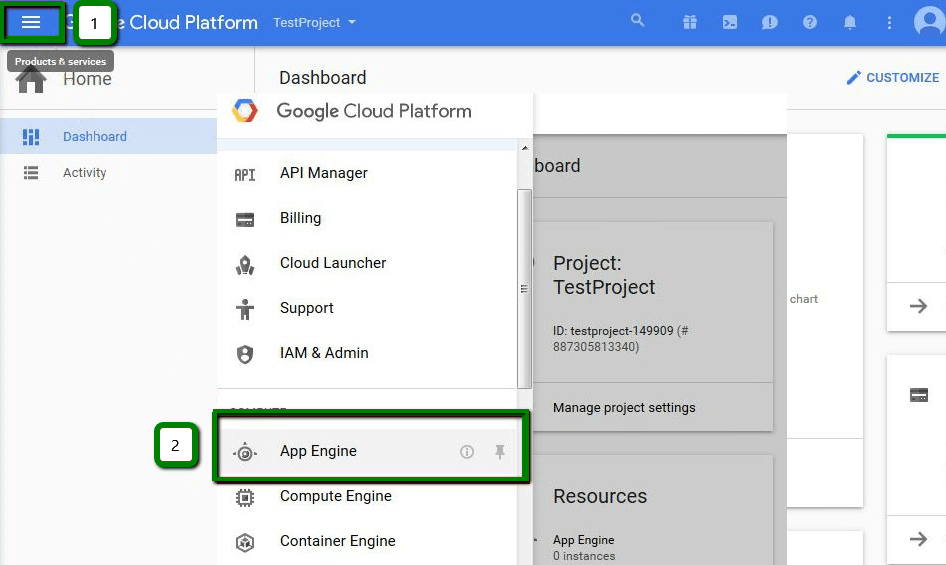
- ចូលទៅក្នុងគណនី Google Cloud របស់អ្នកនៅ https://cloud.google.com/
- រកទីតាំង ផលិតផល និងសេវាកម្ម >> ម៉ាស៊ីនកម្មវិធី:
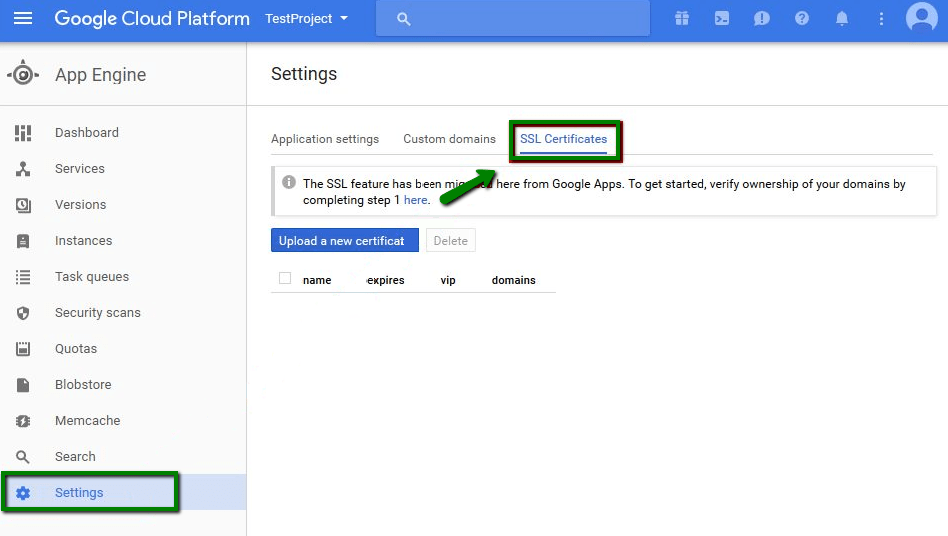
- ពីម៉ឺនុយ App Engine សូមចូលទៅកាន់ Settings >> វិញ្ញាបនបត្រ SSL:
ជំហានទី 2
នៅលើ វិញ្ញាបនបត្រ SSL អេក្រង់, ចុច បង្ហោះវិញ្ញាបនបត្រថ្មី។ – អ្នកនឹងឃើញ បន្ថែមវិញ្ញាបនបត្រ SSL ថ្មី។ បង្អួច:
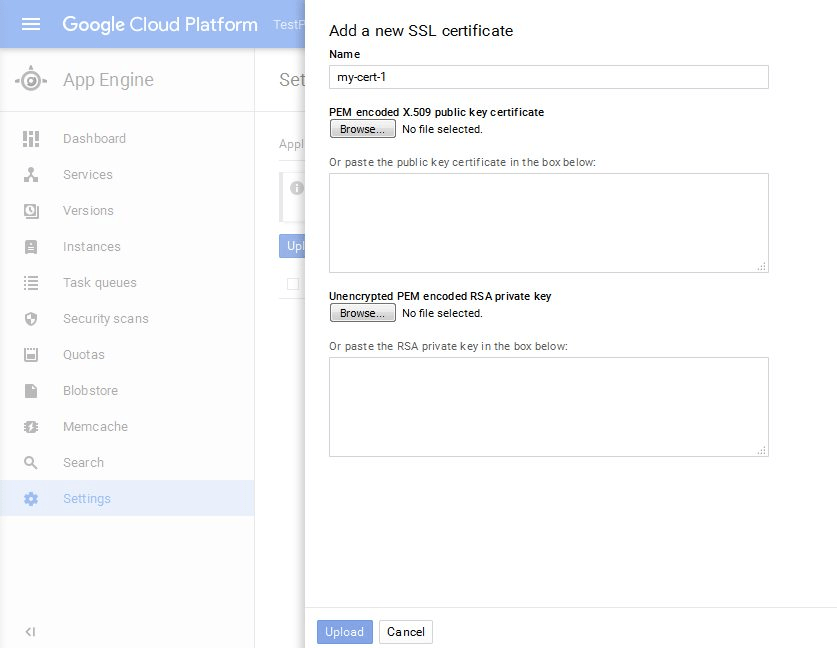
នៅជំហាននេះ ចាំបាច់ត្រូវកំណត់ទីតាំងឯកសារវិញ្ញាបនបត្រ និងលេខកូដ Private Key ដែលត្រូវបានបង្កើតរួមជាមួយឯកសារ CSR.
មានវិធីពីរយ៉ាងដើម្បីបន្តវា៖ ចម្លង / បិទភ្ជាប់លេខកូដ or ផ្ទុកឡើងឯកសារ មានលេខកូដ។ យើងនឹងពិពណ៌នាវិធីសាស្រ្តទាំងពីរខាងក្រោម។
ការបង្ហោះឯកសារ
វាចាំបាច់ក្នុងការរៀបចំឯកសារមុនពេលផ្ទុកឡើង។ ឯកសារវិញ្ញាបនបត្រ (Nginxdomain.crt) គួរតែត្រូវបានភ្ជាប់ (រួមបញ្ចូលគ្នា) ជាមួយឯកសារ CA-bundle ដែលត្រូវគ្នា (របស់អ្នកdomainឯកសារ .ca-bundle ជាមួយវិញ្ញាបនបត្រកម្រិតមធ្យម និងជា Root ពីអាជ្ញាធរវិញ្ញាបនបត្រ)។ នេះអាចត្រូវបានធ្វើដោយបញ្ចូលមាតិកានៃ Nginxdomain.ca-bundle នៅក្រោមលេខកូដវិញ្ញាបនបត្រនៅក្នុងរបស់អ្នក។domainឯកសារ .crt ។ គ្រាន់តែបិទភ្ជាប់កូដទាំងមូលពីឯកសារ CA-bundle ភ្លាមៗបន្ទាប់ពីស្លាក —–END CERTIFICATE— នៅក្នុងរបស់អ្នកdomainឯកសារ .crt ។ ឯកសារដែលបានបង្កើតគួរតែមើលទៅដូចតទៅ៖
—–BEGIN CERTIFICATE—–
…(របស់អ្នក។domainលេខកូដ .crt នៅទីនេះ)
—–END CERTIFICATE—–
—–BEGIN CERTIFICATE—–
…(លេខកូដវិញ្ញាបនបត្រកម្រិតមធ្យម)
—–END CERTIFICATE—–
—–BEGIN CERTIFICATE—–
…(លេខកូដវិញ្ញាបនបត្រកម្រិតមធ្យមបន្ថែម)
—–END CERTIFICATE—–
ឯកសារវិញ្ញាបនបត្រត្រៀមខ្លួនជាស្រេចដើម្បីផ្ទុកឡើងឥឡូវនេះ។ ជំហានមួយទៀតគឺត្រូវរក្សាទុកលេខកូដឯកជនរបស់អ្នក (ពី —–BEGIN RSA PRIVATE KEY—– ទៅ END RSA PRIVATE KEY—–) ទៅជាឯកសារ TXT (ឧទាហរណ៍ mykey.txt) ។ នៅពេលដែលអ្នកមានឯកសារពីរ គឺ yourdomain.crt និង mykey.txt ដែលភ្ជាប់គ្នារួចចុចលើប៊ូតុង “Browse” ហើយបង្ហោះវាទៅតាមនោះ។
ចំណាំ: ប្រសិនបើអ្នកទទួលបានកំហុស "The private key you’ve selected does not appear to be valid" Private Key ដែលអ្នកមានប្រហែលជាបាត់ពាក្យគន្លឹះ 'RSA' នៅក្នុងស្លាក —–BEGIN RSA PRIVATE KEY—– និង —–END RSA PRIVATE KEY—–។ គ្រាន់តែបន្ថែម 'RSA' ទៅក្នុងស្លាក —–BEGIN PRIVATE KEY—– និង —–END PRIVATE KEY—– របស់អ្នកដើម្បីបន្ត។
ចម្លង / បិទភ្ជាប់លេខកូដ។
លេខកូដវិញ្ញាបនបត្រ/ Private Key អាចត្រូវបានបិទភ្ជាប់ដោយផ្ទាល់ទៅក្នុងប្រអប់ដែលត្រូវគ្នា។ ទោះយ៉ាងណាក៏ដោយ PEM បានអ៊ិនកូដវិញ្ញាបនបត្រសោសាធារណៈ X.509 វាលគួរតែត្រូវបានបំពេញដោយ full certificate chain: វិញ្ញាបនបត្រសម្រាប់ domain, Intermediate និង Root certificates. លេខកូដពី Nginxdomain.crt គួរតែត្រូវបានបិទភ្ជាប់ជាមុន ហើយលេខកូដពី Nginxdomain.ca-bundle file គួរតែត្រូវបានបិទភ្ជាប់ខាងក្រោមទៅក្នុងប្រអប់ដូចគ្នា។ លេខកូដ Private Key ដែលអ្នកមានគឺត្រូវបិទភ្ជាប់ទៅក្នុង កូនសោឯកជន RSA ដែលមិនបានអ៊ិនគ្រីប PEM ប្រអប់។
នៅពេលដែល Certificate និង Private Key គឺនៅនឹងកន្លែង សូមចុច ផ្ទុកឡើង ដើម្បីបញ្ចប់ការដំឡើង។ អ្នកនឹងឃើញទំព័រដែលមានព័ត៌មានលម្អិតអំពីការដំឡើង SSL ។ វាចាំបាច់ក្នុងការជ្រើសរើសដែនដែលអ្នកចង់ធានានៅក្រោម បើកដំណើរការ SSL សម្រាប់ទម្លាប់ខាងក្រោម domains:
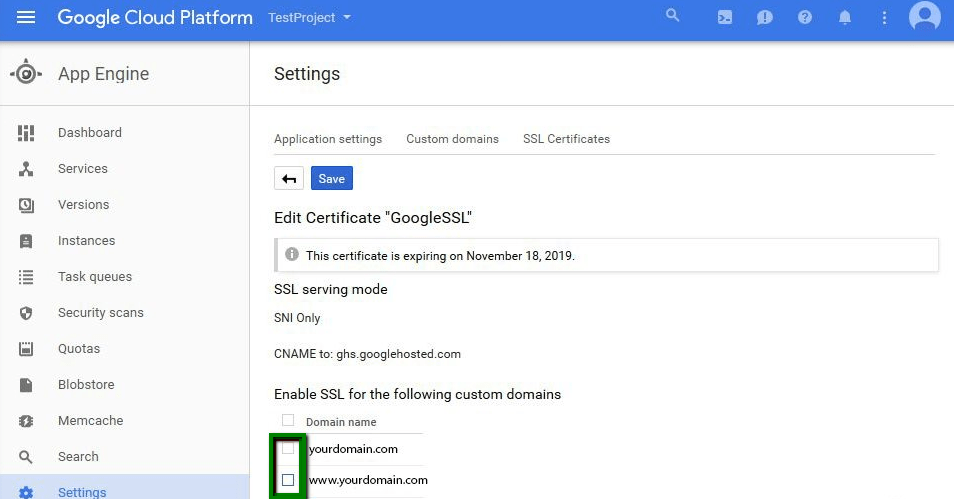
ពេលរួចរាល់សូមចុច រក្សាទុក (Save) នៅខាងលើនៃ Settings screen. នោះហើយ!
អ្នកអាចពិនិត្យមើលការដំឡើង SSL ដោយប្រើឧបករណ៍អនឡាញរបស់យើង៖ https://ssl-checker.1byte.com/.