
ដំណើរការដំឡើង SSL
FURTHER READING: |
| 1. ការដំឡើងវិញ្ញាបនប័ត្រ SSL នៅលើ IIS 7 |
| 2. ការដំឡើងវិញ្ញាបនបត្រ SSL នៅលើ apache2 (Debian, Ubuntu) |
| 3. ការដំឡើងវិញ្ញាបនបត្រ SSL នៅលើ httpd (CentOS) |
រៀបចំឯកសារ SSL របស់អ្នករួចរាល់
ពេលអ្នកមានវិញ្ញាបនបត្រ SSL របស់អ្នក បានធ្វើឱ្យសកម្ម, មានសុពលភាព និងចេញ, អ្នកនឹងទទួលបានឯកសារវិញ្ញាបនបត្រនៅក្នុងប័ណ្ណសារ .zip តាមអ៊ីមែល។ ជាជម្រើស, អ្នកអាចទាញយកវាពីគណនី 1Byte របស់អ្នកដូចដែលបានបង្ហាញ នៅទីនេះ.
សម្រាប់ការដំឡើង SSL នៅលើ Windows អ្នកគួរតែប្រើ .p7b ពីបណ្ណសារដែលបានទាញយក។ វាមានវិញ្ញាបនបត្រអង្គភាពចុងក្រោយសម្រាប់ដែនរបស់អ្នក និងវិញ្ញាបនបត្រកម្រិតមធ្យមនៃអាជ្ញាធរវិញ្ញាបនបត្ររួមបញ្ចូលគ្នា (កញ្ចប់ CA) ។ អ្នកក៏អាចប្រើ .cer (មិនមែន .crt or .cert) ឯកសារសម្រាប់ដំឡើង។ នេះគឺស្រដៀងទៅនឹង .p7b, ដូចដែលវាមានទាំងវិញ្ញាបនបត្រ និងកញ្ចប់ CA ប៉ុន្តែក្នុងទម្រង់ binary form។
ប្រសិនបើអ្នកមានឯកសារវិញ្ញាបនបត្រ .crt/.cert និង .ca-bundle (ឧ. ឯកសារសម្រាប់វិញ្ញាបនបត្រផ្ទាល់ខ្លួន) អ្នកអាចបំប្លែងពួកវាទៅជាឯកសារ .p7b ដោយប្រើ converter tool. ប្រើជម្រើស "PEM ទៅ PKCS7" ។
ដំឡើង SSL
ជំហានទី 1
Start Internet Information Services (IIS) Manager ដោយបញ្ចូល "inetmgr" ទៅក្នុង field ស្វែងរកដែលមានទីតាំងនៅជិត Start ប៊ូតុង ឬនៅក្នុង Run window, ដែលអាចបើកបានដោយចុច Win + R hotkey ។
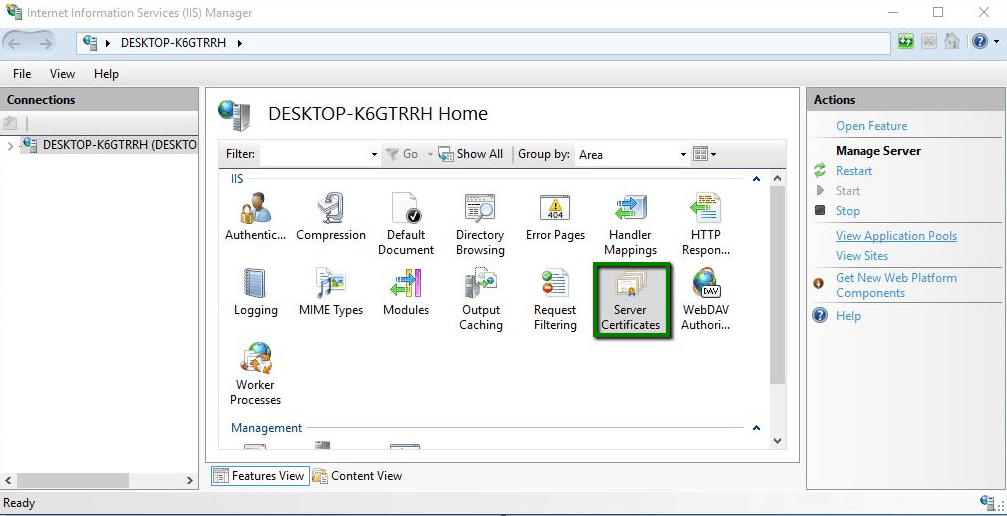
ជំហានទី 2
ចុចពីរដងលើប៊ូតុង Server Certificates icon នៅក្នុងទំព័រដើមរបស់កម្មវិធី IIS Manager។
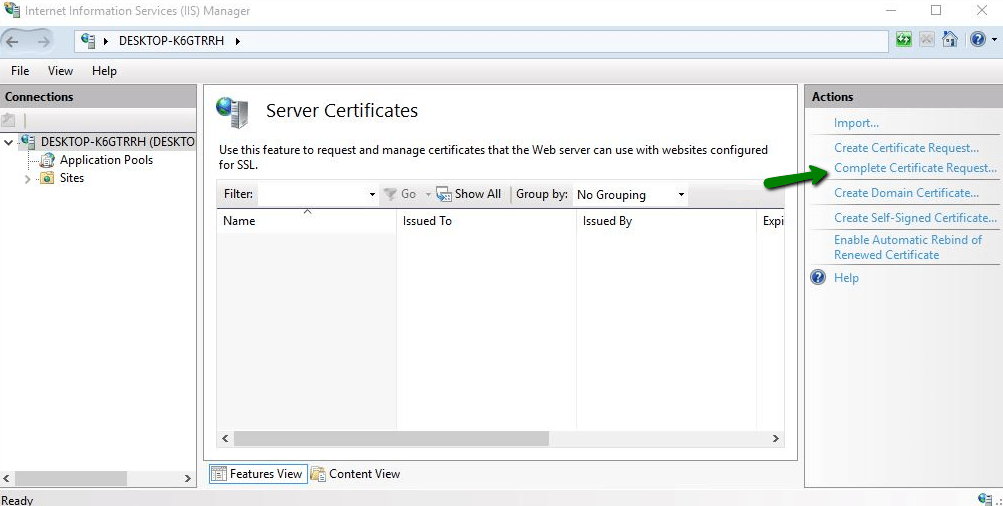
ជំហានទី 3
ដាក់ mouse នៅលើ បន្ទះ Actions នៅជ្រុងខាងស្តាំនៃ window ហើយចុច Complete Certificate Request.
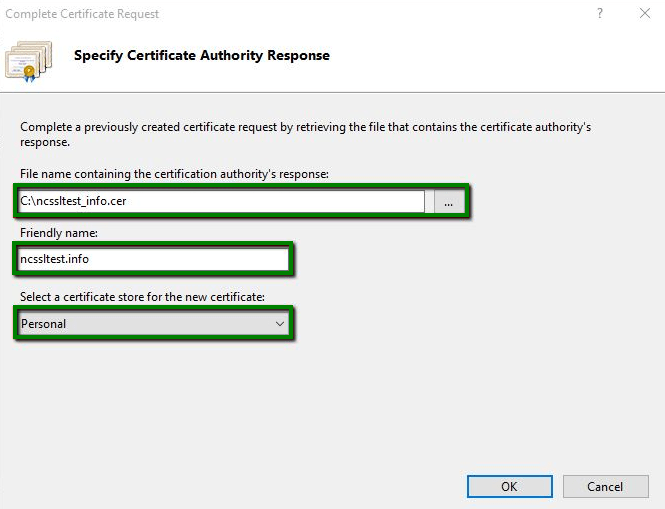
ជំហានទី 4
អេក្រង់បន្ទាប់ - បញ្ជាក់ការឆ្លើយតបរបស់អាជ្ញាធរវិញ្ញាបនប័ត្រ – មាន 3 fields:
- ឈ្មោះឯកសារដែលមានការឆ្លើយតបរបស់ certification authority – រកមើលប្រព័ន្ធឯកសារដើម្បីស្វែងរកឯកសារវិញ្ញាបនបត្រ .p7b ។
- ឈ្មោះ Friendly – វាលនេះជួយ server administrator ឱ្យងាយស្រួលកំណត់ទីតាំងវិញ្ញាបនបត្រជាក់លាក់មួយ។ ឧ domain ឈ្មោះនៃវិញ្ញាបនបត្រអាចត្រូវបានបញ្ជាក់នៅក្នុង field នេះ។
- ជ្រើសរើសកន្លែងផ្ទុកវិញ្ញាបនបត្រសម្រាប់វិញ្ញាបនបត្រថ្មី – រក្សាសំណុំនេះនៅក្នុង Personal, គឺ default value.។
ជំហានទី 5
នៅពេលអ្នកបានបំពេញ fields ទាំងអស់រួចសូមចុច OK ដើម្បីនាំចូលវិញ្ញាបនបត្រទៅ server storage។
ចំណាំ (Note): ប្រសិនបើអ្នកទទួលបានសារ “Cannot find the certificate request…” នៅចំណុចនេះ, សូមយោងទៅលើចំណងជើង "មិនអាចរកឃើញសំណើវិញ្ញាបនបត្រ…” ខាងក្រោមការណែនាំនេះ។
ជំហានទី 6
ប្រសិនបើការដំឡើងបានជោគជ័យ, ការកំណត់ថ្មីនឹងបង្ហាញនៅលើទំព័រ Server Certificates ។

ចំណាំ (Note): ប្រសិនបើវិញ្ញាបនបត្របាត់ពីបញ្ជីបន្ទាប់ពីការនាំចូល, សូមពិនិត្យមើលចំណងជើង “SSL បាត់ពីបញ្ជី” ខាងក្រោមការណែនាំនេះសម្រាប់ដំណោះស្រាយ។
ភ្ជាប់ SSL ទៅគេហទំព័ររបស់អ្នក
ជំហានទី 1
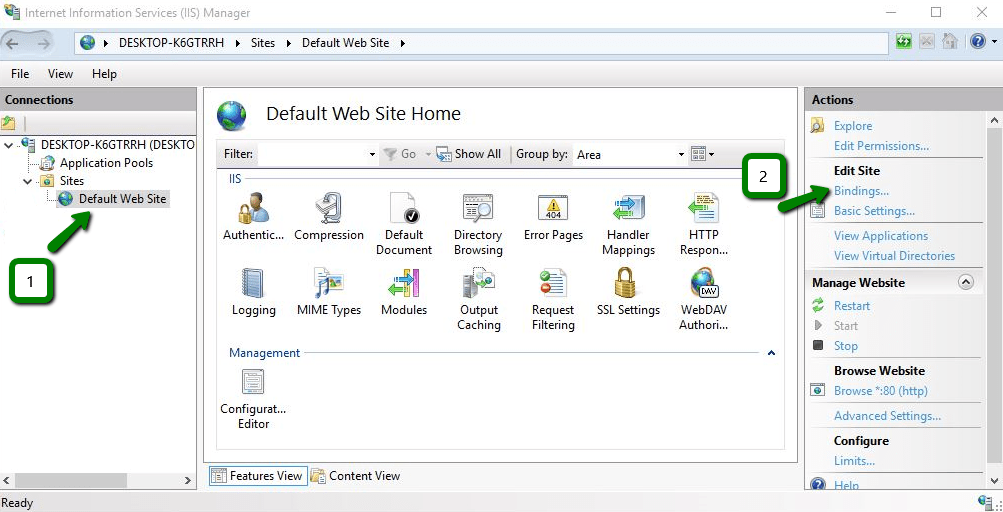
វិញ្ញាបនបត្រ SSL ដែលបានដំឡើងឥឡូវនេះត្រូវតែត្រូវបានផ្តល់ទៅឱ្យគេហទំព័រដោយចងវា secure port។ ដើម្បីធ្វើដូចនេះសូមជ្រើសរើស Sites ថតនៅក្នុងបន្ទះការតភ្ជាប់នៅជ្រុងខាងឆ្វេងនៃកម្មវិធី IIS Manager ហើយចុចលើគេហទំព័រដែលត្រូវគ្នា។ បន្ទាប់មកនៅក្នុង បន្ទះ Actions បន្ទះនៅផ្នែកខាងស្តាំ ជ្រើសរើស ចំណង….
ជំហានទី 2
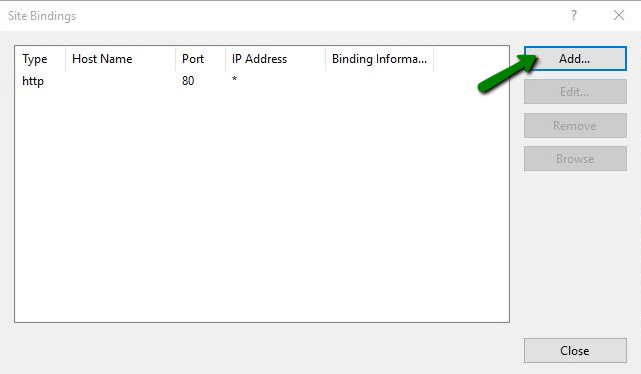
ចុច Add… នៅផ្នែកខាងស្តាំនៃ Site Bindings ។
pop-up លេចឡើងបន្ទាប់នឹងបង្ហាញ fields ជាច្រើនដែលចាំបាច់ត្រូវកែប្រែ៖
- វាយបញ្ចូល – ជ្រើស “https” ពី drop-down menu;
- អាសយដ្ឋាន IP – ជ្រើសរើសអាសយដ្ឋាន IP ជាក់លាក់ ឬ "All Unassigned";
- Port – បញ្ជាក់លេខ port សម្រាប់ការតភ្ជាប់សុវត្ថិភាព។ លេខ default port គឺ 443;
- វិញ្ញាបនប័ត្រ SSL – ជ្រើសរើសវិញ្ញាបនបត្រដែលត្រូវគ្នា, កំណត់ដោយឈ្មោះងាយស្រួលដែលបានបញ្ជាក់ពីមុន។
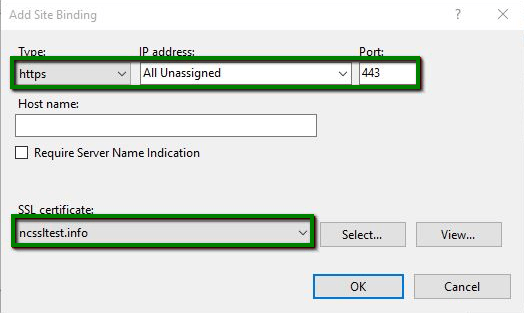
ចុច OK ដើម្បីភ្ជាប់វិញ្ញាបនបត្រជាមួយគេហទំព័រ។ ធាតុថ្មីគួរតែលេចឡើងនៅក្នុង Site Bindings ។
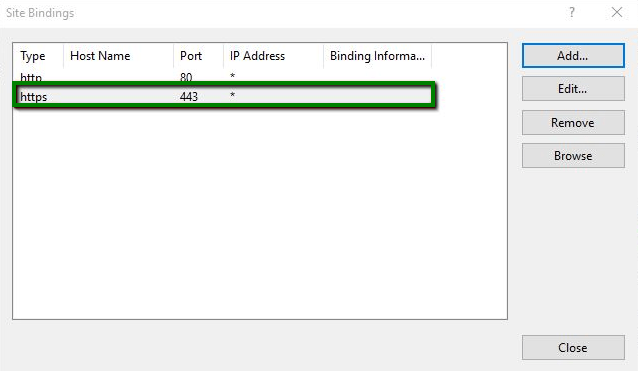
ចំណាំ (Note)ជាទូទៅ មិនចាំបាច់ចាប់ផ្តើមម៉ាស៊ីនបម្រើឡើងវិញទេ។ ដូច្នេះ បន្ទាប់ពីវិញ្ញាបនប័ត្រ SSL ត្រូវបានដំឡើង និងការចង្កង់ (binding) ត្រូវបានបង្កើតរួច គេហទំព័ររបស់អ្នកគួរតែអាចចូលប្រើបានតាមរយៈ https:// នៅក្នុងកម្មវិធីរុករក។
ដើម្បីពិនិត្យមើលថាតើវិញ្ញាបនប័ត្រត្រូវបានដំឡើងដោយជោគជ័យ អ្នកអាចប្រើ ឧបករណ៍ពិនិត្យ ssl.
HTTPS ប្តូរទិស
នៅពេលដែលអ្នកបានដំឡើងវិញ្ញាបនបត្រ SSL នៅលើដែនរបស់អ្នក, អ្នកគួរតែបើក HTTPS redirect ដើម្បី force HTTP requests ទាំងអស់ឱ្យប្រើ HTTPS ជំនួសវិញ។ HTTPS គឺជាផ្នែកបន្ថែមនៃ HTTP protocol ដែលការបញ្ជូនទិន្នន័យត្រូវបានអ៊ិនគ្រីបដោយប្រើវិញ្ញាបនបត្រ SSL ។
នៅលើវីនដូ, HTTP ទៅ HTTPS redirection អាចត្រូវបានបើកដោយមានជំនួយពី URL Rewrite module ។
អ្នកអាចប្រើវាបាន អ្នកត្រួតពិនិត្យ ដើម្បីមើលថាតើការបញ្ជូនបន្តត្រូវបានបើកដោយជោគជ័យ។
បញ្ហាដែលអាចកើតមានជាមួយការដំឡើង
"មិនអាចរកឃើញសំណើវិញ្ញាបនបត្រ..."
នៅពេលដំឡើងវិញ្ញាបនបត្រ SSL នៅលើ IIS, អ្នកនឹងអាចទទួលបានកំហុសដូចខាងក្រោម៖
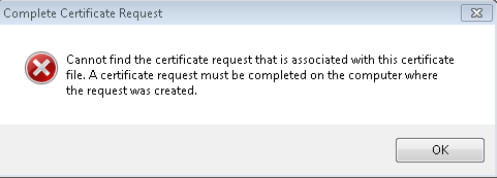
ហេតុផលទូទៅបំផុតសម្រាប់បញ្ហានេះគឺថាអ្នកកំពុងព្យាយាមនាំចូលវិញ្ញាបនបត្រ SSL ដែលបានធ្វើឱ្យសកម្មជាមួយនឹង Certificate Signing Request (CSR) ដែលបង្កើតនៅខាងក្រៅ server។ ប្រសិនបើនោះជាករណីនោះ អ្នកអាច៖
- បង្កើត PFX ដោយប្រើវិញ្ញាបនបត្រ, កញ្ចប់ CA និង private key និង ទាញចូល ទៅជា IIS. ឯកសារវិញ្ញាបនបត្រ PFX អាចត្រូវបានបង្កើតតាមវិធីផ្សេងៗគ្នា, ជាឧទាហរណ៍ :
- ដោយប្រើ OpenSSL, ដូចដែលបានបង្ហាញ នៅទីនេះ;
- ការប្រើប្រាស់ កម្មវិធីបំលែងតាមអ៊ីនធឺណិត (PFX គឺជាទម្រង់ PKCS12) ។
- ចេញវិញ្ញាបនបត្ររបស់អ្នកឡើងវិញជាមួយនឹង CSR ដែលបង្កើតនៅលើ server ហើយដំឡើងវាជាមួយឯកសារ .p7b ។
ចំណាំ (Note): ត្រូវប្រាកដថាបង្កើត ឬកែសម្រួលការចង បន្ទាប់ពីវិញ្ញាបនបត្រត្រូវបាននាំចូល។
ប្រសិនបើអ្នកប្រាកដថា CSR ត្រូវបានបង្កើតឡើងនៅលើ server ហើយអ្នកនៅតែទទួលបាន error នេះ, អ្នកអាចសាកល្បងដូចខាងក្រោម៖
- បិទ error window ហើយ refresh ការដំឡើងឡើងវិញដោយចុច F5, ហើយព្យាយាមម្ដងទៀត។ ប្រសិនបើវិញ្ញាបនបត្រលេចឡើង, សូមបញ្ចប់ការដំឡើង SSL ដោយបង្កើត ឬកែសម្រួលការចង។
- ប្រសិនបើវិញ្ញាបនបត្រមិនលេចឡើងទេ, អ្នកអាចព្យាយាមកំណត់ឈ្មោះមិត្តភាពទៅវាដោយប្រើ MMC ឬ certutil ។ បញ្ហាអាចនឹងកើតឡើងដោយសារតែឈ្មោះមិត្តភាពត្រូវបានទុកចោល, ដូច្នេះត្រូវប្រាកដថាកំណត់វាកំឡុងពេលដំឡើង។ សូមពិនិត្យមើល អត្ថបទ ជាផ្លូវការពីក្រុមហ៊ុន Microsoft ទៅលើបញ្ហានេះ។
ប្រសិនបើជំហានខាងលើមិនបានជួយទេ, សូមចេញវិញ្ញាបនបត្ររបស់អ្នកឡើងវិញដោយប្រើ CSR ថ្មីដែលបានបង្កើតនៅលើ server ហើយព្យាយាមដំឡើងវាម្តងទៀត។
SSL បាត់ពីបញ្ជី
បញ្ហាទូទៅមួយទៀតគឺវិញ្ញាបនបត្របាត់ពីបញ្ជីនៅ import។ វិធីសាស្រ្តដែលអាចដោះស្រាយបានគឺស្រដៀងនឹងបញ្ហាមុន៖
- ប្រសិនបើ CSR ត្រូវបានបង្កើតនៅខាងក្រៅ server, បង្កើត PFX និង import ចូលវាទៅក្នុង IIS. ឯកសារវិញ្ញាបនបត្រ PFX អាចត្រូវបានបង្កើតដោយប្រើ OpenSSL ដូចដែលបានបង្ហាញ នៅទីនេះឬដោយប្រើរបស់យើង។ កម្មវិធីបំលែងតាមអ៊ីនធឺណិត (PFX គឺជាទម្រង់ PKCS12) ។
- ចេញសារជាថ្មី និង ដំឡើង វិញ្ញាបនបត្រដែលមាន CSR បង្កើតនៅលើ server។
ប្រសិនបើ CSR ត្រូវបានបង្កើតនៅលើ server ប៉ុន្តែវិញ្ញាបនបត្របាត់, អ្នកអាចព្យាយាម force link រវាងវិញ្ញាបនបត្រ និង private key។
ខ្សែសង្វាក់វិញ្ញាបនបត្រមិនពេញលេញ
មានបញ្ហាមួយទៀតដែលអាចត្រូវបានរកឃើញនៅលើ Windows server។ ទោះបីជាអ្នកបានដំឡើងវិញ្ញាបនបត្រ SSL យ៉ាងត្រឹមត្រូវក៏ដោយ, អ្នកប្រើប្រាស់មួយចំនួននៅតែអាចប្រឈមមុខនឹង security warnings នៅពេលចូលគេហទំព័ររបស់អ្នក។ មូលហេតុឫសគល់គឺជាភាពប្លែកនៃរបៀបដែល Windows servers ដោះស្រាយ SSL handshake, ដែលបណ្តាលឱ្យវាប្រើ Root certificate មិនត្រឹមត្រូវពី Certificate Authority (CA) Bundle។
ទោះបីជាបញ្ហានេះមិនមែនជារឿងធម្មតាក៏ដោយ, វាអាចកើតឡើងនៅលើឧបករណ៍ចាស់។ អានលម្អិតរបស់យើង អត្ថបទ លើប្រធានបទ ដើម្បីស្វែងយល់បន្ថែម និងរបៀបដែលអ្នកអាចដោះស្រាយវាបាន។