

នៅក្នុងមេរៀននេះ យើងនឹងណែនាំអ្នកអំពីដំណើរការនៃការបន្ថែមគេហទំព័រ និងដំឡើង WordPress នៅលើគេហទំព័រនោះដោយប្រើ aaPanel ។ ការបន្ថែមគេហទំព័រគឺជាដំណើរការដ៏សាមញ្ញមួយ; គ្រាន់តែធ្វើតាមជំហានដែលបានផ្តល់ឱ្យខាងក្រោម ហើយអ្នកនឹងមាន WordPress ឡើង និងដំណើរការក្នុងរយៈពេលប៉ុន្មាននាទី។ ប្លក, រូបភាពគឺជាប្រព័ន្ធគ្រប់គ្រងមាតិកាពេញនិយមបំផុត (CMS) ហើយការណែនាំនៅក្នុងប្រកាសនេះប្រាកដជានឹងបង្ហាញអត្ថប្រយោជន៍សម្រាប់អ្នក ជាពិសេសតាមរយៈការរៀបរាប់លម្អិតអំពីការដំឡើងគេហទំព័រក្នុងលក្ខណៈសាមញ្ញ និងរហ័ស។
របៀបដំឡើង WordPress និងបង្កើតគេហទំព័រនៅក្នុង aaPanel?
ដើម្បីដំឡើង WordPress នៅក្នុង aaPanel អ្នកអាចធ្វើតាមការណែនាំជាជំហាន ៗ ទាំងនេះ៖
ជំហានទី 1: ចូលទៅកាន់ aaPanel
- ចូលប្រើគណនី aaPanel របស់អ្នកដោយចូលទៅកាន់ចំណុចប្រទាក់បណ្ដាញ aaPanel ហើយចូល។
ជំហានទី 2: ចូលទៅកាន់ផ្នែកគេហទំព័រ
- នៅក្នុងផ្ទាំងគ្រប់គ្រង aaPanel ចុចលើ "គេហទំព័រ" ឬជម្រើសស្រដៀងគ្នា (ពាក្យអាចប្រែប្រួលបន្តិចអាស្រ័យលើកំណែរបស់អ្នក)។
ជំហានទី 3: បង្កើតគេហទំព័រថ្មី។
- ជ្រើសរើស "បន្ថែមគេហទំព័រ" ឬជម្រើសស្រដៀងគ្នាដើម្បីបង្កើតគេហទំព័រថ្មីដែលអ្នកនឹងដំឡើង WordPress ។
- បំពេញព័ត៌មានលម្អិតចាំបាច់សម្រាប់គេហទំព័ររបស់អ្នក រួមទាំង domain ឈ្មោះ ថត root និងការកំណត់ផ្សេងទៀត។ អ្នកក៏អាចដំឡើង SSL ប្រសិនបើចាំបាច់។
- ចុច "រក្សាទុក" ឬ "បង្កើត" ដើម្បីបង្កើតគេហទំព័ររបស់អ្នក។
ជំហានទី 4៖ ដំឡើង WordPress
- រមូរចុះក្រោមទៅផ្នែក "គេហទំព័រ" នៅក្នុង aaPanel ហើយស្វែងរក "WordPress" ។
- ចុចលើរូបតំណាង WordPress ឬជម្រើស "ដំឡើង" នៅជាប់វា។
ជំហានទី 5: កំណត់រចនាសម្ព័ន្ធការដំឡើង WordPress
- បំពេញព័ត៌មានចាំបាច់សម្រាប់ការដំឡើង WordPress របស់អ្នក៖
- ការដំឡើងកម្មវិធី៖ ជ្រើសរើសកំណែ WordPress ដែលអ្នកចង់ដំឡើង។ ទុកឱ្យ "នៅក្នុងថត" ទទេប្រសិនបើអ្នកចង់ឱ្យ WordPress ត្រូវបានដំឡើងនៅក្នុងថត root នៃគេហទំព័ររបស់អ្នក។
- ការកំណត់គេហទំព័រ៖ បញ្ចូលឈ្មោះគេហទំព័រ និងការពិពណ៌នារបស់អ្នក។
- គណនីអ្នកគ្រប់គ្រង៖ កំណត់ឈ្មោះអ្នកប្រើប្រាស់ និងពាក្យសម្ងាត់សម្រាប់គណនីអ្នកគ្រប់គ្រង WordPress របស់អ្នក។ វានឹងត្រូវបានប្រើដើម្បីចូលទៅផ្ទាំងគ្រប់គ្រង WordPress របស់អ្នក។
- ជ្រើសរើសភាសា៖ ជ្រើសរើសភាសាសម្រាប់ការដំឡើង WordPress របស់អ្នក។
- ជ្រើសរើសកម្មវិធីជំនួយ៖ អ្នកអាចជ្រើសរើសដំឡើងកម្មវិធីជំនួយបន្ថែមប្រសិនបើចង់បាន។
- ចុច "ដំឡើង" ដើម្បីចាប់ផ្តើមការដំឡើង WordPress ។
ជំហានទី 6: បញ្ចប់ការដំឡើង
- ឥឡូវនេះ aaPanel នឹងដំឡើង WordPress នៅលើម៉ាស៊ីនមេរបស់អ្នក។ នៅពេលដែលការដំឡើងត្រូវបានបញ្ចប់ អ្នកនឹងទទួលបានសារបញ្ជាក់។
ជំហានទី 7: ចូលប្រើផ្ទាំងគ្រប់គ្រង WordPress របស់អ្នក។
- ចូលមើលឈ្មោះដែនរបស់អ្នកនៅក្នុងកម្មវិធីរុករកតាមអ៊ីនធឺណិត (ឧ.ទ, www. របស់អ្នក។domain.com) អ្នកគួរតែឃើញទំព័រដំឡើង WordPress ។ ធ្វើតាមការណែនាំដើម្បីបញ្ចប់ការដំឡើង រួមទាំងការបង្កើតគណនីអ្នកគ្រប់គ្រង WordPress របស់អ្នក។
- បន្ទាប់ពីបញ្ចប់ការដំឡើង អ្នកអាចចូលទៅផ្ទាំងគ្រប់គ្រង WordPress របស់អ្នក ដើម្បីចាប់ផ្តើមប្ដូរគេហទំព័ររបស់អ្នកតាមបំណង និងបង្កើតមាតិកា។
អបអរសាទរ! អ្នកបានដំឡើង WordPress ដោយជោគជ័យនៅក្នុង aaPanel។ ឥឡូវនេះ អ្នកអាចចាប់ផ្តើមបង្កើត និងគ្រប់គ្រងគេហទំព័រ WordPress ឬប្លុករបស់អ្នក។
FURTHER READING: |
| 1. ការកំណត់ទូទៅ ៩ចំណុច នៃ aaPanel |
| 2. ការកំណត់ការត្រួតពិនិត្យរបស់ aaPanel៖ ការណែនាំដ៏ទូលំទូលាយ |
| 3. តើធ្វើដូចម្តេចដើម្បីងាយស្រួលបង្ហោះគេហទំព័ររបស់អ្នកនៅក្នុង aaPanel? |
តើធ្វើដូចម្តេចដើម្បីបន្ថែមគេហទំព័រនៅក្នុង aaPanel?
ជំហានទី 1
ចូលទៅកាន់ aaPanel admin ហើយចុចលើ Website ពីម៉ឺនុយនៅខាងឆ្វេង។
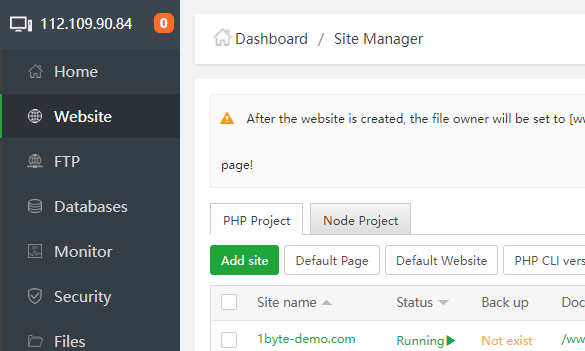
ជំហានទី 2
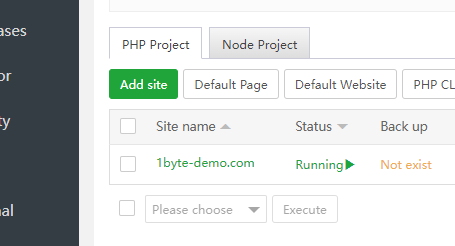
ដើម្បីបន្ត ចុចប៊ូតុងពណ៌បៃតងដែលតំណាងឱ្យ "Add site"។
ជំហានទី 3
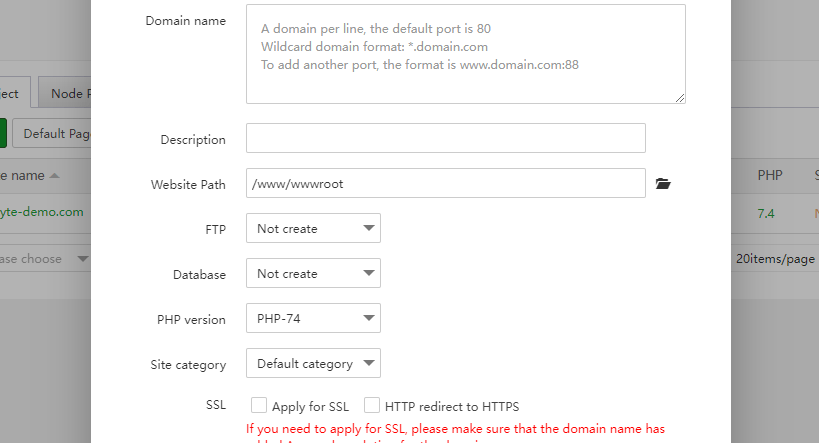
សូមបំពេញវាលខាងក្រោមជាមួយនឹងព័ត៌មានដែលត្រូវការ ដើម្បីបន្ថែមគេហទំព័រថ្មី។
- Domain៖ សូមប្រាកដថាត្រូវបំពេញ ឈ្មោះដែន ចម្បង ក៏ដូចជាច្រកដែលនឹងត្រូវចង។ (ឈ្មោះម៉ាស៊ីនសម្រាប់ www នឹងមិនត្រូវបានបង្កើតដោយស្វ័យប្រវត្តិទេ)។
- ការពិពណ៌នា៖ សូមផ្តល់ការពិពណ៌នាអំពីមុខងារនៃគេហទំព័រ។
- ផ្លូវនៃគេហទំព័រ៖ នេះគឺសំដៅទៅលើទីតាំងនៃឯកសារដែលកំពុងត្រូវបានប្រើដោយគេហទំព័រ។ ទោះបីជាអ្នកមានសមត្ថភាពក្នុងការជ្រើសរើសចំណុចដែលថតត្រូវបានបង្កើតក៏ដោយ វាត្រូវបានណែនាំឱ្យអ្នកប្រើទីតាំងលំនាំដើម (/www/wwwroot) គ្រប់ទីកន្លែងដែលអាចធ្វើទៅបានដើម្បីងាយស្រួលគ្រប់គ្រង។
- FTP៖ នៅពេលអ្នកបង្កើតគេហទំព័រ អ្នកមានជម្រើសក្នុងការបង្កើតគណនី FTP បន្ថែម។ នេះគឺជាជម្រើសដែលអាចត្រូវបានធ្វើឡើងនៅពេលបង្កើតគេហទំព័រ។
- មូលដ្ឋានទិន្នន័យ៖ នៅពេលអ្នកបង្កើតគេហទំព័រ អ្នកមានជម្រើសក្នុងការបង្កើតមូលដ្ឋានទិន្នន័យ Mysql ក្នុងពេលតែមួយ។ ជម្រើសនេះមានសម្រាប់អ្នកនៅពេលអ្នកបង្កើតគេហទំព័រ។
- កំណែ PHP៖ ជ្រើសរើសគេហទំព័ររបស់អ្នក ដែលត្រូវតែអនុវត្តជាមួយនឹងកំណែជាក់លាក់នៃ PHP ហើយអ្នកត្រូវតែទទួលបានច្រើនជាងនេះ។ នៅក្នុងហាងកម្មវិធីរបស់បន្ទះ កំណែ PHP អាចទាញយក និងដំឡើង (គាំទ្រ 5.2-7.4)
- ប្រភេទនៃគេហទំព័រ៖ ប្រើក្នុងគោលបំណងចាត់ថ្នាក់គេហទំព័រ ដើម្បីធ្វើឱ្យការគ្រប់គ្រងកាន់តែងាយស្រួល
របៀបដាក់ពង្រាយគេហទំព័រទើបបង្កើតថ្មី?
ជំហានទី 1
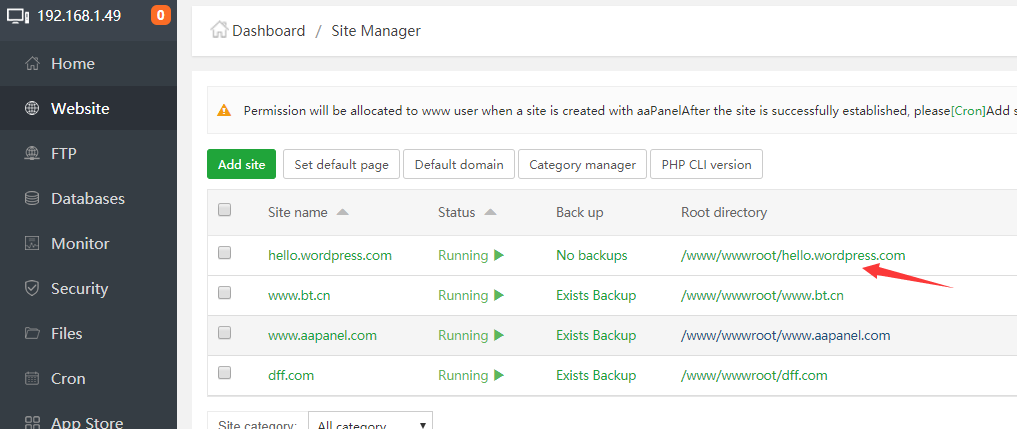
ដើម្បីចូលទៅកាន់ថតគេហទំព័រ ចុចលើថតក្នុងបញ្ជី (ក្នុងជួរឈរ ឯកសារ Root).
ជំហានទី 2
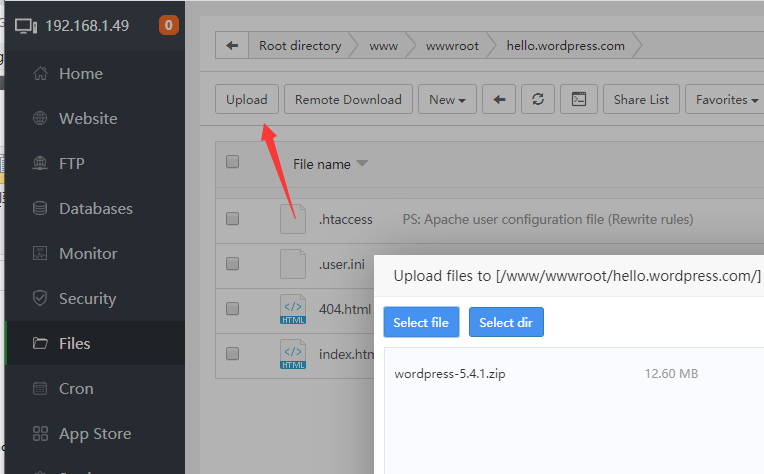
ចុចប៊ូតុង ផ្ទុកឡើង បន្ទាប់មកគ្រាន់តែជ្រើសរើសកញ្ចប់គេហទំព័រដែលអ្នកចង់បាន។
ជំហានទី 3
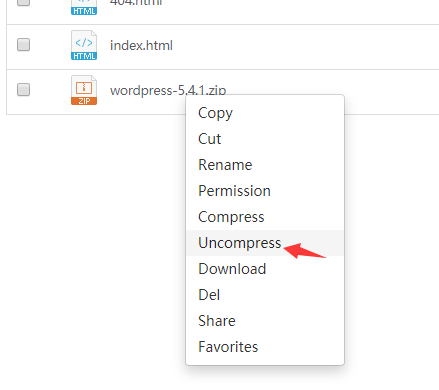
Unzip ឯកសារដែលមានគេហទំព័ររបស់អ្នក។
ជំហានទី 4
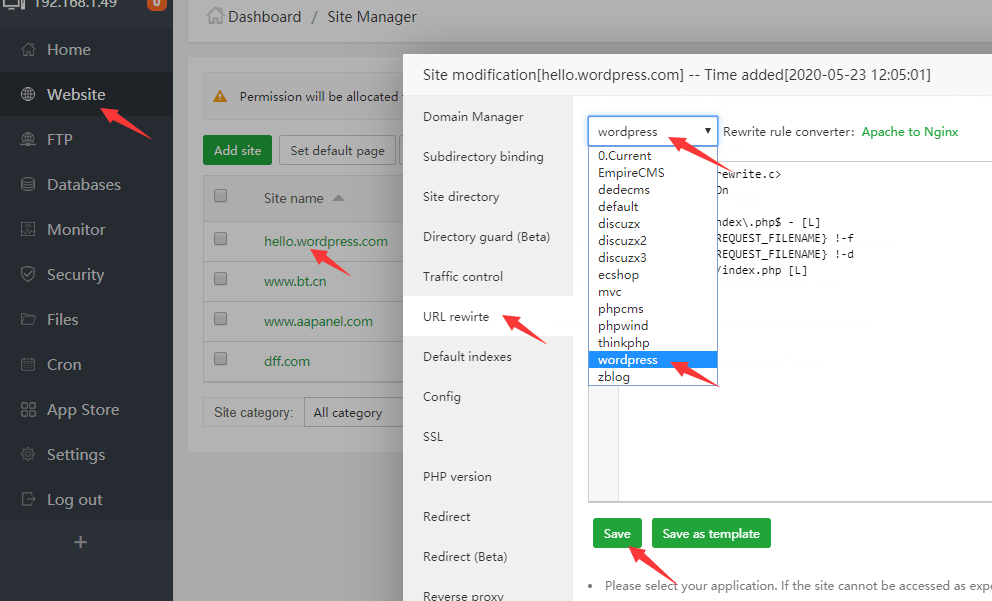
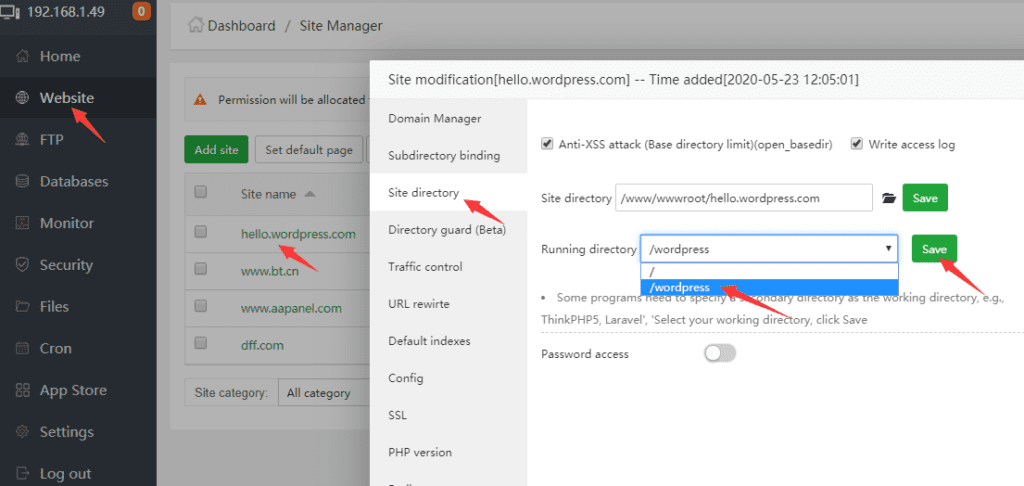
កំណត់ការបង្ហាញគេហទំព័ររបស់អ្នក បន្ទាប់មកកំណត់ URL-Rewrite របស់អ្នក។
ជំហានទី 5
បញ្ចូលឈ្មោះដែនរបស់អ្នកនៅក្នុងកម្មវិធីរុករកដើម្បីចូលប្រើវា។
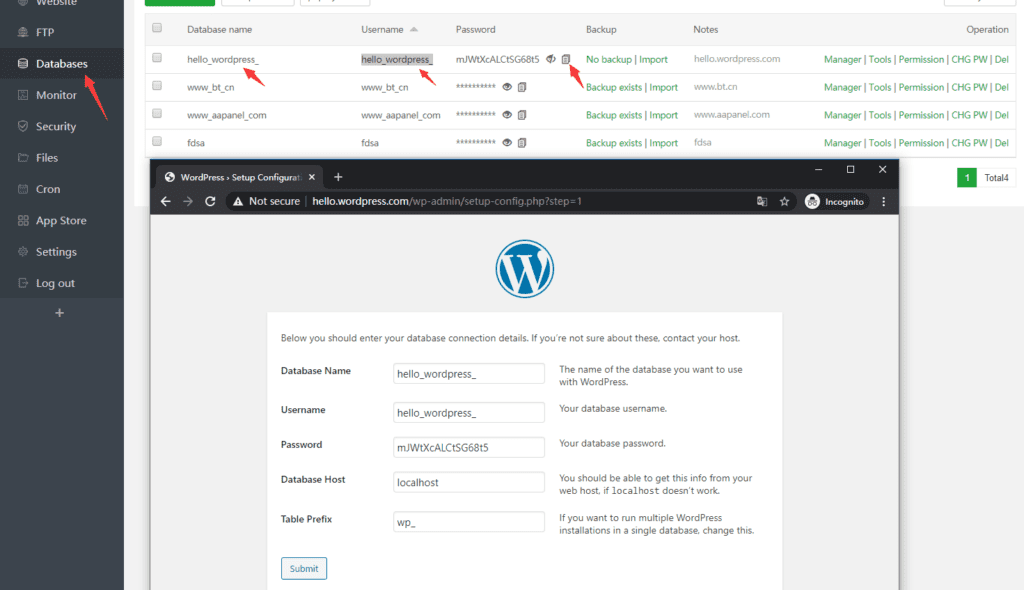
ក្នុងពេលជាមួយគ្នាកំណត់ទីតាំងឈ្មោះនៃមូលដ្ឋានទិន្នន័យរបស់អ្នក ឈ្មោះអ្នកប្រើប្រាស់ និងពាក្យសម្ងាត់របស់អ្នក។ បន្ទាប់ពីនេះត្រូវបានធ្វើរួច អ្នកអាចចាប់ផ្តើមការធ្វើដំណើររបស់អ្នកជាមួយ WordPress ដោយដំបូងបង្អស់ការបំពេញព័ត៌មាននៅលើគេហទំព័ររបស់អ្នកស្របតាមអ្វីដែលបានបង្ហាញនៅលើទំព័រមូលដ្ឋានទិន្នន័យ។
សន្និដ្ឋាន
សរុបសេចក្តី ការដំឡើង WordPress នៅក្នុង aaPanel គឺជាដំណើរការដ៏សាមញ្ញមួយ ដែលអាចត្រូវបានបញ្ចប់ក្នុងរយៈពេលតែប៉ុន្មាននាទីប៉ុណ្ណោះ។ ដោយធ្វើតាមជំហានដែលបានរៀបរាប់នៅក្នុងការណែនាំនេះ អ្នកអាចធ្វើឱ្យគេហទំព័រ WordPress របស់អ្នកដំណើរការ និងដំណើរការបានភ្លាមៗ។
នេះគឺជាការណែនាំបន្ថែមមួយចំនួនសម្រាប់ការដំឡើង WordPress នៅក្នុង aaPanel៖
- ត្រូវប្រាកដថាអ្នកមានឈ្មោះដែន និងគណនីបង្ហោះដែលបានបង្កើតឡើង មុនពេលអ្នកចាប់ផ្តើម។
- ជ្រើសរើសពាក្យសម្ងាត់ខ្លាំងសម្រាប់គណនីអ្នកគ្រប់គ្រង WordPress របស់អ្នក។
- ដំឡើងកម្មវិធីជំនួយសុវត្ថិភាពដើម្បីការពារគេហទំព័ររបស់អ្នកពីការវាយប្រហារ។
- បម្រុងទុកគេហទំព័ររបស់អ្នកជាទៀងទាត់ដើម្បីការពារការបាត់បង់ទិន្នន័យ។
ជាមួយនឹងការខិតខំប្រឹងប្រែងតិចតួច អ្នកអាចដំឡើង WordPress ក្នុង aaPanel បានយ៉ាងងាយស្រួល ហើយបង្កើតគេហទំព័រដ៏ស្រស់ស្អាត និងមានមុខងារ។